> ## Documentation Index
> Fetch the complete documentation index at: https://devdocs.xbox.com/llms.txt
> Use this file to discover all available pages before exploring further.
# Configuration de l'authentification PlayFab avec Google et HTML5
> Tutoriel étape par étape pour ajouter la connexion Google à un titre PlayFab à l'aide de HTML5 et JavaScript, couvrant la configuration de l'API Google et l'authentification OAuth des joueurs.
Ce tutoriel vous guide dans le processus d'authentification PlayFab à l'aide de Google et de HTML5/JavaScript.
## Exigences
Vous aurez besoin de :
* Un [compte Google](https://google.com/) pour les tests.
* Un titre `[PlayFab](https://developer.playfab.com/)` inscrit.
* Une bonne connaissance des [principes de base et meilleures pratiques de connexion](/fr-CA/services/playfab/identity/player-identity/login/login-basics-best-practices).
* Au minimum, un serveur avec un nom de domaine valide pour servir un fichier HTML statique. Consultez le tutoriel [Exécution d'un serveur HTTP pour les tests](/fr-CA/services/playfab/identity/player-identity/platform-specific-authentication/running-an-http-server-for-testing) pour savoir comment en configurer un.
## Serveur et domaine
Ce guide nécessite un serveur avec un domaine valide. Si vous n'avez pas encore de domaine inscrit ni de serveur Web distant, suivez notre tutoriel [Exécution d'un serveur HTTP pour les tests](/fr-CA/services/playfab/identity/player-identity/platform-specific-authentication/running-an-http-server-for-testing) pour savoir comment exécuter un serveur Web local avec un nom de domaine valide.
Tout au long de ce guide, nous supposerons que votre domaine est `[http://playfab.example](http://playfab.example)`.
## Inscription d'un projet d'API Google
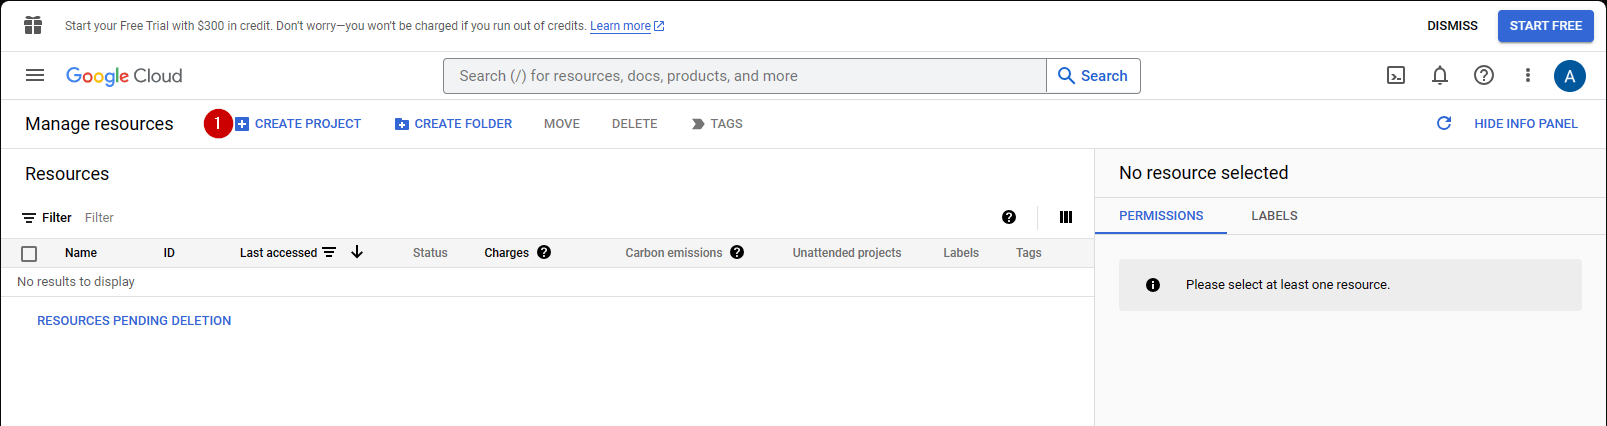
Commencez par accéder à la [console des API Google](https://console.developers.google.com/) :
1. Accédez à **CREATE PROJECT** et sélectionnez-le.
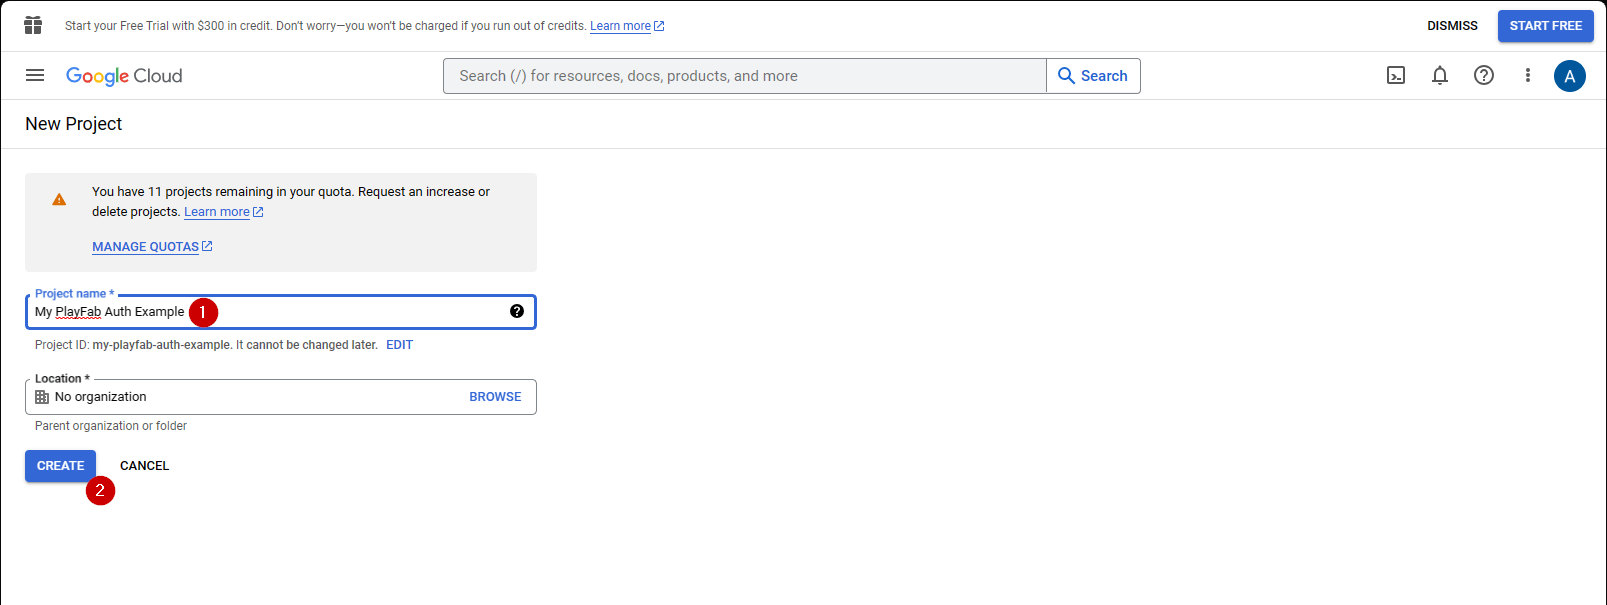
1. Remplissez le champ sous **Project Name**.
2. Sélectionnez le bouton **Create**.
Il est normal que l'**API Manager** prenne de 10 à 20 secondes pour générer le projet.
Une fois le projet créé :
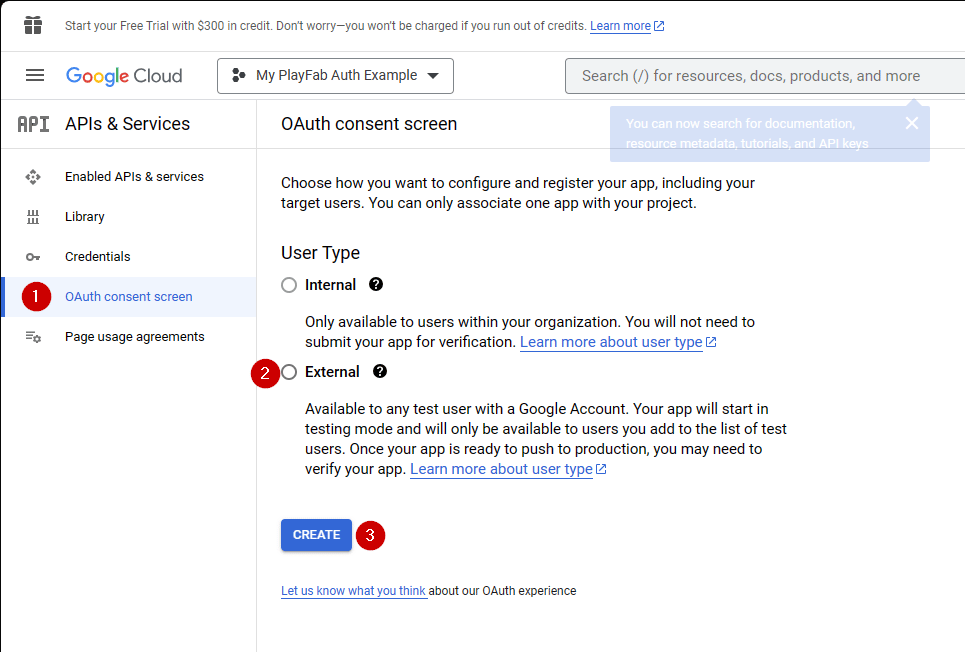
1. Accédez à l'**OAuth consent screen**.
2. Sélectionnez **External** sous User Type
3. Sélectionnez ensuite **Create**.
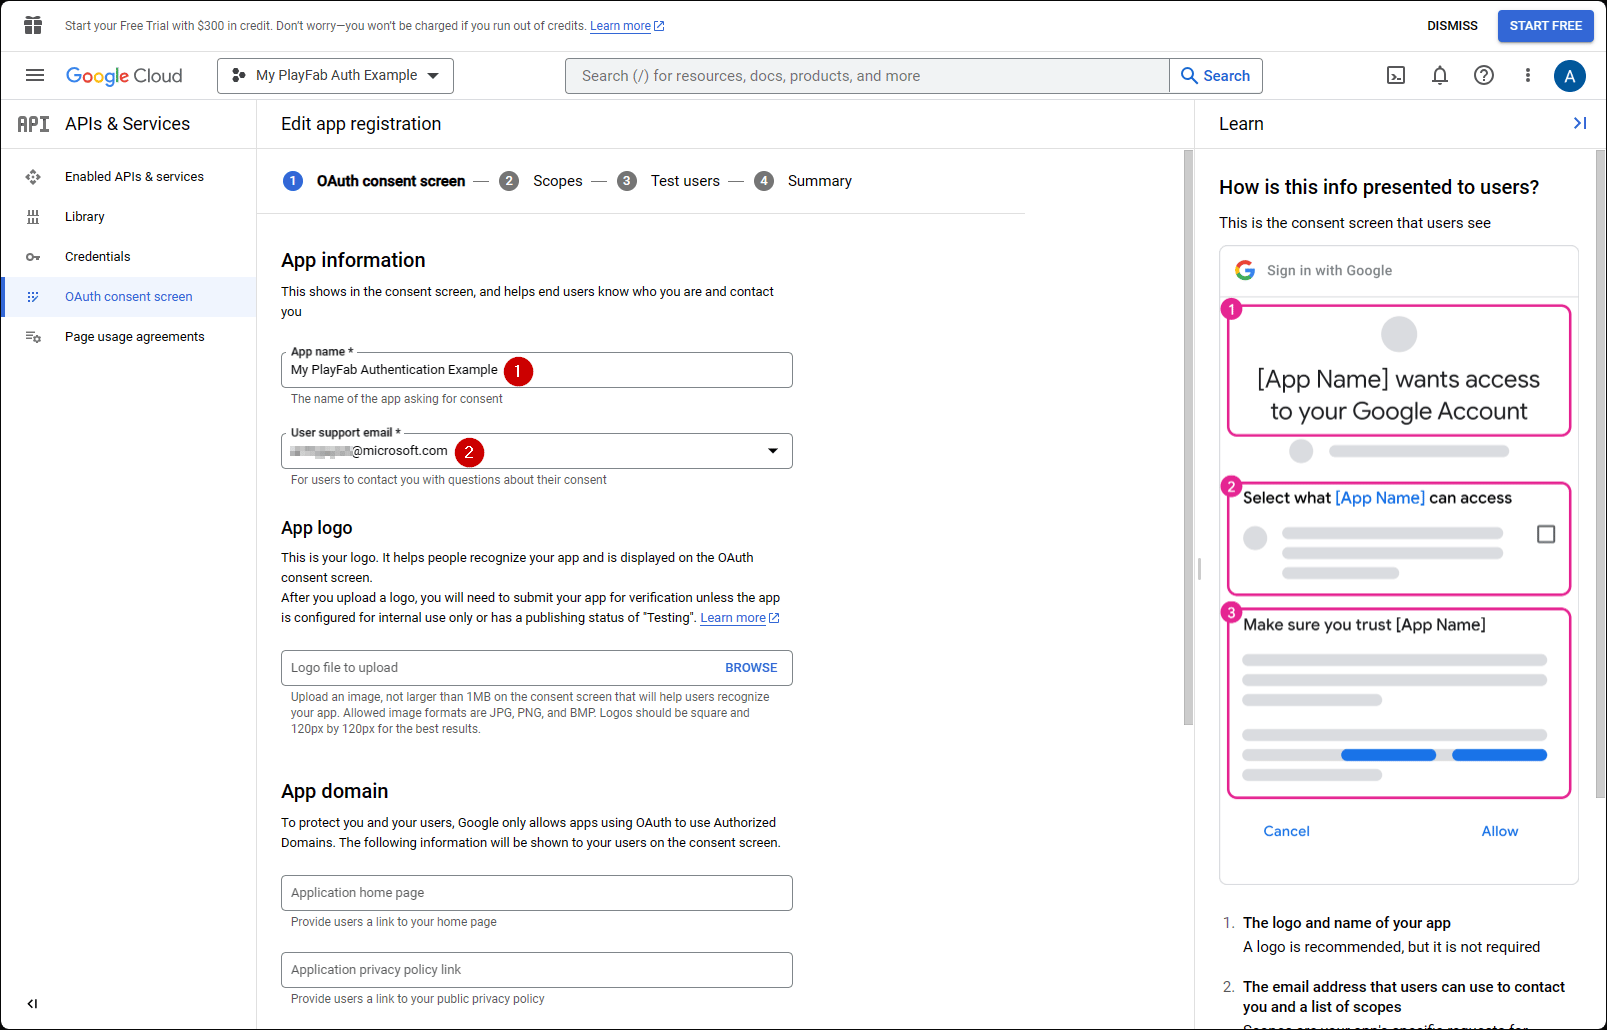
1. Remplissez un nom d'application (App Name)
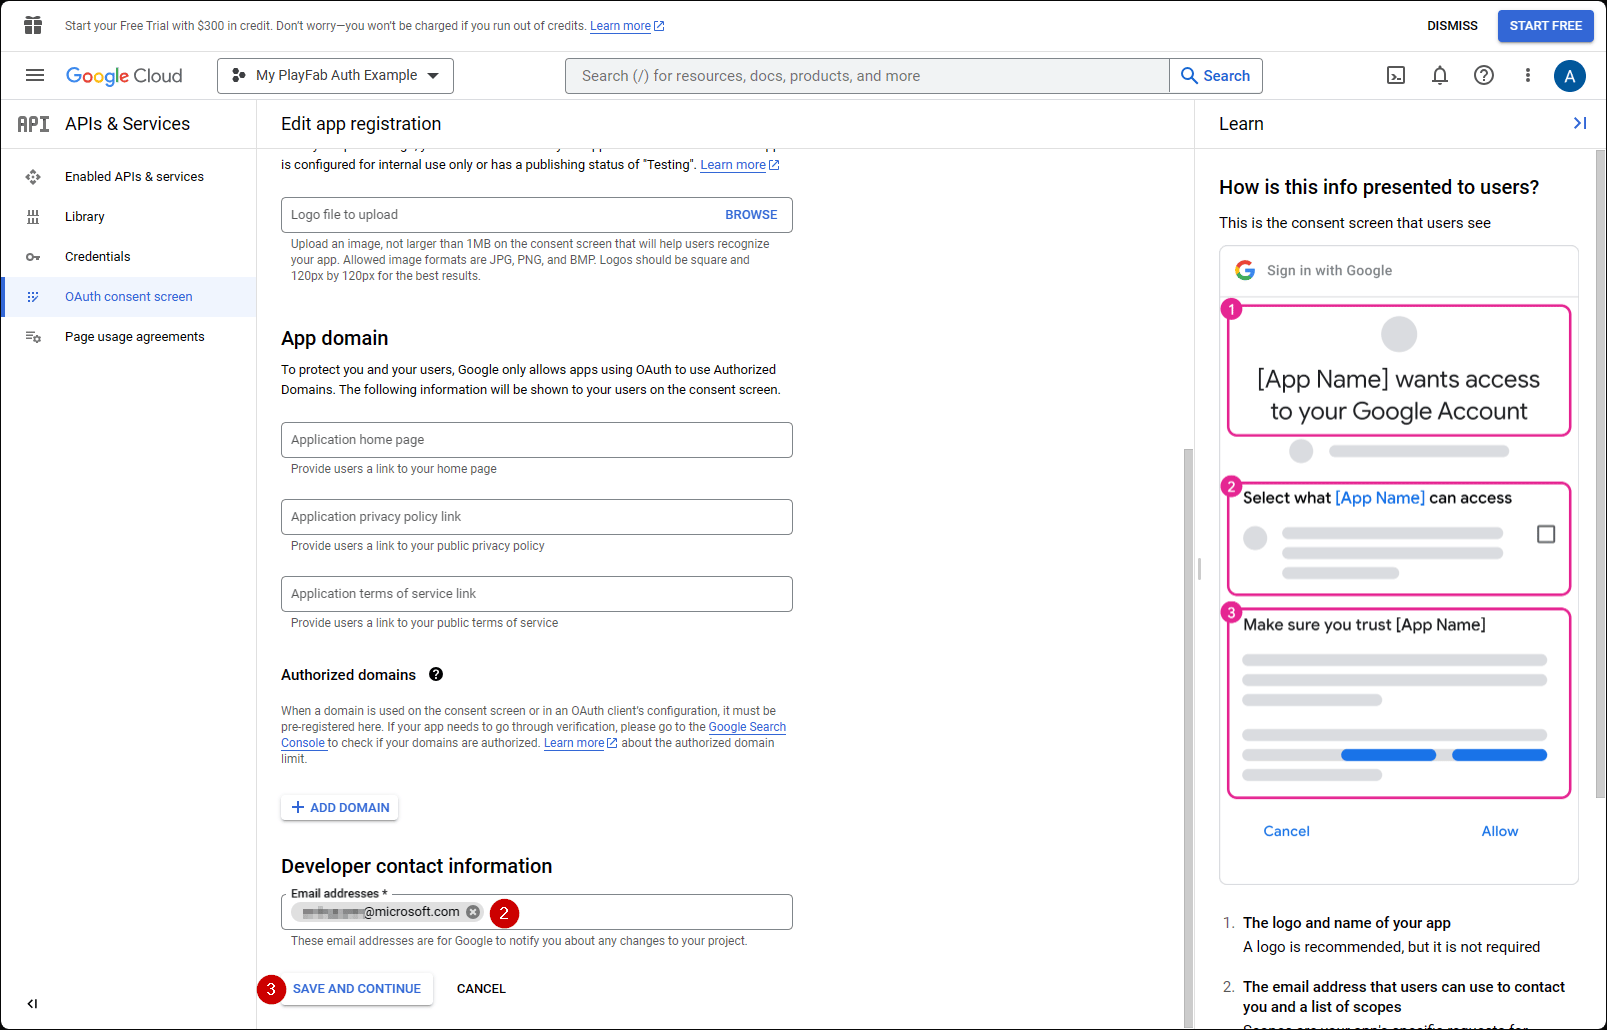
2. Assurez-vous que des adresses courriel sont indiquées pour **user support email** et **Developer Contact Email**
3. Sélectionnez ensuite **SAVE AND CONTINUE**
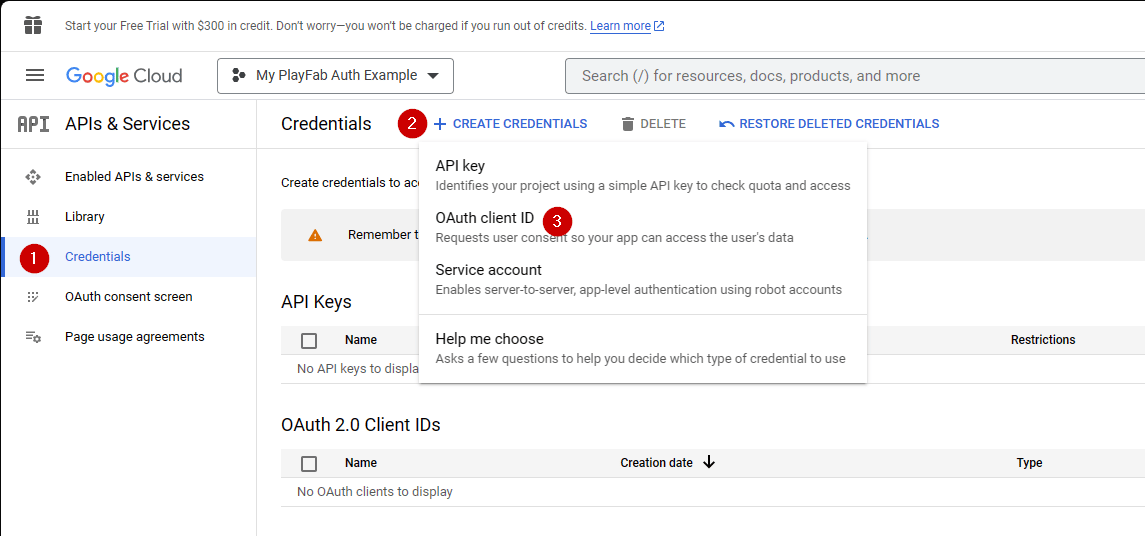
1. Accédez ensuite à **Credentials**.
2. Sélectionnez **Create credentials**.
3. Sélectionnez ensuite **OAuth client ID**.
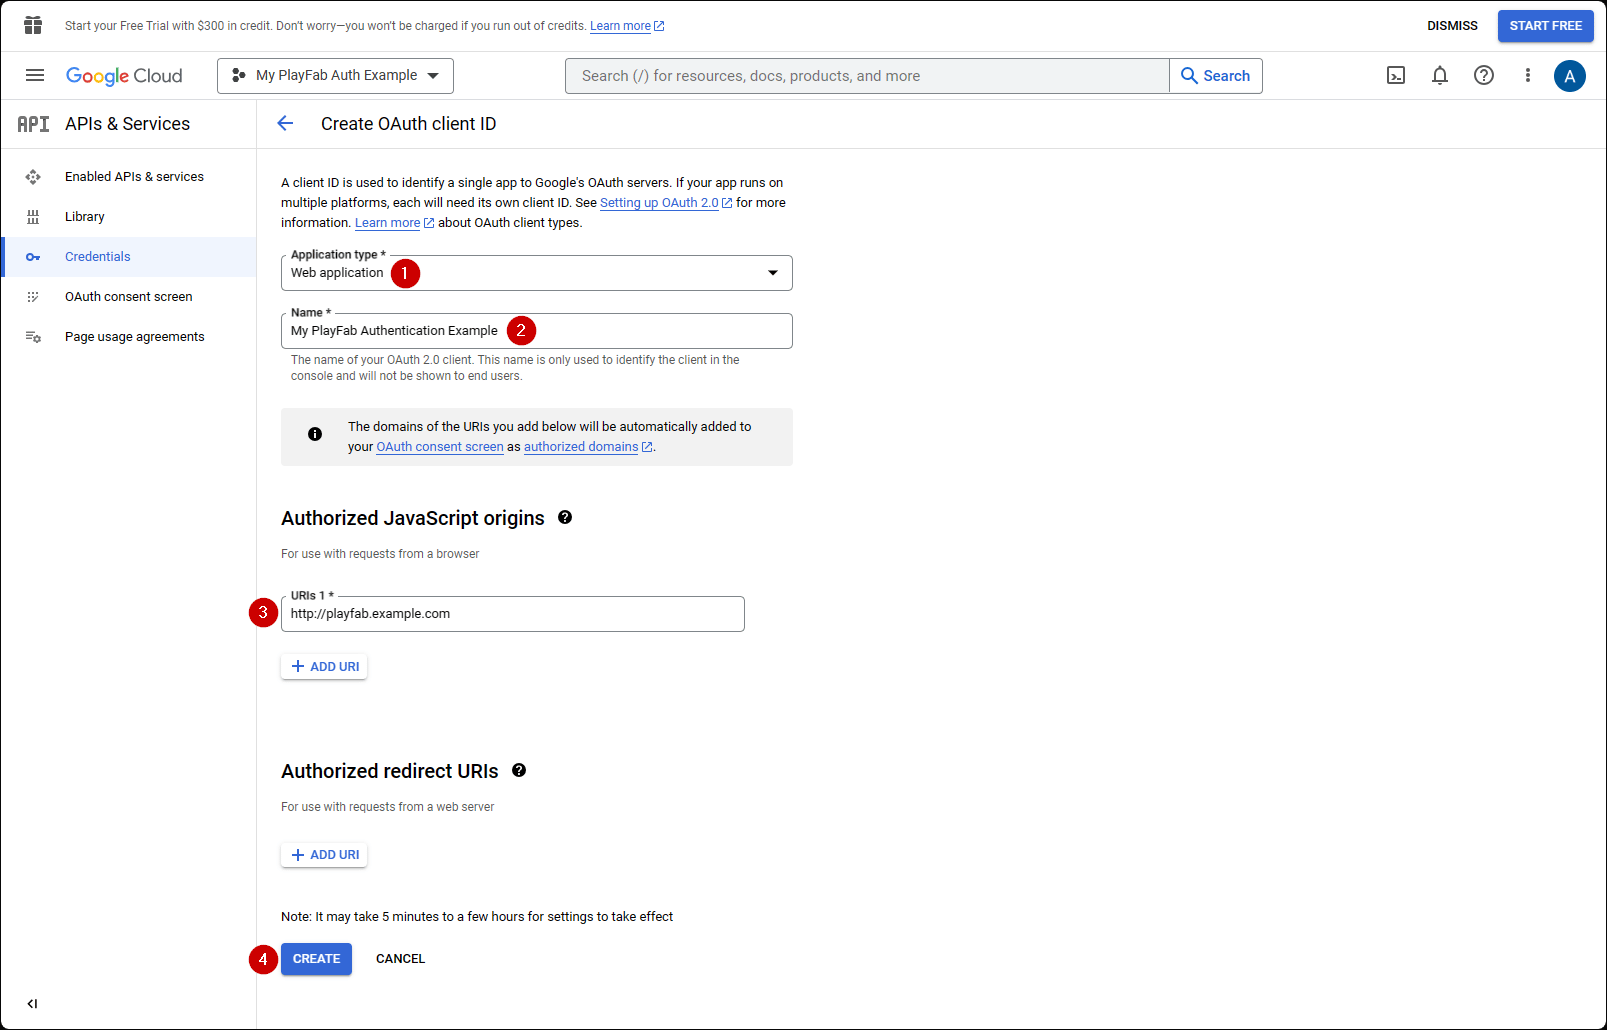
1. Sélectionnez **Web Application** comme **Application type**.
2. Donnez un **Name** à votre application.
3. Ajoutez votre domaine à **Authorized JavaScript origins** - `[PlayFab](http://playfab.example.com)` dans notre cas.
4. Enfin, sélectionnez le bouton **Create** pour valider vos modifications.
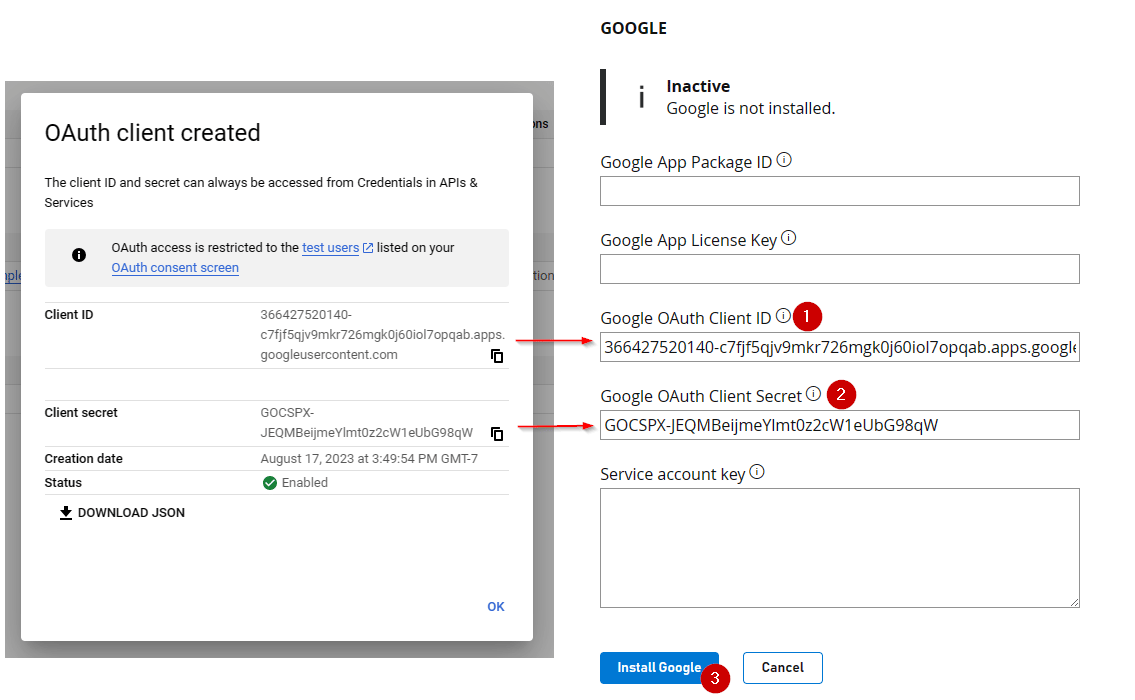
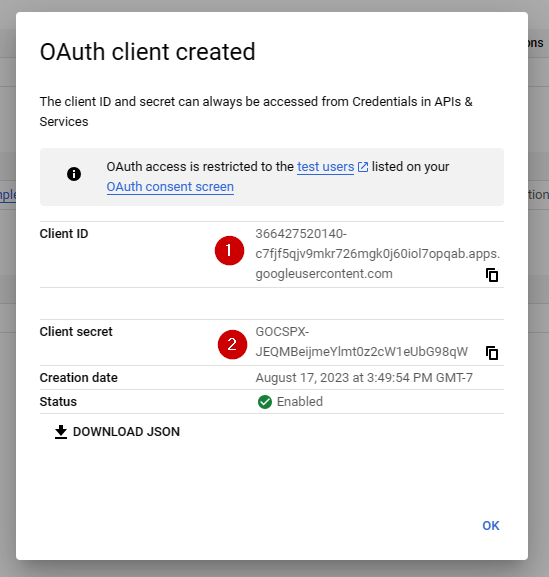
Sur l'écran **OAuth client** illustré ci-dessous, le Google API Manager révèle deux informations importantes :
1. Le **client ID**
2. Le **client secret**.
Assurez-vous de copier et d'enregistrer ces valeurs dans un endroit sûr et facilement accessible, car elles seront utilisées dans le processus d'autorisation présenté plus loin dans ce tutoriel.
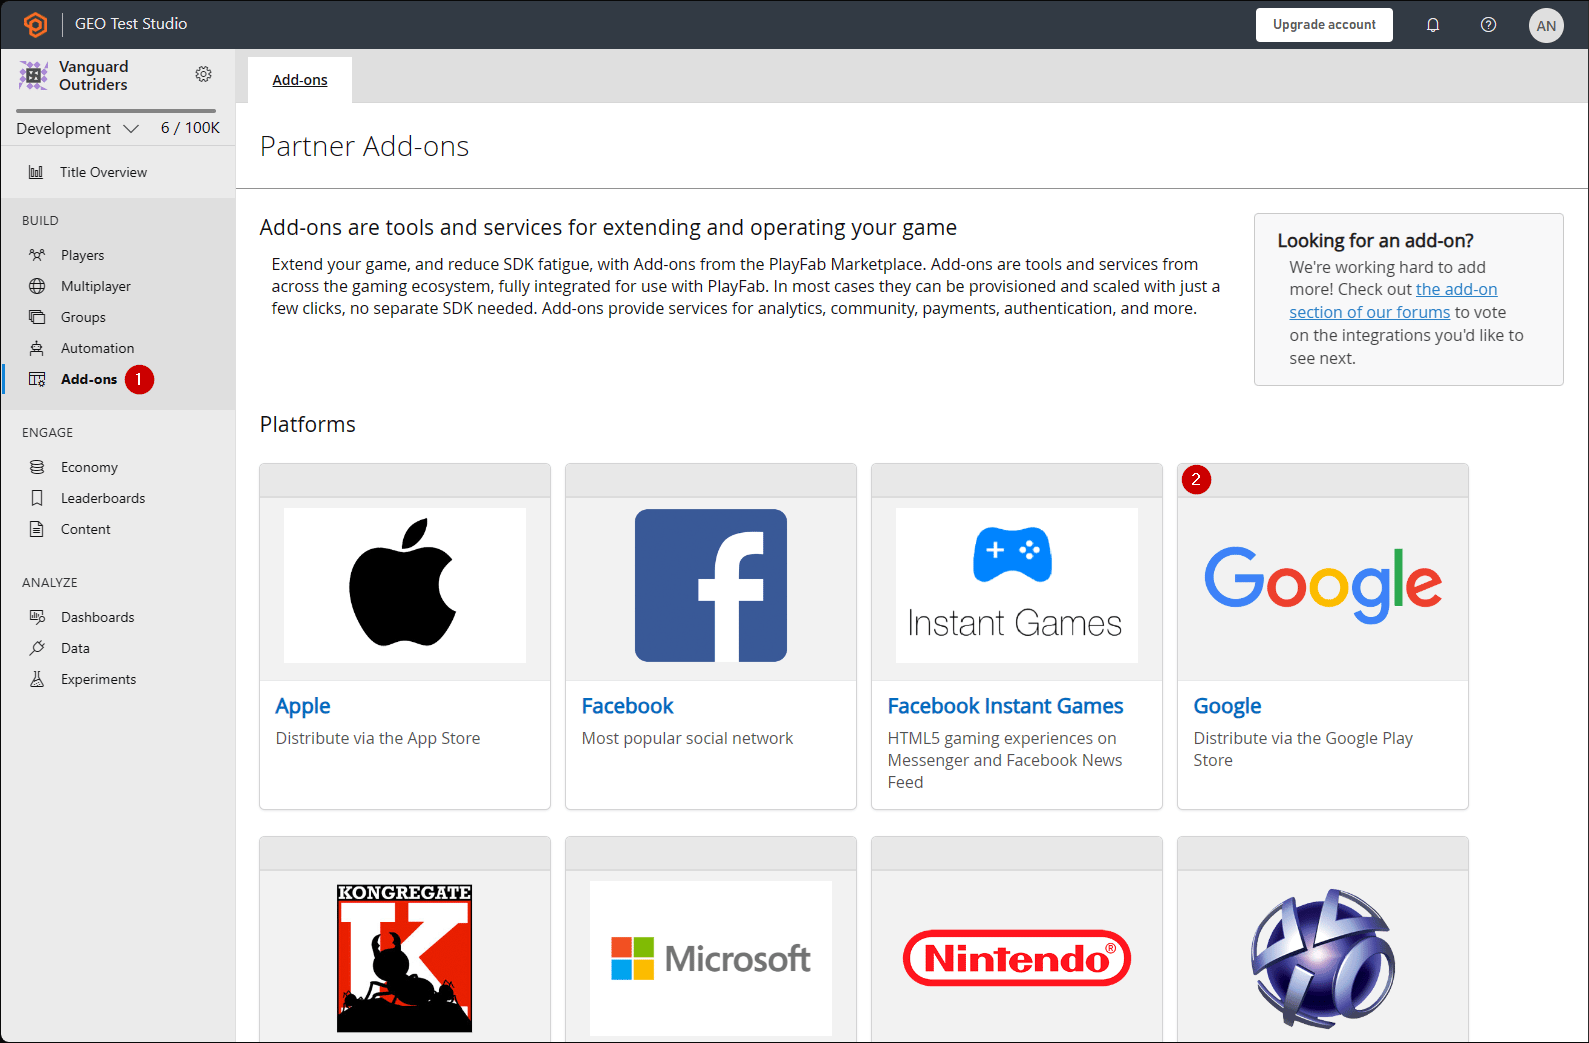
Accédez à la page **Game Manager** de PlayFab pour votre titre.
1. Accédez à **Add-ons** dans le menu.
2. Repérez et ouvrez l'icône ou le lien **Google Add-on**.
1. Remplissez le **Client ID**.
2. Remplissez le **Client secret**.
3. Sélectionnez ensuite le bouton **Install Google**.
Depuis juillet 2017, le **Google API Manager** a la mauvaise habitude de *ne pas* associer correctement le domaine d'origine **Allowed JS**. Si vous recevez l'erreur suivante : **"idpiframe\_initialization\_failed", details: "Not a valid origin for the client: somedomain.com..."**, supprimez les informations d'identification et recréez-les. *Il n'est pas nécessaire de supprimer tout le projet, seulement les informations d'identification.*
## Test à l'aide d'un jeton d'accès
Dans cet exemple, nous montrons comment tester l'API LoginWithGoogleAccount à l'aide de l'approche classique par jeton d'accès. Utilisez le code HTML fourni ci-dessous pour vos tests.
Assurez-vous\* de remplacer `YOUR_CLIENT_ID` et `YOUR_PLAYFAB_TITLE` par vos propres valeurs.
le paramètre **AccessToken** est absent de l'objet **LoginWithGoogleAccountRequest** dans les fichiers de typage TypeScript. Si vous utilisez TypeScript avec le Node SDK, vous pouvez créer un type personnalisé `interface LoginRequest extends PlayFabClientModels.LoginWithGoogleAccountRequest { AccessToken: string; }` et convertir le type lors de l'utilisation de l'API `PlayFabClient.LoginWithGoogleAccount( { AccessToken: accessToken, CreateAccount: true, } as LoginRequest, onPlayFabResponse);`
```html theme={null}
Google Access Token Auth Example
```
**Test à l'aide de la bibliothèque Google Sign-in Platform (dépréciée)**
L'exemple ci-dessous utilise la bibliothèque de plateforme Google Sign-In. **Selon le [site de documentation publique de Google Identity](https://developers.google.com/identity/gsi/web/guides/migration), la bibliothèque de plateforme JavaScript Google Sign-In pour le Web sera dépréciée le 31 mars 2023**. Cet exemple ne fonctionnera pas pour les nouveaux clients Google créés à l'avenir; consultez l'exemple de code précédent, qui utilise la bibliothèque Google Identity Services plus récente!
```html theme={null}
Google Access Token Auth Example
```
N'oubliez pas d'ouvrir cette page à l'aide de votre serveur Web, et assurez-vous d'y accéder à l'aide de l'URL que vous avez spécifiée lors de la configuration du projet Google (`http://playfab.example` dans notre cas).
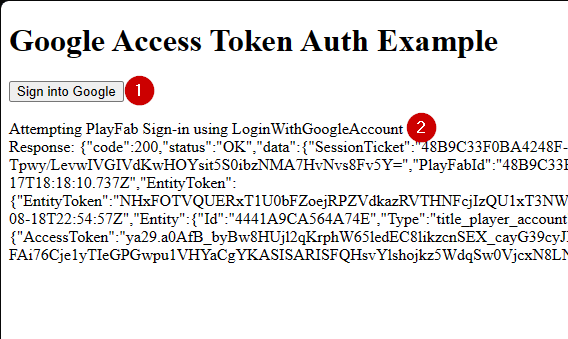
1. Une fois la page ouverte, sélectionnez **G Signed In** et suivez le flux d'authentification Google habituel.
2. Une fois cela terminé, le script tentera de s'authentifier du côté de PlayFab et affichera le résultat.
Si vous avez *déjà* une session d'authentification Google en cours, vous n'aurez pas à sélectionner **G Signed In**. Tout se fera automatiquement.
## Related topics
- [Authentification propre à la plateforme](/fr-CA/services/playfab/identity/player-identity/platform-specific-authentication/index.md)
- [Configuration de l'authentification PlayFab avec Kongregate et HTML5](/fr-CA/services/playfab/identity/player-identity/platform-specific-authentication/kongregate-html5.md)
- [Configuration de l'authentification PlayFab avec Facebook et HTML5](/fr-CA/services/playfab/identity/player-identity/platform-specific-authentication/facebook-html5.md)
- [Configuration de l'authentification PlayFab avec Twitch et HTML5](/fr-CA/services/playfab/identity/player-identity/platform-specific-authentication/twitch-html5.md)
- [Authentification par connexion anonyme côté serveur](/fr-CA/services/playfab/identity/player-identity/platform-specific-authentication/anonymous-login.md)
 1. Remplissez le champ sous **Project Name**.
2. Sélectionnez le bouton **Create**.
1. Remplissez le champ sous **Project Name**.
2. Sélectionnez le bouton **Create**.
 1. Remplissez un nom d'application (App Name)
2. Assurez-vous que des adresses courriel sont indiquées pour **user support email** et **Developer Contact Email**
3. Sélectionnez ensuite **SAVE AND CONTINUE**
1. Remplissez un nom d'application (App Name)
2. Assurez-vous que des adresses courriel sont indiquées pour **user support email** et **Developer Contact Email**
3. Sélectionnez ensuite **SAVE AND CONTINUE**
 1. Accédez ensuite à **Credentials**.
2. Sélectionnez **Create credentials**.
3. Sélectionnez ensuite **OAuth client ID**.
1. Accédez ensuite à **Credentials**.
2. Sélectionnez **Create credentials**.
3. Sélectionnez ensuite **OAuth client ID**.
 1. Sélectionnez **Web Application** comme **Application type**.
2. Donnez un **Name** à votre application.
3. Ajoutez votre domaine à **Authorized JavaScript origins** - `[PlayFab](http://playfab.example.com)` dans notre cas.
4. Enfin, sélectionnez le bouton **Create** pour valider vos modifications.
1. Sélectionnez **Web Application** comme **Application type**.
2. Donnez un **Name** à votre application.
3. Ajoutez votre domaine à **Authorized JavaScript origins** - `[PlayFab](http://playfab.example.com)` dans notre cas.
4. Enfin, sélectionnez le bouton **Create** pour valider vos modifications.
 Sur l'écran **OAuth client** illustré ci-dessous, le Google API Manager révèle deux informations importantes :
1. Le **client ID**
2. Le **client secret**.
Sur l'écran **OAuth client** illustré ci-dessous, le Google API Manager révèle deux informations importantes :
1. Le **client ID**
2. Le **client secret**.
 Accédez à la page **Game Manager** de PlayFab pour votre titre.
1. Accédez à **Add-ons** dans le menu.
2. Repérez et ouvrez l'icône ou le lien **Google Add-on**.
Accédez à la page **Game Manager** de PlayFab pour votre titre.
1. Accédez à **Add-ons** dans le menu.
2. Repérez et ouvrez l'icône ou le lien **Google Add-on**.
 1. Remplissez le **Client ID**.
2. Remplissez le **Client secret**.
3. Sélectionnez ensuite le bouton **Install Google**.
1. Remplissez le **Client ID**.
2. Remplissez le **Client secret**.
3. Sélectionnez ensuite le bouton **Install Google**.