> ## Documentation Index
> Fetch the complete documentation index at: https://devdocs.xbox.com/llms.txt
> Use this file to discover all available pages before exploring further.
# Inicio rápido de Photon
> Conecte el multijugador de Photon Realtime y PUN con PlayFab para autenticar jugadores y recibir eventos de sala mediante devoluciones de llamada de CloudScript en un proyecto de Unity.
En esta sección se proporciona información sobre el uso de PlayFab junto con los servicios multijugador de Photon, como Photon Realtime y Photon Unity Networking (PUN).
Actualmente, ofrecemos las siguientes integraciones de Photon:
* Autenticar jugadores de Photon con PlayFab.
* Escuchar eventos de sala mediante devoluciones de llamada de CloudScript de PlayFab.
## Inicio rápido de Photon
En este inicio rápido se muestra cómo configurar el multijugador de Photon para que funcione con PlayFab. Actualmente, PlayFab ofrece las siguientes integraciones de Photon:
* Autenticar jugadores de Photon con PlayFab.
* Escuchar eventos de sala mediante devoluciones de llamada de CloudScript de PlayFab.
En este inicio rápido, mostramos cómo funcionan ambas características usando el último [proyecto de ejemplo de Photon para Unity](https://assetstore.unity.com/packages/tools/network/photon-unity-networking-classic-free-1786).
Para obtener una experiencia multijugador y de chat de PlayFab totalmente compatible en Unity, consulte el [complemento de Unity de PlayFab Party](/services/playfab/multiplayer/networking/party-unity-overview) para obtener más información.
## Requisitos previos
1. Un proyecto de [Unity](/services/playfab/sdks/unity3d/quickstart) con el SDK de PlayFab importado y un título configurado.
2. El título de PlayFab registrado.
Esta guía omite la configuración de la aplicación de chat. Para integrar su aplicación de chat, cree una nueva aplicación de Photon Chat y escriba el App ID en los cuadros correspondientes de Unity y de la página del complemento de Photon en Game Manager de PlayFab.
## Configuración de una aplicación de Photon
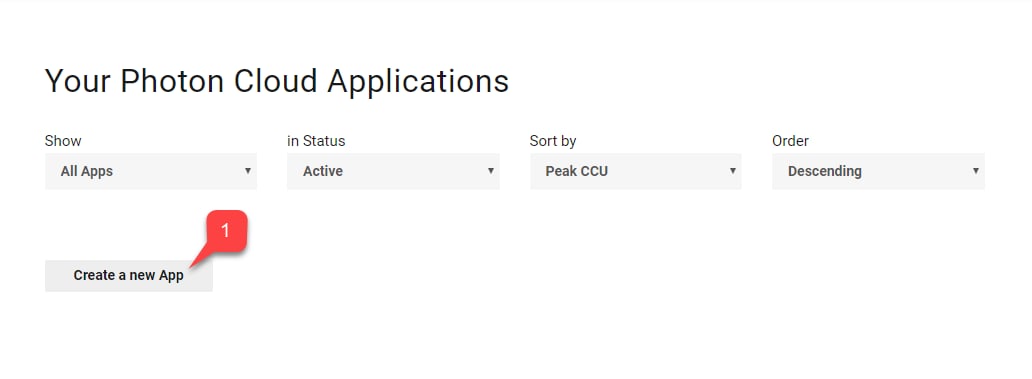
1. Una vez que se haya registrado e iniciado sesión en el panel de Photon, seleccione **Create a new App**.
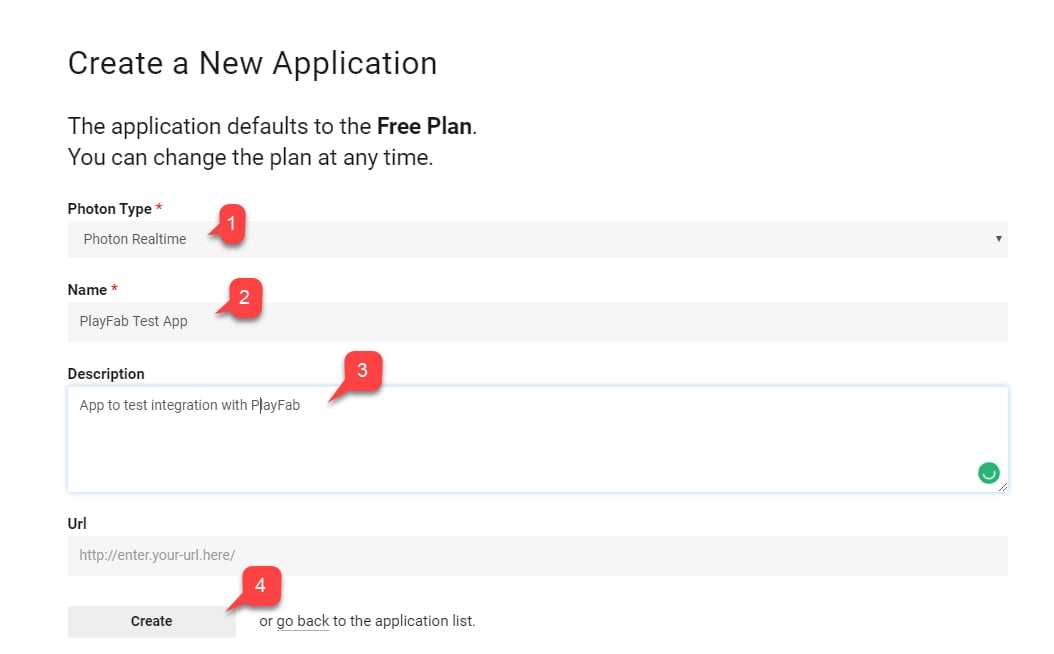
 2. Seleccione el **Photon Type**.
3. Elija un **Name**.
4. Cree una **Description**.
5. Envíe el formulario seleccionando **Create**.
2. Seleccione el **Photon Type**.
3. Elija un **Name**.
4. Cree una **Description**.
5. Envíe el formulario seleccionando **Create**.
 ## Configuración de la autenticación
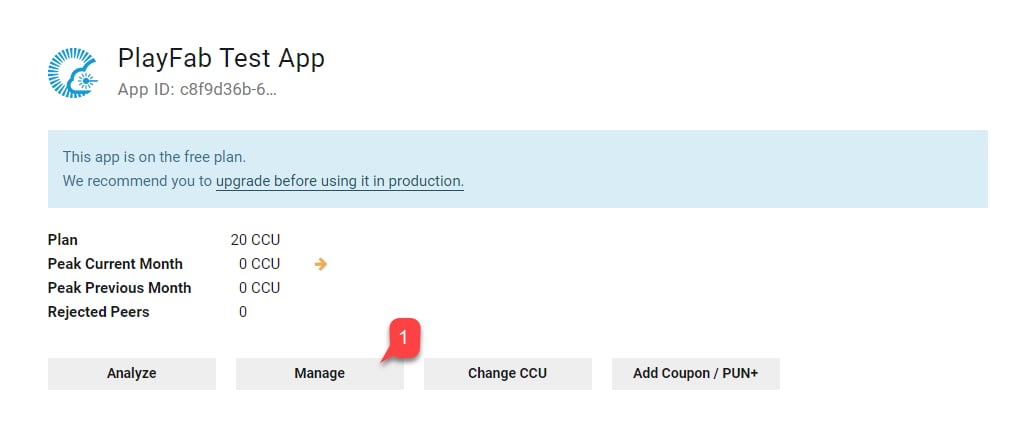
1. Busque la aplicación recién creada en la lista y seleccione **Manage**.
## Configuración de la autenticación
1. Busque la aplicación recién creada en la lista y seleccione **Manage**.
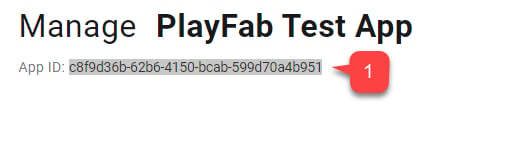
 2. En el panel de la **aplicación**, busque y guarde el **App ID**, que se encuentra debajo del **título** de la página.
 3. Localice la sección **Authentication**.
4. Seleccione **Custom Server**.
3. Localice la sección **Authentication**.
4. Seleccione **Custom Server**.
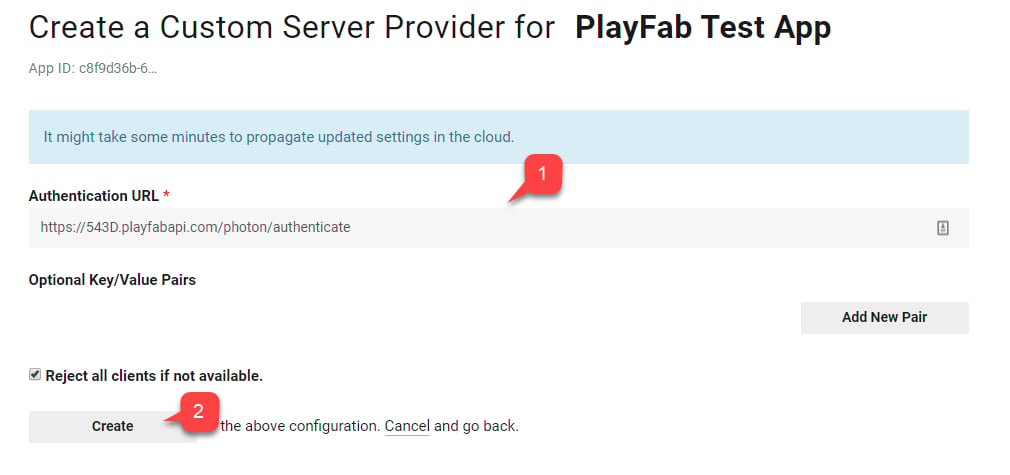
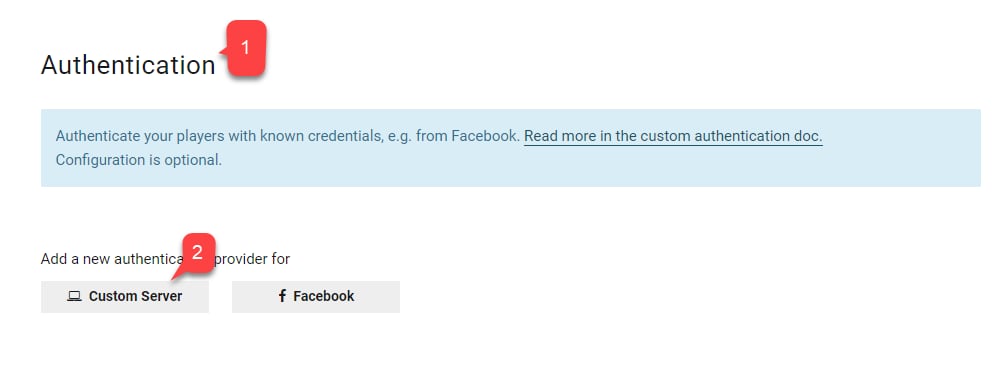 La página siguiente le permite configurar la dirección URL de autenticación para Photon.
```html theme={null}
https://{PlayFabTitleId}.playfabapi.com/photon/authenticate
```
Reemplace el marcador de posición `PlayFabTitleId` por su propio id. de título.
```html theme={null}
{PlayFabTitleId}
```
5. Escriba la **URL**.
6. Envíe el formulario seleccionando el botón **Create**.
La página siguiente le permite configurar la dirección URL de autenticación para Photon.
```html theme={null}
https://{PlayFabTitleId}.playfabapi.com/photon/authenticate
```
Reemplace el marcador de posición `PlayFabTitleId` por su propio id. de título.
```html theme={null}
{PlayFabTitleId}
```
5. Escriba la **URL**.
6. Envíe el formulario seleccionando el botón **Create**.
 ## Configuración de un título de PlayFab para Photon
Vaya a la página de **Game Manager** de su título y, a continuación:
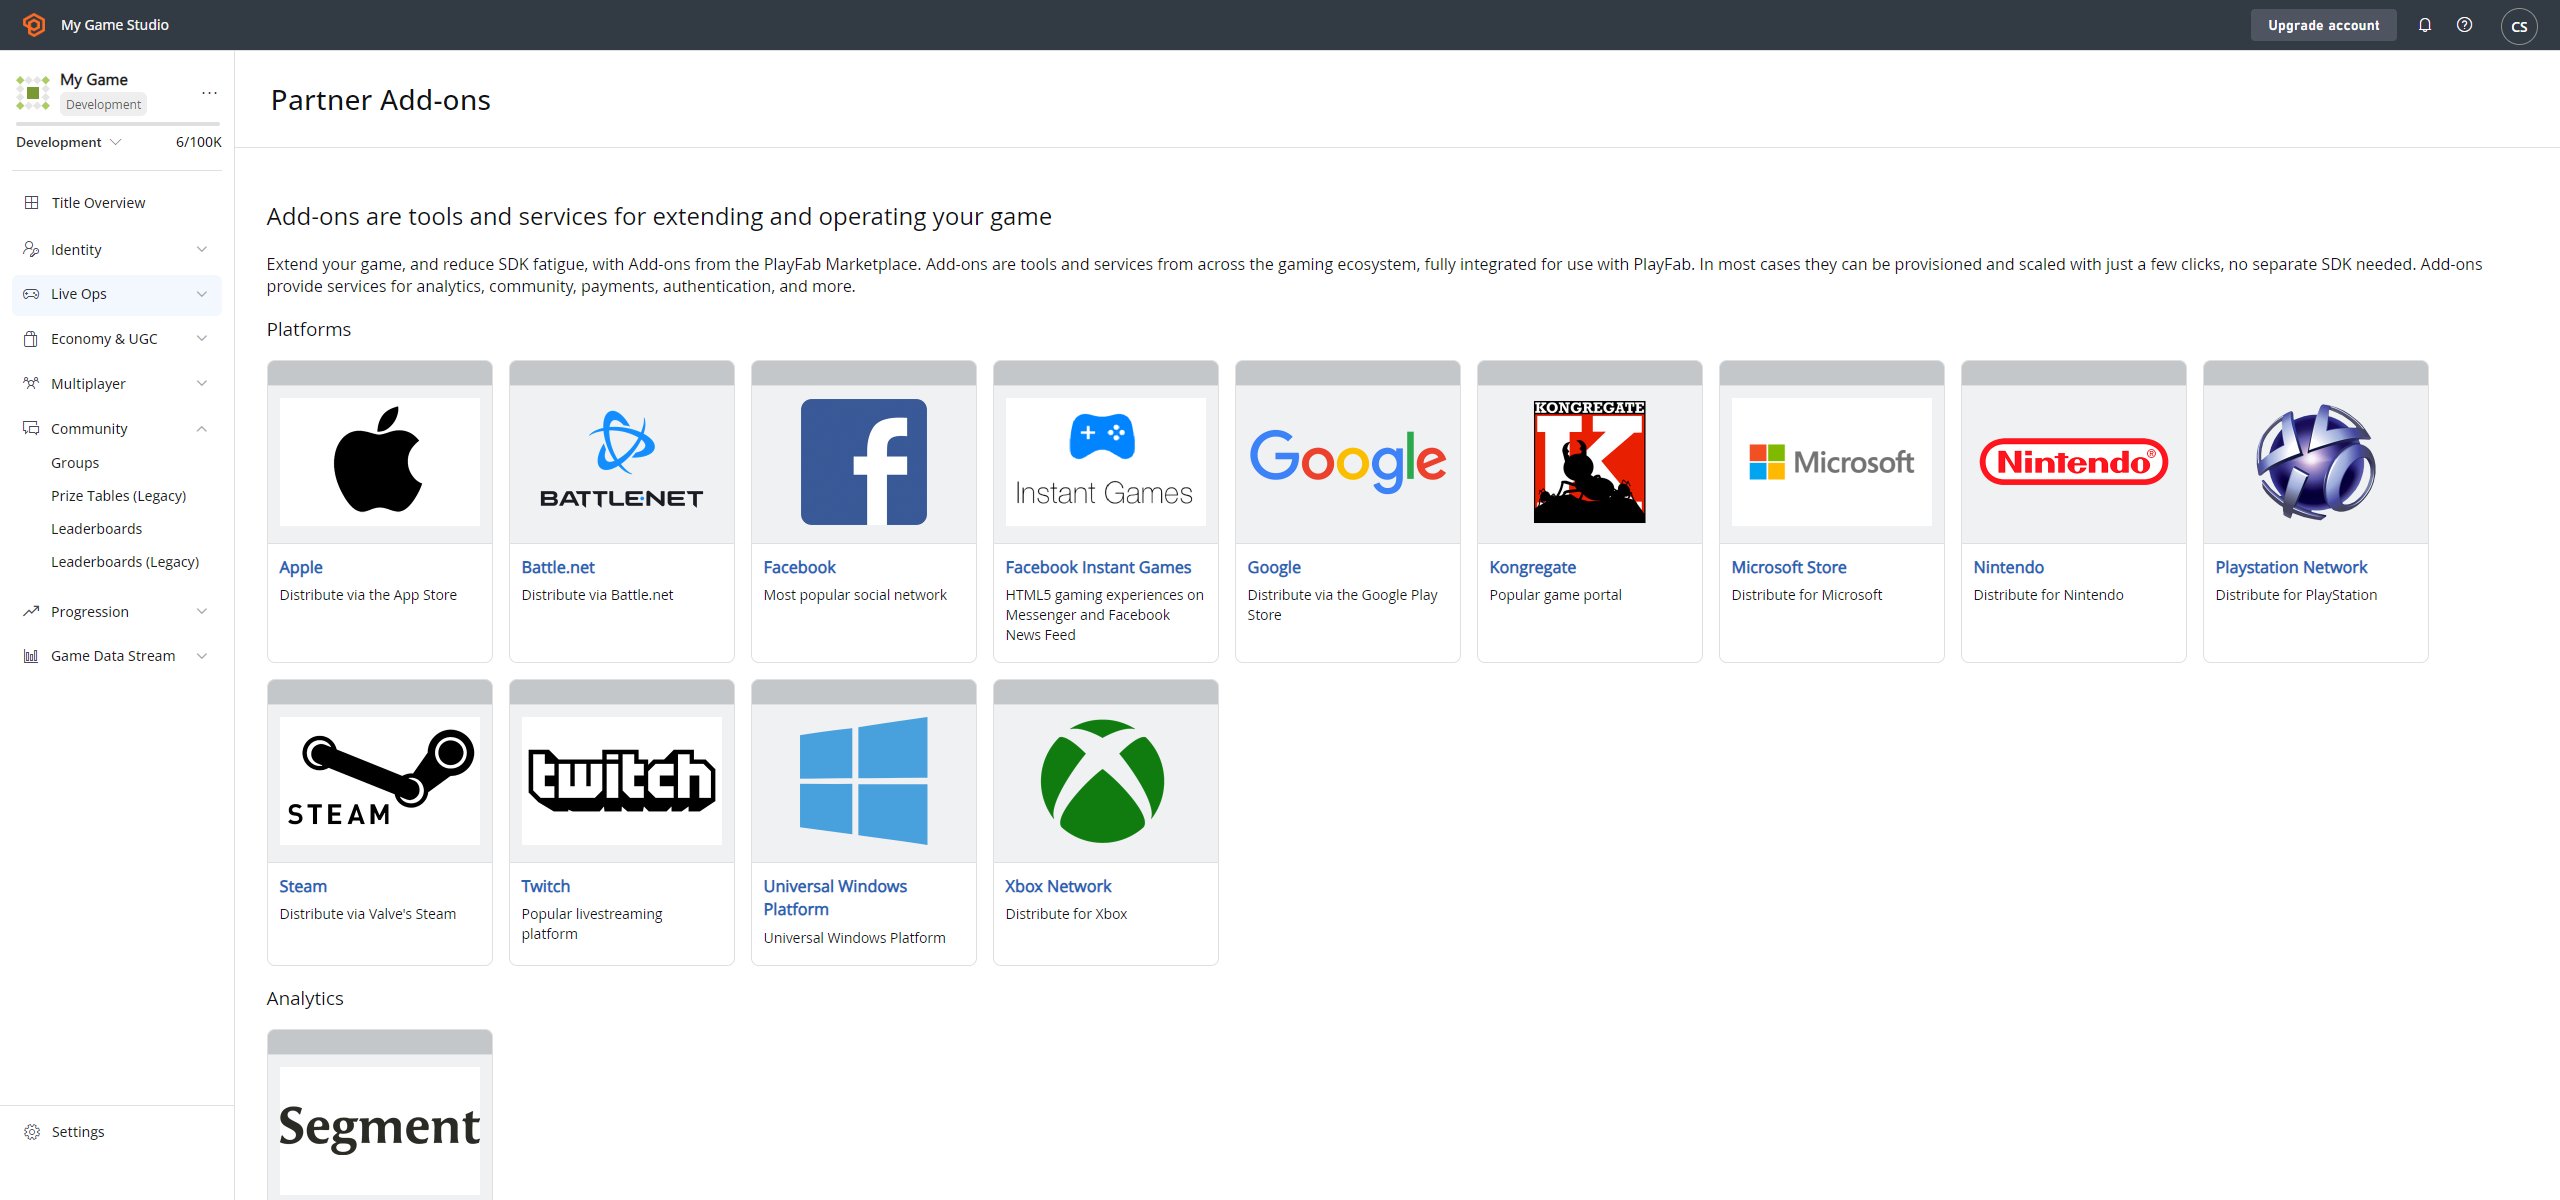
1. Vaya a la pestaña **Add-ons**.
2. En la lista de **complementos**, busque y seleccione **Photon**.
## Configuración de un título de PlayFab para Photon
Vaya a la página de **Game Manager** de su título y, a continuación:
1. Vaya a la pestaña **Add-ons**.
2. En la lista de **complementos**, busque y seleccione **Photon**.
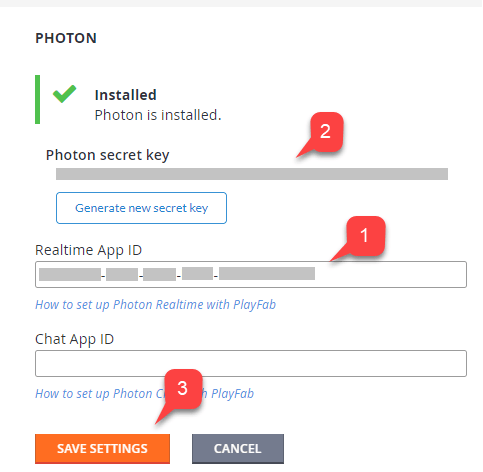
 3. La página del **complemento de Photon** le permite instalar Photon especificando su **Photon Realtime Application ID**.
* Opcionalmente, puede especificar el **Chat App ID**.
* Una vez que instale el **complemento (3)**, se genera una **clave secreta de Photon** **(2)**.
* Guárdela para usarla más adelante al configurar los webhooks.
Recuerde guardar su clave secreta de Photon en un lugar seguro y de fácil acceso. Resulta útil al configurar los webhooks.
3. La página del **complemento de Photon** le permite instalar Photon especificando su **Photon Realtime Application ID**.
* Opcionalmente, puede especificar el **Chat App ID**.
* Una vez que instale el **complemento (3)**, se genera una **clave secreta de Photon** **(2)**.
* Guárdela para usarla más adelante al configurar los webhooks.
Recuerde guardar su clave secreta de Photon en un lugar seguro y de fácil acceso. Resulta útil al configurar los webhooks.
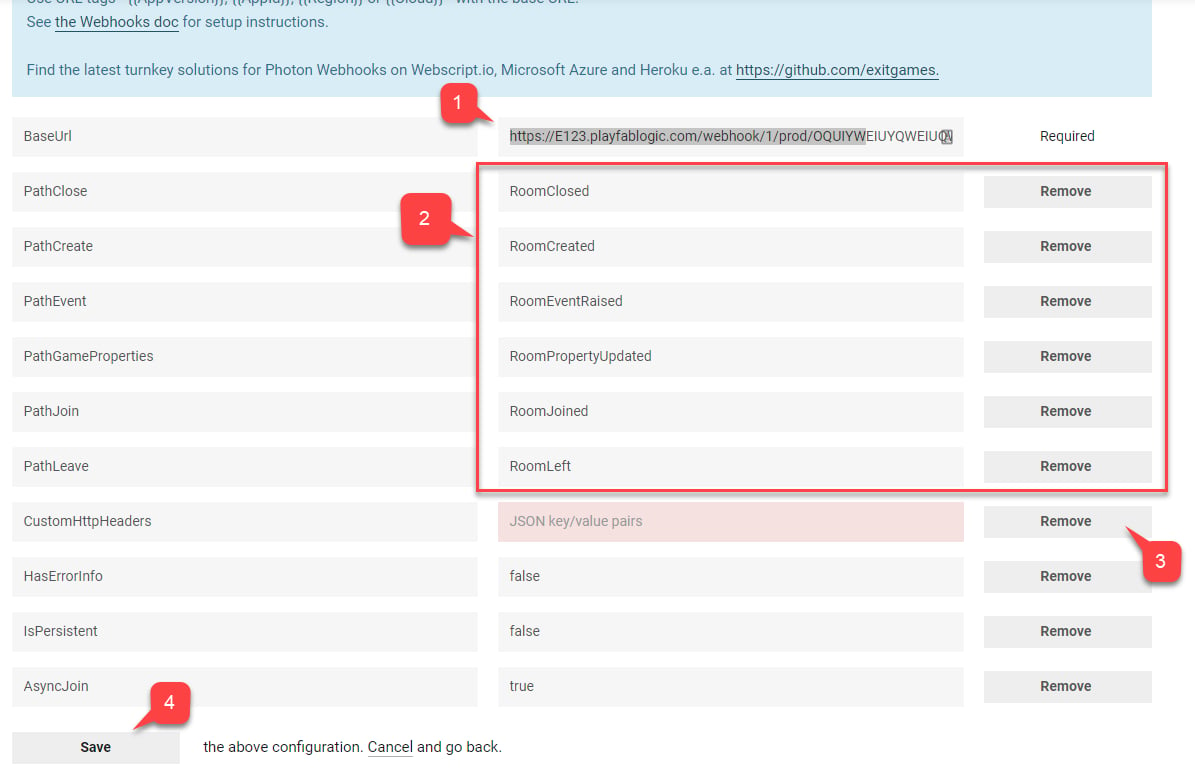
 ## Configuración de los webhooks de Photon
Como integración opcional, Photon puede transmitir determinados eventos a su CloudScript de PlayFab. Esto se hace con webhooks:
* Especifique una dirección URL base.
* A continuación, especifique la ruta de acceso para cada uno de los eventos disponibles.
* Una ruta de acceso es, en la práctica, un nombre de controlador implementado en su CloudScript.
La dirección URL base tiene el siguiente formato:
```html theme={null}
https://{PlayFabTitleId}.playfablogic.com/webhook/1/prod/{PhotonSecretKey}
```
Asegúrese de reemplazar el marcador de posición `Title Id` por su propio id. de título.
```html theme={null}
{PlayFabTitleId}
```
Asegúrese de reemplazar el token `PhotonSecretKey` por la clave secreta que generó en la página del **complemento de Photon**.
```html theme={null}
{PhotonSecretKey}
```
1. Rellene la **Base URL**.
2. Asigne un **nombre** de controlador de **CloudScript** para cada uno de los **eventos** disponibles.
3. Quite los **CustomHttpHeaders** que haya.
4. Envíelo seleccionando el botón **Save**.
## Configuración de los webhooks de Photon
Como integración opcional, Photon puede transmitir determinados eventos a su CloudScript de PlayFab. Esto se hace con webhooks:
* Especifique una dirección URL base.
* A continuación, especifique la ruta de acceso para cada uno de los eventos disponibles.
* Una ruta de acceso es, en la práctica, un nombre de controlador implementado en su CloudScript.
La dirección URL base tiene el siguiente formato:
```html theme={null}
https://{PlayFabTitleId}.playfablogic.com/webhook/1/prod/{PhotonSecretKey}
```
Asegúrese de reemplazar el marcador de posición `Title Id` por su propio id. de título.
```html theme={null}
{PlayFabTitleId}
```
Asegúrese de reemplazar el token `PhotonSecretKey` por la clave secreta que generó en la página del **complemento de Photon**.
```html theme={null}
{PhotonSecretKey}
```
1. Rellene la **Base URL**.
2. Asigne un **nombre** de controlador de **CloudScript** para cada uno de los **eventos** disponibles.
3. Quite los **CustomHttpHeaders** que haya.
4. Envíelo seleccionando el botón **Save**.
 ## Configuración de un proyecto de Unity
Esta guía asume que ya tiene el SDK de PlayFab importado, configurado y con la configuración del título establecida.
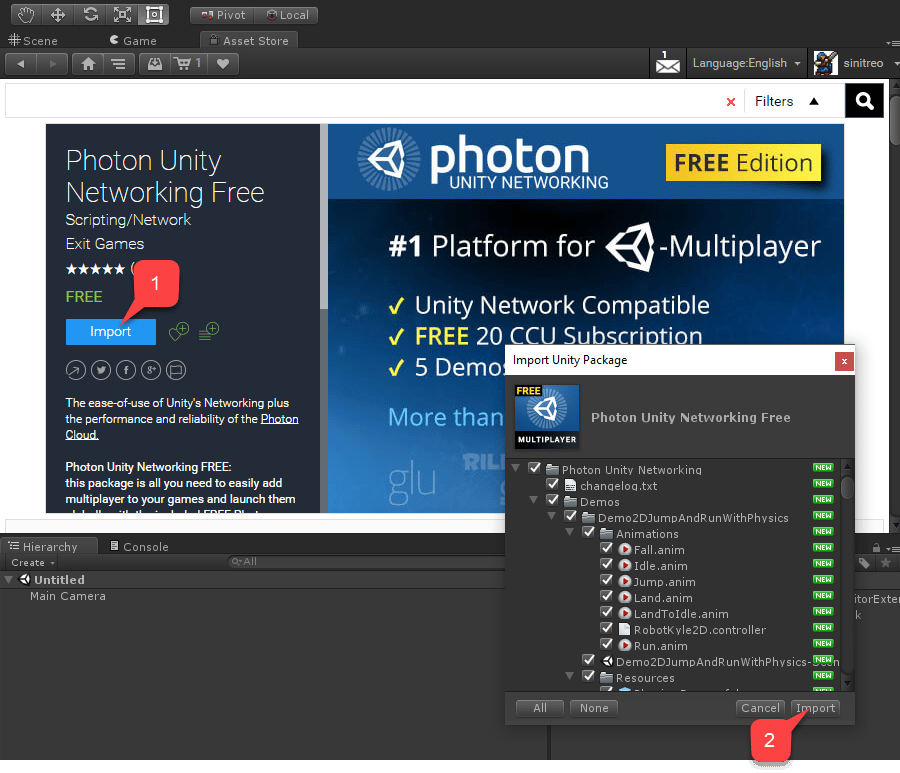
* Empiece por ir a la **Asset Store**.
* Localice el [paquete gratuito Photon Unity Networking](https://assetstore.unity.com/packages/tools/network/photon-unity-networking-classic-free-1786).
* Seleccione **Import (1)**.
* Puede inspeccionar los archivos importados.
* A continuación, seleccione **Import (2)**.
## Configuración de un proyecto de Unity
Esta guía asume que ya tiene el SDK de PlayFab importado, configurado y con la configuración del título establecida.
* Empiece por ir a la **Asset Store**.
* Localice el [paquete gratuito Photon Unity Networking](https://assetstore.unity.com/packages/tools/network/photon-unity-networking-classic-free-1786).
* Seleccione **Import (1)**.
* Puede inspeccionar los archivos importados.
* A continuación, seleccione **Import (2)**.
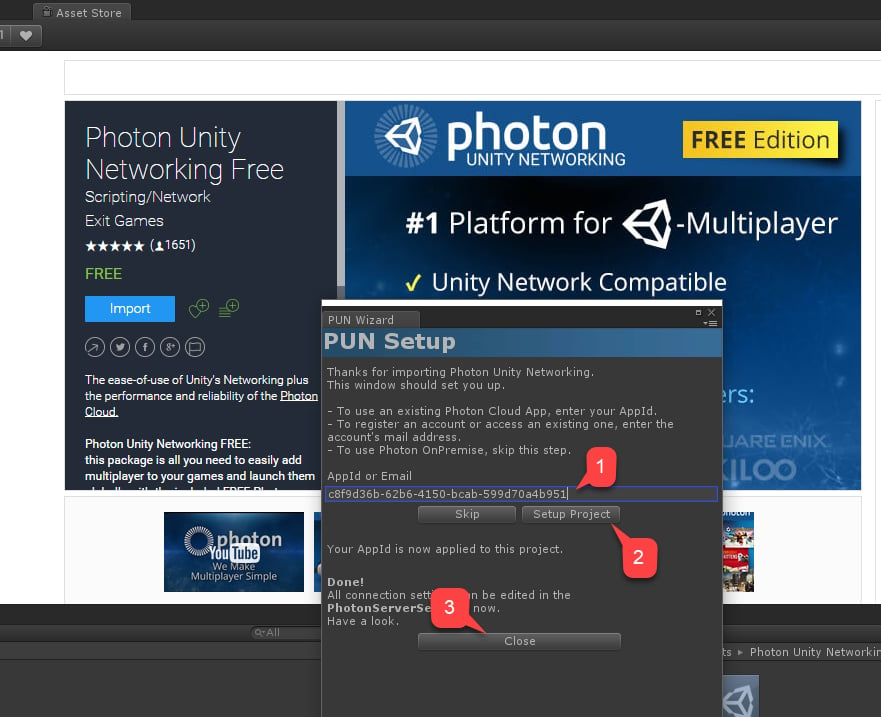
 Justo después de que finalice el proceso de importación, se abre la ventana **PUN Setup**.
* Escriba su **Realtime Application ID (1)**, que se encuentra en el **panel de aplicaciones de Photon** para la **aplicación de Photon** que creó.
* Seleccione **Setup Project (2)**.
* Una vez finalizada la configuración, seleccione **Close (3)**.
Justo después de que finalice el proceso de importación, se abre la ventana **PUN Setup**.
* Escriba su **Realtime Application ID (1)**, que se encuentra en el **panel de aplicaciones de Photon** para la **aplicación de Photon** que creó.
* Seleccione **Setup Project (2)**.
* Una vez finalizada la configuración, seleccione **Close (3)**.
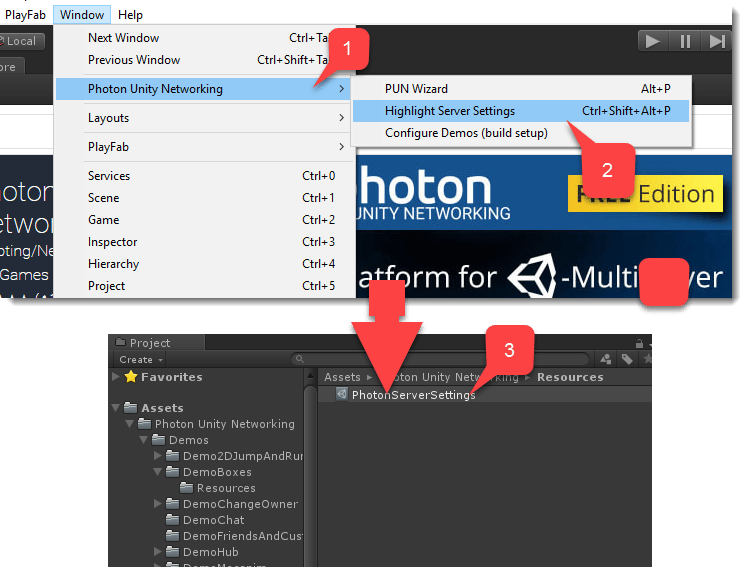
 Si se aceptó el **AppId**, el objeto **Photon Server Settings** queda seleccionado y visible en la ventana **Inspector de Unity**. Para acceder manualmente al objeto **Server Settings**:
* Vaya al panel superior de la ventana.
* Seleccione **Window**.
* A continuación, seleccione **Photon Unity Networking (1)**.
* Por último, seleccione **Highlight Server Settings (2)**.
* La ventana estándar del proyecto de **Unity** muestra el objeto **PhotonServerSettings (3)**.
* Seleccione el objeto para ver su configuración en la ventana **Inspector de Unity**.
Si se aceptó el **AppId**, el objeto **Photon Server Settings** queda seleccionado y visible en la ventana **Inspector de Unity**. Para acceder manualmente al objeto **Server Settings**:
* Vaya al panel superior de la ventana.
* Seleccione **Window**.
* A continuación, seleccione **Photon Unity Networking (1)**.
* Por último, seleccione **Highlight Server Settings (2)**.
* La ventana estándar del proyecto de **Unity** muestra el objeto **PhotonServerSettings (3)**.
* Seleccione el objeto para ver su configuración en la ventana **Inspector de Unity**.
 Como parte de **PhotonServerSettings**, tiene la opción de asignar el **Chat Application ID**.
En este punto, el proyecto está configurado.
## Implementación de la autenticación de PlayFab con Photon
Cuando habilita el **complemento de Photon** para su título en Game Manager de PlayFab y configura la autenticación en el panel de la **aplicación de Photon**, PlayFab le permite autenticar a los jugadores existentes de PlayFab dentro del entorno de Photon.
Esto significa que puede evitar por completo implementar cualquier administración de usuarios para Photon.
1. Vaya a la escena **DemoHub-Scene-V2** del paquete **Photon Unity Networking Free**, la versión **Classic**.
* Esta escena es un centro para todos los ejemplos del paquete.
* Como es la *primera* escena que se carga, agreguemos un pequeño script para habilitar la autenticación de PlayFab con Photon.
2. Cree un **GameObject** vacío llamado **PlayFabAuthenticator**.
3. A continuación, en la ventana **Inspector de Unity**, agregue un componente con el mismo nombre a este **GameObject**.
Como parte de **PhotonServerSettings**, tiene la opción de asignar el **Chat Application ID**.
En este punto, el proyecto está configurado.
## Implementación de la autenticación de PlayFab con Photon
Cuando habilita el **complemento de Photon** para su título en Game Manager de PlayFab y configura la autenticación en el panel de la **aplicación de Photon**, PlayFab le permite autenticar a los jugadores existentes de PlayFab dentro del entorno de Photon.
Esto significa que puede evitar por completo implementar cualquier administración de usuarios para Photon.
1. Vaya a la escena **DemoHub-Scene-V2** del paquete **Photon Unity Networking Free**, la versión **Classic**.
* Esta escena es un centro para todos los ejemplos del paquete.
* Como es la *primera* escena que se carga, agreguemos un pequeño script para habilitar la autenticación de PlayFab con Photon.
2. Cree un **GameObject** vacío llamado **PlayFabAuthenticator**.
3. A continuación, en la ventana **Inspector de Unity**, agregue un componente con el mismo nombre a este **GameObject**.
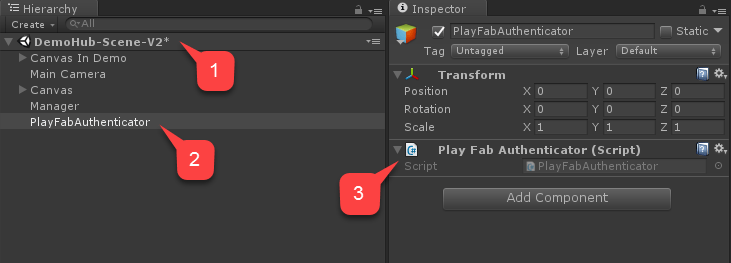 Seleccione el icono de engranaje y, a continuación, elija editar el script en el menú desplegable. Copie y pegue el código del componente `PlayFabAuthenticator`, y guarde y cierre el archivo.
```csharp theme={null}
using PlayFab;
using PlayFab.ClientModels;
using UnityEngine;
public class PlayFabAuthenticator : MonoBehaviour {
private string _playFabPlayerIdCache;
//Run the entire thing on awake
public void Awake() {
AuthenticateWithPlayFab();
}
/*
* Step 1
* We authenticate a current PlayFab user normally.
* In this case we use the LoginWithCustomID API call for simplicity.
* You can absolutely use any Login method you want.
* We use PlayFabSettings.DeviceUniqueIdentifier as our custom ID.
* We pass RequestPhotonToken as a callback to be our next step, if
* authentication was successful.
*/
private void AuthenticateWithPlayFab(){
LogMessage("PlayFab authenticating using Custom ID...");
PlayFabClientAPI.LoginWithCustomID(new LoginWithCustomIDRequest()
{
CreateAccount = true,
CustomId = PlayFabSettings.DeviceUniqueIdentifier
}, RequestPhotonToken, OnPlayFabError);
}
/*
* Step 2
* We request a Photon authentication token from PlayFab.
* This is a crucial step, because Photon uses different authentication tokens
* than PlayFab. Thus, you cannot directly use PlayFab SessionTicket and
* you need to explicitly request a token. This API call requires you to
* pass a Photon App ID. The App ID may be hard coded, but in this example,
* we are accessing it using convenient static field on PhotonNetwork class.
* We pass in AuthenticateWithPhoton as a callback to be our next step, if
* we have acquired the token successfully.
*/
private void RequestPhotonToken(LoginResult obj) {
LogMessage("PlayFab authenticated. Requesting photon token...");
//We can player PlayFabId. This will come in handy during next step
_playFabPlayerIdCache = obj.PlayFabId;
PlayFabClientAPI.GetPhotonAuthenticationToken(new GetPhotonAuthenticationTokenRequest()
{
PhotonApplicationId = PhotonNetwork.PhotonServerSettings.AppSettings.AppIdRealtime
}, AuthenticateWithPhoton, OnPlayFabError);
}
/*
* Step 3
* This is the final and the simplest step. We create a new AuthenticationValues instance.
* This class describes how to authenticate a player inside the Photon environment.
*/
private void AuthenticateWithPhoton(GetPhotonAuthenticationTokenResult obj) {
LogMessage("Photon token acquired: " + obj.PhotonCustomAuthenticationToken + " Authentication complete.");
//We set AuthType to custom, meaning we bring our own, PlayFab authentication procedure.
var customAuth = new Photon.Realtime.AuthenticationValues { AuthType = CustomAuthenticationType.Custom };
//We add "username" parameter. Do not let it confuse you: PlayFab is expecting this parameter to contain player PlayFab ID (!) and not username.
customAuth.AddAuthParameter("username", _playFabPlayerIdCache); // expected by PlayFab custom auth service
//We add "token" parameter. PlayFab expects it to contain Photon Authentication Token issues to your during previous step.
customAuth.AddAuthParameter("token", obj.PhotonCustomAuthenticationToken);
//We finally tell Photon to use this authentication parameters throughout the entire application.
PhotonNetwork.AuthValues = customAuth;
}
private void OnPlayFabError(PlayFabError obj) {
LogMessage(obj.GenerateErrorReport());
}
public void LogMessage(string message) {
Debug.Log("PlayFab + Photon Example: " + message);
}
}
```
## Prueba de la autenticación de PlayFab con Photon
1. Inicie la escena.
2. Inspeccione el flujo de mensajes de la consola.
Compruebe que:
3. La autenticación en PlayFab se realizó correctamente.
4. Se adquirió el token de Photon.
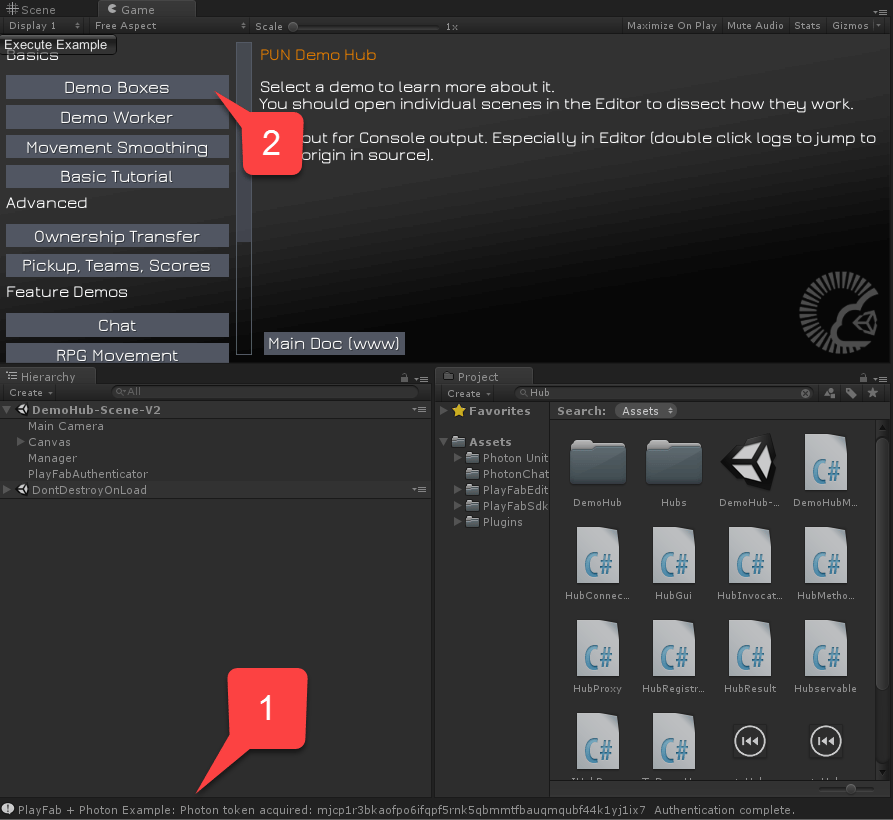
La siguiente imagen ilustra el flujo correcto.
Seleccione el icono de engranaje y, a continuación, elija editar el script en el menú desplegable. Copie y pegue el código del componente `PlayFabAuthenticator`, y guarde y cierre el archivo.
```csharp theme={null}
using PlayFab;
using PlayFab.ClientModels;
using UnityEngine;
public class PlayFabAuthenticator : MonoBehaviour {
private string _playFabPlayerIdCache;
//Run the entire thing on awake
public void Awake() {
AuthenticateWithPlayFab();
}
/*
* Step 1
* We authenticate a current PlayFab user normally.
* In this case we use the LoginWithCustomID API call for simplicity.
* You can absolutely use any Login method you want.
* We use PlayFabSettings.DeviceUniqueIdentifier as our custom ID.
* We pass RequestPhotonToken as a callback to be our next step, if
* authentication was successful.
*/
private void AuthenticateWithPlayFab(){
LogMessage("PlayFab authenticating using Custom ID...");
PlayFabClientAPI.LoginWithCustomID(new LoginWithCustomIDRequest()
{
CreateAccount = true,
CustomId = PlayFabSettings.DeviceUniqueIdentifier
}, RequestPhotonToken, OnPlayFabError);
}
/*
* Step 2
* We request a Photon authentication token from PlayFab.
* This is a crucial step, because Photon uses different authentication tokens
* than PlayFab. Thus, you cannot directly use PlayFab SessionTicket and
* you need to explicitly request a token. This API call requires you to
* pass a Photon App ID. The App ID may be hard coded, but in this example,
* we are accessing it using convenient static field on PhotonNetwork class.
* We pass in AuthenticateWithPhoton as a callback to be our next step, if
* we have acquired the token successfully.
*/
private void RequestPhotonToken(LoginResult obj) {
LogMessage("PlayFab authenticated. Requesting photon token...");
//We can player PlayFabId. This will come in handy during next step
_playFabPlayerIdCache = obj.PlayFabId;
PlayFabClientAPI.GetPhotonAuthenticationToken(new GetPhotonAuthenticationTokenRequest()
{
PhotonApplicationId = PhotonNetwork.PhotonServerSettings.AppSettings.AppIdRealtime
}, AuthenticateWithPhoton, OnPlayFabError);
}
/*
* Step 3
* This is the final and the simplest step. We create a new AuthenticationValues instance.
* This class describes how to authenticate a player inside the Photon environment.
*/
private void AuthenticateWithPhoton(GetPhotonAuthenticationTokenResult obj) {
LogMessage("Photon token acquired: " + obj.PhotonCustomAuthenticationToken + " Authentication complete.");
//We set AuthType to custom, meaning we bring our own, PlayFab authentication procedure.
var customAuth = new Photon.Realtime.AuthenticationValues { AuthType = CustomAuthenticationType.Custom };
//We add "username" parameter. Do not let it confuse you: PlayFab is expecting this parameter to contain player PlayFab ID (!) and not username.
customAuth.AddAuthParameter("username", _playFabPlayerIdCache); // expected by PlayFab custom auth service
//We add "token" parameter. PlayFab expects it to contain Photon Authentication Token issues to your during previous step.
customAuth.AddAuthParameter("token", obj.PhotonCustomAuthenticationToken);
//We finally tell Photon to use this authentication parameters throughout the entire application.
PhotonNetwork.AuthValues = customAuth;
}
private void OnPlayFabError(PlayFabError obj) {
LogMessage(obj.GenerateErrorReport());
}
public void LogMessage(string message) {
Debug.Log("PlayFab + Photon Example: " + message);
}
}
```
## Prueba de la autenticación de PlayFab con Photon
1. Inicie la escena.
2. Inspeccione el flujo de mensajes de la consola.
Compruebe que:
3. La autenticación en PlayFab se realizó correctamente.
4. Se adquirió el token de Photon.
La siguiente imagen ilustra el flujo correcto.
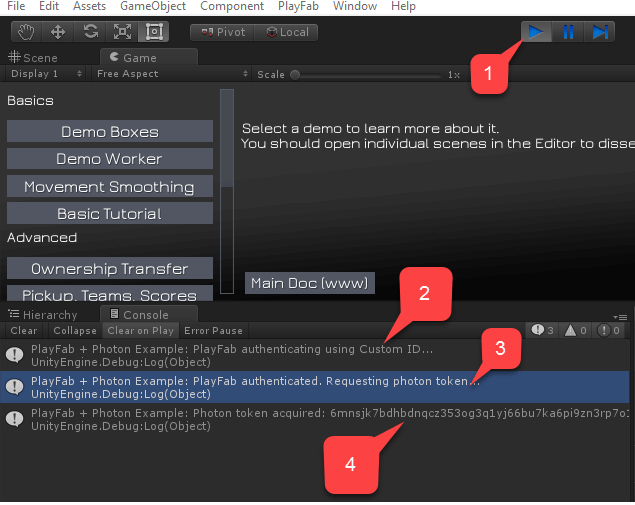 Una vez adquirido el token de Photon y completada la autenticación, podemos probar las demostraciones de Photon.
Por ejemplo, inicie una demostración llamada **Demo Boxes**.
5. Para asegurarse de que la autenticación de PlayFab se ha completado, seleccione **Demo Boxes**.
6. A continuación, seleccione **Load Demo**, como se muestra en la siguiente imagen.
Una vez adquirido el token de Photon y completada la autenticación, podemos probar las demostraciones de Photon.
Por ejemplo, inicie una demostración llamada **Demo Boxes**.
5. Para asegurarse de que la autenticación de PlayFab se ha completado, seleccione **Demo Boxes**.
6. A continuación, seleccione **Load Demo**, como se muestra en la siguiente imagen.
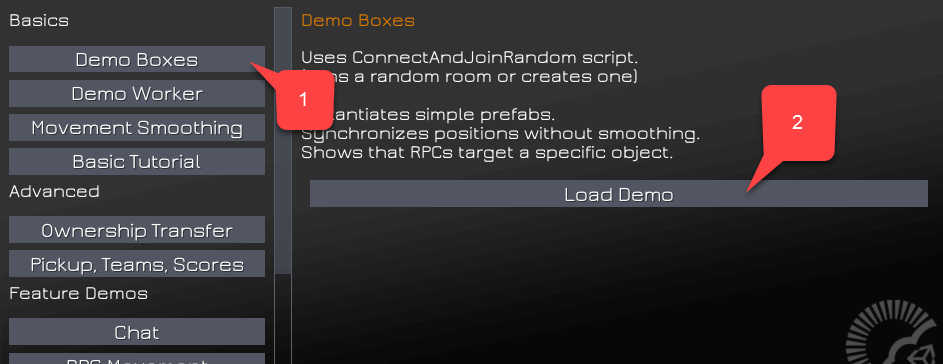 Photon comienza a generar mensajes de depuración. Al supervisar la consola, puede detectar fácilmente si tiene algún problema de autenticación.
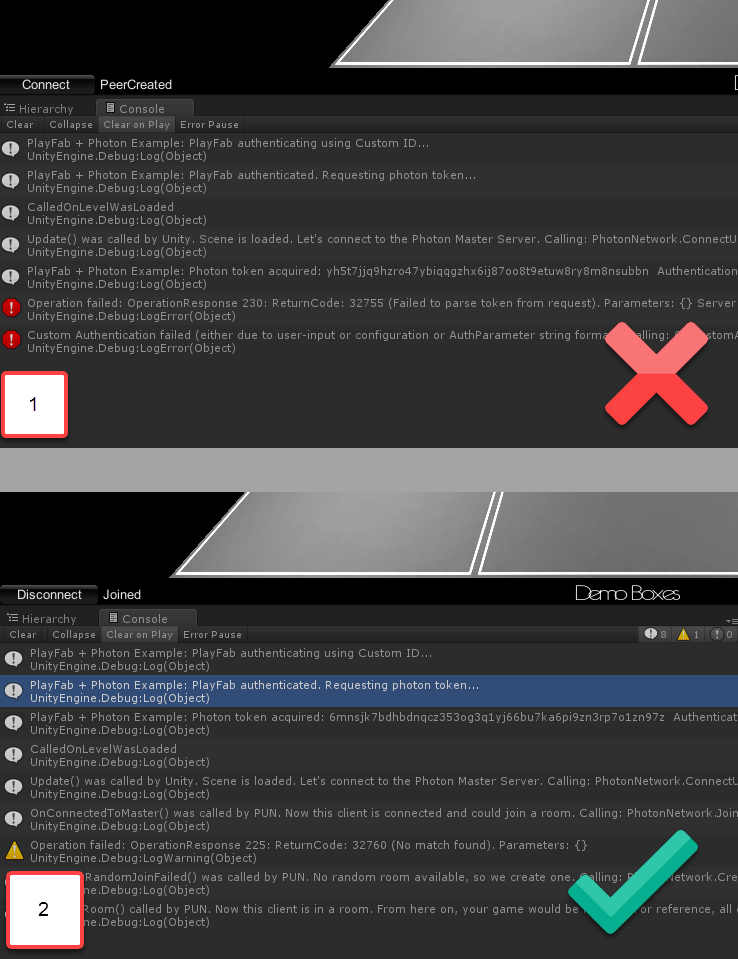 Asegúrese de que no haya errores de **Authentication Denied** en la consola. En este punto, ha configurado la integración mínima de PlayFab y Photon.
## Eventos de sala de Photon + CloudScript
El sistema de emparejamiento de Photon tiene el concepto de *sala*. Si no está familiarizado con este concepto, consulte la [guía de emparejamiento de Photon](https://doc.photonengine.com/realtime/current/lobby-and-matchmaking/matchmaking-and-lobby).
PlayFab le permite interceptar varios eventos de sala. Los siguientes eventos de sala solo requieren CloudScript para ser interceptados:
* `RoomCreated`
* `RoomJoined`
* `RoomLeft`
* `RoomClosed`
Los siguientes eventos requieren control adicional sobre el código de Unity para ser interceptados (los detalles se dan más adelante en este documento):
* `RoomPropertyUpdated`
* `RoomEventRaised`
Una vez que introduce un controlador para un evento de sala, este se convierte en una parte esencial del flujo de control de eventos. Por lo tanto, los errores producidos al ejecutar su CloudScript pueden causar problemas en *todo* el sistema. Por ejemplo, si el controlador `RoomCreated` produce un error, sus clientes también producirán un error y no podrán conectarse correctamente.
Construyamos un CloudScript de PlayFab definiendo un controlador para cada tipo de evento individualmente.
### Controlador de Room Created
El controlador `RoomCreated` se invoca cada vez que se crea una sala de Photon. El siguiente controlador de CloudScript intercepta dichos eventos.
```javascript theme={null}
// Triggered automatically when a Photon room is first created
handlers.RoomCreated = function (args) {
return { ResultCode : 0, Message: 'Success' };
};
```
Puede obtener más datos sobre el evento usando el argumento "args".
```json theme={null}
{
"ActorNr": 1,
"AppVersion": "1.2_1.85",
"AppId": "bfd5f98b-c6a4-4763-80d9-824d20db842b",
// Options with which the room was created.
"CreateOptions": {
"MaxPlayers": 4,
"LobbyId": null,
"LobbyType": 0,
"CustomProperties": {
},
"EmptyRoomTTL": 0,
"PlayerTTL": 0,
"CheckUserOnJoin": false,
"DeleteCacheOnLeave": true,
"SuppressRoomEvents": false,
"PublishUserId": false,
"ExpectedUsers": null
},
// Unique game identifier
"GameId": "8b8322de-096d-4481-a2b2-8db8bb45cfef",
"Region": "EU",
"Type": "Create",
// User that caused the room to be created
"UserId": "834D5AA5BAB1DFB6",
"Username": ""
}
```
### Controlador de Room Joined
El controlador `RoomJoined` se invoca cada vez que un jugador se une a la sala. El siguiente controlador de CloudScript intercepta este tipo de evento.
```javascript theme={null}
// Triggered automatically when a player joins a Photon room
handlers.RoomJoined = function (args) {
return { ResultCode : 0, Message: 'Success' };
};
```
Esta devolución de llamada no se invoca para el primer usuario que entra en la sala. Use `RoomCreated` para interceptar al primer jugador que se une. Puede obtener más datos sobre el evento usando el argumento "args".
```json theme={null}
{
"ActorNr": 2,
"AppVersion": "1.2_1.85",
"AppId": "bfd5f98b-c6a4-4763-80d9-824d20db842b",
// Unique Game Identifier
"GameId": "b0f55a2e-431d-402a-9809-b0240443267e",
"Region": "EU",
"Type": "Join",
// Id of the player that has joined
"UserId": "AAC7634BF46289DF",
"Username": ""
}
```
### Room left
El controlador `RoomLeft` se invoca cada vez que un jugador abandona la sala. El siguiente controlador de CloudScript intercepta este tipo de evento.
```javascript theme={null}
// Triggered automatically when a player leaves a Photon room
handlers.RoomLeft = function (args) {
return { ResultCode : 0, Message: 'Success' };
};
```
Puede obtener más datos sobre el evento usando el argumento "args".
```json theme={null}
{
"ActorNr": 2,
"AppVersion": "1.2_1.85",
"AppId": "bfd5f98b-c6a4-4763-80d9-824d20db842b",
// Unique Game Identifier
"GameId": "b0f55a2e-431d-402a-9809-b0240443267e",
"IsInactive": false,
"Reason": "0",
"Region": "EU",
"Type": "ClientDisconnect",
// Id of the user that has left the room
"UserId": "AAC7634BF46289DF",
"Username": ""
}
```
### Controlador de Room Closed
El controlador `RoomClosed` se invoca cada vez que el último jugador abandona la sala y no quedan jugadores en ella. El siguiente controlador de CloudScript intercepta este tipo de evento.
```javascript theme={null}
// Triggered automatically when a Photon room closes
// Note: currentPlayerId is undefined in this function
handlers.RoomClosed = function (args) {
return { ResultCode : 0, Message: 'Success' };
};
```
Puede obtener más datos sobre el evento usando el argumento "args".
```json theme={null}
"ActorCount": 0,
"ActorNr": 1,
"AppVersion": "1.2_1.85",
"AppId": "bfd5f98b-c6a4-4763-80d9-824d20db842b",
// Unique game identifier
"GameId": "b0f55a2e-431d-402a-9809-b0240443267e",
"Region": "EU",
"State2": {
"ActorList": [
]
},
"Type": "Close"
}
```
### Room Property Updated
El controlador `RoomPropertyUpdated` se invoca cada vez que se cambia una propiedad de la sala. El siguiente controlador de CloudScript intercepta este tipo de evento.
```javascript theme={null}
// Triggered automatically when a Photon room game property is updated.
// Note: currentPlayerId is undefined in this function
handlers.RoomPropertyUpdated = function (args) {
return { ResultCode : 0, Message: 'Success' };
};
```
`currentPlayerId` no está definido en este controlador. Si la propiedad de la sala se cambió desde el cliente, puede usar el argumento "args" y consultar UserId para obtener el jugador responsable.
Puede obtener más datos sobre el evento usando el argumento "args".
```json theme={null}
{
"ActorNr": 1,
"AppVersion": "1.2_1.85",
"AppId": "bfd5f98b-c6a4-4763-80d9-824d20db842b",
// Custom Room Properties
"Properties": {
"CustomProperty": "It's Value"
},
"GameId": "8b8322de-096d-4481-a2b2-8db8bb45cfef",
"Region": "EU",
"State": {
"ActorCounter": 1,
"ActorList": [
{
"ActorNr": 1,
"UserId": "834D5AA5BAB1DFB6",
"Username": "",
"IsActive": true,
"Binary": "RGIAAAEBRAAAAAFi\/3MAAA==",
"DEBUG_BINARY": {
"1": {
"255": ""
}
}
}
],
"Binary": {
"18": "RAAAAANi+nkAAHNzAA1QbGF5ZXJJbmRleGVzRGlpAAEAAAABAAAAAHMADkN1c3RvbVByb3BlcnR5cwAKSXQncyBWYWx1ZQ=="
},
"CheckUserOnJoin": false,
"CustomProperties": {
},
"DeleteCacheOnLeave": true,
"EmptyRoomTTL": 0,
"IsOpen": true,
"IsVisible": true,
"LobbyType": 0,
"LobbyProperties": [
],
"MaxPlayers": 4,
"PlayerTTL": 0,
"SuppressRoomEvents": false,
"Slice": 0,
"DebugInfo": {
"DEBUG_PROPERTIES_18": {
"250": [
],
"PlayerIndexes": {
"1": 0
},
"CustomProperty": "It's Value"
}
},
"ExcludedActors": [
],
"PublishUserId": false,
"ExpectedUsers": [
]
},
"Type": "Game",
"UserId": "834D5AA5BAB1DFB6",
"Username": ""
}
```
Al cambiar propiedades personalizadas de la sala usando el cliente de Photon para Unity, *es importante marcar la llamada* para que pase el evento al webhook (PlayFab en este caso).
```csharp theme={null}
// Properties updates ( this hashtable contains the properties to be changed. Properties not mentioned here will stay as is
var properties = new ExitGames.Client.Photon.Hashtable() { { "CustomProperty" , "It's Value" } };
// Control set. Empty in this case, because our property has not existed before.
// Otherwise you would include previous value of the property.
var expectedProperties = new ExitGames.Client.Photon.Hashtable();
// Set Custom Properties call. Notice the last argument set to "true"
// This tells Photon to forward event to the webhook.
PhotonNetwork.room.SetCustomProperties(properties, expectedProperties, true);
```
### Room Event Raised
El evento **Room Event Raised** se llama cada vez que se genera un evento de sala personalizado. El siguiente controlador de **CloudScript** intercepta este tipo de evento.
```javascript theme={null}
// Triggered by calling "OpRaiseEvent" on the Photon client. The "args.Data" property is
// set to the value of the "customEventContent" HashTable parameter, so you can use
// it to pass in arbitrary data.
handlers.RoomEventRaised= function (args) {
return { ResultCode : 0, Message: 'Success' };
};
```
Puede obtener más datos sobre el evento usando el argumento "args".
```json theme={null}
{
"ActorNr": 1,
"AppVersion": "1.2_1.85",
"AppId": "bfd5f98b-c6a4-4763-80d9-824d20db842b",
// Custom event data
"Data": {
"Hello": "World"
},
"GameId": "8b8322de-096d-4481-a2b2-8db8bb45cfef",
"Region": "EU",
"State": {
"ActorCounter": 1,
"ActorList": [
{
"ActorNr": 1,
"UserId": "834D5AA5BAB1DFB6",
"Username": "",
"IsActive": true,
"Binary": "RGIAAAEBRAAAAAFi\/3MAAA==",
"DEBUG_BINARY": {
"1": {
"255": ""
}
}
}
],
"Binary": {
"18": "RAAAAAJi+nkAAHNzAA1QbGF5ZXJJbmRleGVzRGlpAAEAAAABAAAAAA=="
},
"CheckUserOnJoin": false,
"CustomProperties": {
},
"DeleteCacheOnLeave": true,
"EmptyRoomTTL": 0,
"IsOpen": true,
"IsVisible": true,
"LobbyType": 0,
"LobbyProperties": [
],
"MaxPlayers": 4,
"PlayerTTL": 0,
"SuppressRoomEvents": false,
"Slice": 0,
"DebugInfo": {
"DEBUG_PROPERTIES_18": {
"250": [
],
"PlayerIndexes": {
"1": 0
}
}
},
"ExcludedActors": [
],
"PublishUserId": false,
"ExpectedUsers": [
]
},
"Type": "Event",
// PlayFab User Id if he/she was the source of the event
"UserId": "834D5AA5BAB1DFB6",
"Username": "",
// Event code
"EvCode": 15
}
```
Al generar eventos de sala personalizados usando el cliente de Photon para Unity, es importante marcar la llamada para que pase el evento a los webhooks (PlayFab en este caso).
```csharp theme={null}
var data = new Dictionary() {
{ "Hello" , "World" }
};
// Raise custom room event
// Replace 15 with any custom event code of your choice [0..299]
PhotonNetwork.RaiseEvent(15, data, true, new RaiseEventOptions() {
ForwardToWebhook = true, // Mark call to pass event to Webhook (PlayFab in this case)
});
```
## Prueba de los controladores de eventos de sala
Este ejemplo amplía el ejemplo anterior (autenticación de PlayFab + Photon).
Cargue el siguiente CloudScript para su título.
```javascript theme={null}
handlers.RoomCreated = function (args) {
server.WriteTitleEvent({
EventName : "room_created"
});
return { ResultCode : 0, Message: 'Success' };
};
handlers.RoomJoined = function (args) {
server.WriteTitleEvent({
EventName : "room_joined"
});
return { ResultCode : 0, Message: 'Success' };
};
handlers.RoomLeft = function (args) {
server.WriteTitleEvent({
EventName : "room_left"
});
return { ResultCode : 0, Message: 'Success' };
};
handlers.RoomClosed = function (args) {
server.WriteTitleEvent({
EventName : "room_closed"
});
return { ResultCode : 0, Message: 'Success' };
};
handlers.RoomPropertyUpdated = function (args) {
server.WriteTitleEvent({
EventName : "room_property_changed"
});
return { ResultCode : 0, Message: 'Success' };
};
handlers.RoomEventRaised = function (args) {
server.WriteTitleEvent({
EventName : "room_event_raised"
});
return { ResultCode : 0, Message: 'Success' };
};
```
El código no hace más que publicar un nuevo evento de título cada vez que se invoca una devolución de llamada de Photon. Aunque no tiene utilidad en producción, este ejemplo nos permite ver claramente cómo se invocan las devoluciones de llamada.
Amplíe el script `PlayFabAuthenticator` incluyendo un nuevo código de ejemplo que genere un evento personalizado y establezca una propiedad de sala personalizada. La versión ampliada también usa un método `Awake` para no destruir el objeto entre cargas de escenas.
```csharp theme={null}
using System.Collections.Generic;
using PlayFab;
using PlayFab.ClientModels;
using UnityEngine;
public class PlayFabAuthenticator : MonoBehaviour {
private string _playFabPlayerIdCache;
//Run the entire thing on awake
public void Awake() {
AuthenticateWithPlayFab();
DontDestroyOnLoad(gameObject);
}
/*
* Step 1
* We authenticate a current PlayFab user normally.
* In this case we use the LoginWithCustomID API call for simplicity.
* You can absolutely use any Login method you want.
* We use PlayFabSettings.DeviceUniqueIdentifier as our custom ID.
* We pass RequestPhotonToken as a callback to be our next step, if
* authentication was successful.
*/
private void AuthenticateWithPlayFab() {
LogMessage("PlayFab authenticating using Custom ID...");
PlayFabClientAPI.LoginWithCustomID(new LoginWithCustomIDRequest()
{
CreateAccount = true,
CustomId = PlayFabSettings.DeviceUniqueIdentifier+"EDITOR"
}, RequestPhotonToken, OnPlayFabError);
}
/*
* Step 2
* We request a Photon authentication token from PlayFab.
* This is a crucial step, because Photon uses different authentication tokens
* than PlayFab. Thus, you cannot directly use PlayFab SessionTicket and
* you need to explicitly request a token. This API call requires you to
* pass a Photon App ID. The App ID may be hard coded, but in this example,
* we are accessing it using convenient static field on PhotonNetwork class.
* We pass in AuthenticateWithPhoton as a callback to be our next step, if
* we have acquired the token successfully.
*/
private void RequestPhotonToken(LoginResult obj) {
LogMessage("PlayFab authenticated. Requesting photon token...");
//We can player PlayFabId. This will come in handy during next step
_playFabPlayerIdCache = obj.PlayFabId;
PlayFabClientAPI.GetPhotonAuthenticationToken(new GetPhotonAuthenticationTokenRequest()
{
PhotonApplicationId = PhotonNetwork.PhotonServerSettings.AppSettings.AppIdRealtime
}, AuthenticateWithPhoton, OnPlayFabError);
}
/*
* Step 3
* This is the final and the simplest step. We create a new AuthenticationValues instance.
* This class describes how to authenticate a player inside the Photon environment.
*/
private void AuthenticateWithPhoton(GetPhotonAuthenticationTokenResult obj) {
LogMessage("Photon token acquired: " + obj.PhotonCustomAuthenticationToken + " Authentication complete.");
//We set AuthType to custom, meaning we bring our own, PlayFab authentication procedure.
var customAuth = new Photon.Realtime.AuthenticationValues { AuthType = CustomAuthenticationType.Custom };
//We add "username" parameter. Do not let it confuse you: PlayFab is expecting this parameter to contain player PlayFab ID (!) and not username.
customAuth.AddAuthParameter("username", _playFabPlayerIdCache); // expected by PlayFab custom auth service
//We add "token" parameter. PlayFab expects it to contain Photon Authentication Token issues to your during previous step.
customAuth.AddAuthParameter("token", obj.PhotonCustomAuthenticationToken);
//We finally tell Photon to use this authentication parameters throughout the entire application.
PhotonNetwork.AuthValues = customAuth;
}
private void OnPlayFabError(PlayFabError obj) {
LogMessage(obj.ErrorMessage);
}
public void LogMessage(string message) {
Debug.Log("PlayFab + Photon Example: " + message);
}
// Add small button to launch our example code
public void OnGUI() {
if (GUILayout.Button("Execute Example ")) ExecuteExample();
}
// Example code which raises custom room event, then sets custom room property
private void ExecuteExample() {
// Raise custom room event
var data = new Dictionary() { {"Hello","World"} };
var result = PhotonNetwork.RaiseEvent(15, data, true, new RaiseEventOptions()
{
ForwardToWebhook = true,
});
LogMessage("New Room Event Post: "+result);
// Set custom room property
var properties = new ExitGames.Client.Photon.Hashtable() { { "CustomProperty", "It's Value" } };
var expectedProperties = new ExitGames.Client.Photon.Hashtable();
PhotonNetwork.room.SetCustomProperties(properties, expectedProperties, true);
LogMessage("New Room Properties Set");
}
}
```
* Ejecute la escena del centro y espere a que se complete la autenticación de PlayFab **(1)**.
* A continuación, cargue la escena **Boxes Demo** **(2)**.
Asegúrese de que no haya errores de **Authentication Denied** en la consola. En este punto, ha configurado la integración mínima de PlayFab y Photon.
## Eventos de sala de Photon + CloudScript
El sistema de emparejamiento de Photon tiene el concepto de *sala*. Si no está familiarizado con este concepto, consulte la [guía de emparejamiento de Photon](https://doc.photonengine.com/realtime/current/lobby-and-matchmaking/matchmaking-and-lobby).
PlayFab le permite interceptar varios eventos de sala. Los siguientes eventos de sala solo requieren CloudScript para ser interceptados:
* `RoomCreated`
* `RoomJoined`
* `RoomLeft`
* `RoomClosed`
Los siguientes eventos requieren control adicional sobre el código de Unity para ser interceptados (los detalles se dan más adelante en este documento):
* `RoomPropertyUpdated`
* `RoomEventRaised`
Una vez que introduce un controlador para un evento de sala, este se convierte en una parte esencial del flujo de control de eventos. Por lo tanto, los errores producidos al ejecutar su CloudScript pueden causar problemas en *todo* el sistema. Por ejemplo, si el controlador `RoomCreated` produce un error, sus clientes también producirán un error y no podrán conectarse correctamente.
Construyamos un CloudScript de PlayFab definiendo un controlador para cada tipo de evento individualmente.
### Controlador de Room Created
El controlador `RoomCreated` se invoca cada vez que se crea una sala de Photon. El siguiente controlador de CloudScript intercepta dichos eventos.
```javascript theme={null}
// Triggered automatically when a Photon room is first created
handlers.RoomCreated = function (args) {
return { ResultCode : 0, Message: 'Success' };
};
```
Puede obtener más datos sobre el evento usando el argumento "args".
```json theme={null}
{
"ActorNr": 1,
"AppVersion": "1.2_1.85",
"AppId": "bfd5f98b-c6a4-4763-80d9-824d20db842b",
// Options with which the room was created.
"CreateOptions": {
"MaxPlayers": 4,
"LobbyId": null,
"LobbyType": 0,
"CustomProperties": {
},
"EmptyRoomTTL": 0,
"PlayerTTL": 0,
"CheckUserOnJoin": false,
"DeleteCacheOnLeave": true,
"SuppressRoomEvents": false,
"PublishUserId": false,
"ExpectedUsers": null
},
// Unique game identifier
"GameId": "8b8322de-096d-4481-a2b2-8db8bb45cfef",
"Region": "EU",
"Type": "Create",
// User that caused the room to be created
"UserId": "834D5AA5BAB1DFB6",
"Username": ""
}
```
### Controlador de Room Joined
El controlador `RoomJoined` se invoca cada vez que un jugador se une a la sala. El siguiente controlador de CloudScript intercepta este tipo de evento.
```javascript theme={null}
// Triggered automatically when a player joins a Photon room
handlers.RoomJoined = function (args) {
return { ResultCode : 0, Message: 'Success' };
};
```
Esta devolución de llamada no se invoca para el primer usuario que entra en la sala. Use `RoomCreated` para interceptar al primer jugador que se une. Puede obtener más datos sobre el evento usando el argumento "args".
```json theme={null}
{
"ActorNr": 2,
"AppVersion": "1.2_1.85",
"AppId": "bfd5f98b-c6a4-4763-80d9-824d20db842b",
// Unique Game Identifier
"GameId": "b0f55a2e-431d-402a-9809-b0240443267e",
"Region": "EU",
"Type": "Join",
// Id of the player that has joined
"UserId": "AAC7634BF46289DF",
"Username": ""
}
```
### Room left
El controlador `RoomLeft` se invoca cada vez que un jugador abandona la sala. El siguiente controlador de CloudScript intercepta este tipo de evento.
```javascript theme={null}
// Triggered automatically when a player leaves a Photon room
handlers.RoomLeft = function (args) {
return { ResultCode : 0, Message: 'Success' };
};
```
Puede obtener más datos sobre el evento usando el argumento "args".
```json theme={null}
{
"ActorNr": 2,
"AppVersion": "1.2_1.85",
"AppId": "bfd5f98b-c6a4-4763-80d9-824d20db842b",
// Unique Game Identifier
"GameId": "b0f55a2e-431d-402a-9809-b0240443267e",
"IsInactive": false,
"Reason": "0",
"Region": "EU",
"Type": "ClientDisconnect",
// Id of the user that has left the room
"UserId": "AAC7634BF46289DF",
"Username": ""
}
```
### Controlador de Room Closed
El controlador `RoomClosed` se invoca cada vez que el último jugador abandona la sala y no quedan jugadores en ella. El siguiente controlador de CloudScript intercepta este tipo de evento.
```javascript theme={null}
// Triggered automatically when a Photon room closes
// Note: currentPlayerId is undefined in this function
handlers.RoomClosed = function (args) {
return { ResultCode : 0, Message: 'Success' };
};
```
Puede obtener más datos sobre el evento usando el argumento "args".
```json theme={null}
"ActorCount": 0,
"ActorNr": 1,
"AppVersion": "1.2_1.85",
"AppId": "bfd5f98b-c6a4-4763-80d9-824d20db842b",
// Unique game identifier
"GameId": "b0f55a2e-431d-402a-9809-b0240443267e",
"Region": "EU",
"State2": {
"ActorList": [
]
},
"Type": "Close"
}
```
### Room Property Updated
El controlador `RoomPropertyUpdated` se invoca cada vez que se cambia una propiedad de la sala. El siguiente controlador de CloudScript intercepta este tipo de evento.
```javascript theme={null}
// Triggered automatically when a Photon room game property is updated.
// Note: currentPlayerId is undefined in this function
handlers.RoomPropertyUpdated = function (args) {
return { ResultCode : 0, Message: 'Success' };
};
```
`currentPlayerId` no está definido en este controlador. Si la propiedad de la sala se cambió desde el cliente, puede usar el argumento "args" y consultar UserId para obtener el jugador responsable.
Puede obtener más datos sobre el evento usando el argumento "args".
```json theme={null}
{
"ActorNr": 1,
"AppVersion": "1.2_1.85",
"AppId": "bfd5f98b-c6a4-4763-80d9-824d20db842b",
// Custom Room Properties
"Properties": {
"CustomProperty": "It's Value"
},
"GameId": "8b8322de-096d-4481-a2b2-8db8bb45cfef",
"Region": "EU",
"State": {
"ActorCounter": 1,
"ActorList": [
{
"ActorNr": 1,
"UserId": "834D5AA5BAB1DFB6",
"Username": "",
"IsActive": true,
"Binary": "RGIAAAEBRAAAAAFi\/3MAAA==",
"DEBUG_BINARY": {
"1": {
"255": ""
}
}
}
],
"Binary": {
"18": "RAAAAANi+nkAAHNzAA1QbGF5ZXJJbmRleGVzRGlpAAEAAAABAAAAAHMADkN1c3RvbVByb3BlcnR5cwAKSXQncyBWYWx1ZQ=="
},
"CheckUserOnJoin": false,
"CustomProperties": {
},
"DeleteCacheOnLeave": true,
"EmptyRoomTTL": 0,
"IsOpen": true,
"IsVisible": true,
"LobbyType": 0,
"LobbyProperties": [
],
"MaxPlayers": 4,
"PlayerTTL": 0,
"SuppressRoomEvents": false,
"Slice": 0,
"DebugInfo": {
"DEBUG_PROPERTIES_18": {
"250": [
],
"PlayerIndexes": {
"1": 0
},
"CustomProperty": "It's Value"
}
},
"ExcludedActors": [
],
"PublishUserId": false,
"ExpectedUsers": [
]
},
"Type": "Game",
"UserId": "834D5AA5BAB1DFB6",
"Username": ""
}
```
Al cambiar propiedades personalizadas de la sala usando el cliente de Photon para Unity, *es importante marcar la llamada* para que pase el evento al webhook (PlayFab en este caso).
```csharp theme={null}
// Properties updates ( this hashtable contains the properties to be changed. Properties not mentioned here will stay as is
var properties = new ExitGames.Client.Photon.Hashtable() { { "CustomProperty" , "It's Value" } };
// Control set. Empty in this case, because our property has not existed before.
// Otherwise you would include previous value of the property.
var expectedProperties = new ExitGames.Client.Photon.Hashtable();
// Set Custom Properties call. Notice the last argument set to "true"
// This tells Photon to forward event to the webhook.
PhotonNetwork.room.SetCustomProperties(properties, expectedProperties, true);
```
### Room Event Raised
El evento **Room Event Raised** se llama cada vez que se genera un evento de sala personalizado. El siguiente controlador de **CloudScript** intercepta este tipo de evento.
```javascript theme={null}
// Triggered by calling "OpRaiseEvent" on the Photon client. The "args.Data" property is
// set to the value of the "customEventContent" HashTable parameter, so you can use
// it to pass in arbitrary data.
handlers.RoomEventRaised= function (args) {
return { ResultCode : 0, Message: 'Success' };
};
```
Puede obtener más datos sobre el evento usando el argumento "args".
```json theme={null}
{
"ActorNr": 1,
"AppVersion": "1.2_1.85",
"AppId": "bfd5f98b-c6a4-4763-80d9-824d20db842b",
// Custom event data
"Data": {
"Hello": "World"
},
"GameId": "8b8322de-096d-4481-a2b2-8db8bb45cfef",
"Region": "EU",
"State": {
"ActorCounter": 1,
"ActorList": [
{
"ActorNr": 1,
"UserId": "834D5AA5BAB1DFB6",
"Username": "",
"IsActive": true,
"Binary": "RGIAAAEBRAAAAAFi\/3MAAA==",
"DEBUG_BINARY": {
"1": {
"255": ""
}
}
}
],
"Binary": {
"18": "RAAAAAJi+nkAAHNzAA1QbGF5ZXJJbmRleGVzRGlpAAEAAAABAAAAAA=="
},
"CheckUserOnJoin": false,
"CustomProperties": {
},
"DeleteCacheOnLeave": true,
"EmptyRoomTTL": 0,
"IsOpen": true,
"IsVisible": true,
"LobbyType": 0,
"LobbyProperties": [
],
"MaxPlayers": 4,
"PlayerTTL": 0,
"SuppressRoomEvents": false,
"Slice": 0,
"DebugInfo": {
"DEBUG_PROPERTIES_18": {
"250": [
],
"PlayerIndexes": {
"1": 0
}
}
},
"ExcludedActors": [
],
"PublishUserId": false,
"ExpectedUsers": [
]
},
"Type": "Event",
// PlayFab User Id if he/she was the source of the event
"UserId": "834D5AA5BAB1DFB6",
"Username": "",
// Event code
"EvCode": 15
}
```
Al generar eventos de sala personalizados usando el cliente de Photon para Unity, es importante marcar la llamada para que pase el evento a los webhooks (PlayFab en este caso).
```csharp theme={null}
var data = new Dictionary() {
{ "Hello" , "World" }
};
// Raise custom room event
// Replace 15 with any custom event code of your choice [0..299]
PhotonNetwork.RaiseEvent(15, data, true, new RaiseEventOptions() {
ForwardToWebhook = true, // Mark call to pass event to Webhook (PlayFab in this case)
});
```
## Prueba de los controladores de eventos de sala
Este ejemplo amplía el ejemplo anterior (autenticación de PlayFab + Photon).
Cargue el siguiente CloudScript para su título.
```javascript theme={null}
handlers.RoomCreated = function (args) {
server.WriteTitleEvent({
EventName : "room_created"
});
return { ResultCode : 0, Message: 'Success' };
};
handlers.RoomJoined = function (args) {
server.WriteTitleEvent({
EventName : "room_joined"
});
return { ResultCode : 0, Message: 'Success' };
};
handlers.RoomLeft = function (args) {
server.WriteTitleEvent({
EventName : "room_left"
});
return { ResultCode : 0, Message: 'Success' };
};
handlers.RoomClosed = function (args) {
server.WriteTitleEvent({
EventName : "room_closed"
});
return { ResultCode : 0, Message: 'Success' };
};
handlers.RoomPropertyUpdated = function (args) {
server.WriteTitleEvent({
EventName : "room_property_changed"
});
return { ResultCode : 0, Message: 'Success' };
};
handlers.RoomEventRaised = function (args) {
server.WriteTitleEvent({
EventName : "room_event_raised"
});
return { ResultCode : 0, Message: 'Success' };
};
```
El código no hace más que publicar un nuevo evento de título cada vez que se invoca una devolución de llamada de Photon. Aunque no tiene utilidad en producción, este ejemplo nos permite ver claramente cómo se invocan las devoluciones de llamada.
Amplíe el script `PlayFabAuthenticator` incluyendo un nuevo código de ejemplo que genere un evento personalizado y establezca una propiedad de sala personalizada. La versión ampliada también usa un método `Awake` para no destruir el objeto entre cargas de escenas.
```csharp theme={null}
using System.Collections.Generic;
using PlayFab;
using PlayFab.ClientModels;
using UnityEngine;
public class PlayFabAuthenticator : MonoBehaviour {
private string _playFabPlayerIdCache;
//Run the entire thing on awake
public void Awake() {
AuthenticateWithPlayFab();
DontDestroyOnLoad(gameObject);
}
/*
* Step 1
* We authenticate a current PlayFab user normally.
* In this case we use the LoginWithCustomID API call for simplicity.
* You can absolutely use any Login method you want.
* We use PlayFabSettings.DeviceUniqueIdentifier as our custom ID.
* We pass RequestPhotonToken as a callback to be our next step, if
* authentication was successful.
*/
private void AuthenticateWithPlayFab() {
LogMessage("PlayFab authenticating using Custom ID...");
PlayFabClientAPI.LoginWithCustomID(new LoginWithCustomIDRequest()
{
CreateAccount = true,
CustomId = PlayFabSettings.DeviceUniqueIdentifier+"EDITOR"
}, RequestPhotonToken, OnPlayFabError);
}
/*
* Step 2
* We request a Photon authentication token from PlayFab.
* This is a crucial step, because Photon uses different authentication tokens
* than PlayFab. Thus, you cannot directly use PlayFab SessionTicket and
* you need to explicitly request a token. This API call requires you to
* pass a Photon App ID. The App ID may be hard coded, but in this example,
* we are accessing it using convenient static field on PhotonNetwork class.
* We pass in AuthenticateWithPhoton as a callback to be our next step, if
* we have acquired the token successfully.
*/
private void RequestPhotonToken(LoginResult obj) {
LogMessage("PlayFab authenticated. Requesting photon token...");
//We can player PlayFabId. This will come in handy during next step
_playFabPlayerIdCache = obj.PlayFabId;
PlayFabClientAPI.GetPhotonAuthenticationToken(new GetPhotonAuthenticationTokenRequest()
{
PhotonApplicationId = PhotonNetwork.PhotonServerSettings.AppSettings.AppIdRealtime
}, AuthenticateWithPhoton, OnPlayFabError);
}
/*
* Step 3
* This is the final and the simplest step. We create a new AuthenticationValues instance.
* This class describes how to authenticate a player inside the Photon environment.
*/
private void AuthenticateWithPhoton(GetPhotonAuthenticationTokenResult obj) {
LogMessage("Photon token acquired: " + obj.PhotonCustomAuthenticationToken + " Authentication complete.");
//We set AuthType to custom, meaning we bring our own, PlayFab authentication procedure.
var customAuth = new Photon.Realtime.AuthenticationValues { AuthType = CustomAuthenticationType.Custom };
//We add "username" parameter. Do not let it confuse you: PlayFab is expecting this parameter to contain player PlayFab ID (!) and not username.
customAuth.AddAuthParameter("username", _playFabPlayerIdCache); // expected by PlayFab custom auth service
//We add "token" parameter. PlayFab expects it to contain Photon Authentication Token issues to your during previous step.
customAuth.AddAuthParameter("token", obj.PhotonCustomAuthenticationToken);
//We finally tell Photon to use this authentication parameters throughout the entire application.
PhotonNetwork.AuthValues = customAuth;
}
private void OnPlayFabError(PlayFabError obj) {
LogMessage(obj.ErrorMessage);
}
public void LogMessage(string message) {
Debug.Log("PlayFab + Photon Example: " + message);
}
// Add small button to launch our example code
public void OnGUI() {
if (GUILayout.Button("Execute Example ")) ExecuteExample();
}
// Example code which raises custom room event, then sets custom room property
private void ExecuteExample() {
// Raise custom room event
var data = new Dictionary() { {"Hello","World"} };
var result = PhotonNetwork.RaiseEvent(15, data, true, new RaiseEventOptions()
{
ForwardToWebhook = true,
});
LogMessage("New Room Event Post: "+result);
// Set custom room property
var properties = new ExitGames.Client.Photon.Hashtable() { { "CustomProperty", "It's Value" } };
var expectedProperties = new ExitGames.Client.Photon.Hashtable();
PhotonNetwork.room.SetCustomProperties(properties, expectedProperties, true);
LogMessage("New Room Properties Set");
}
}
```
* Ejecute la escena del centro y espere a que se complete la autenticación de PlayFab **(1)**.
* A continuación, cargue la escena **Boxes Demo** **(2)**.
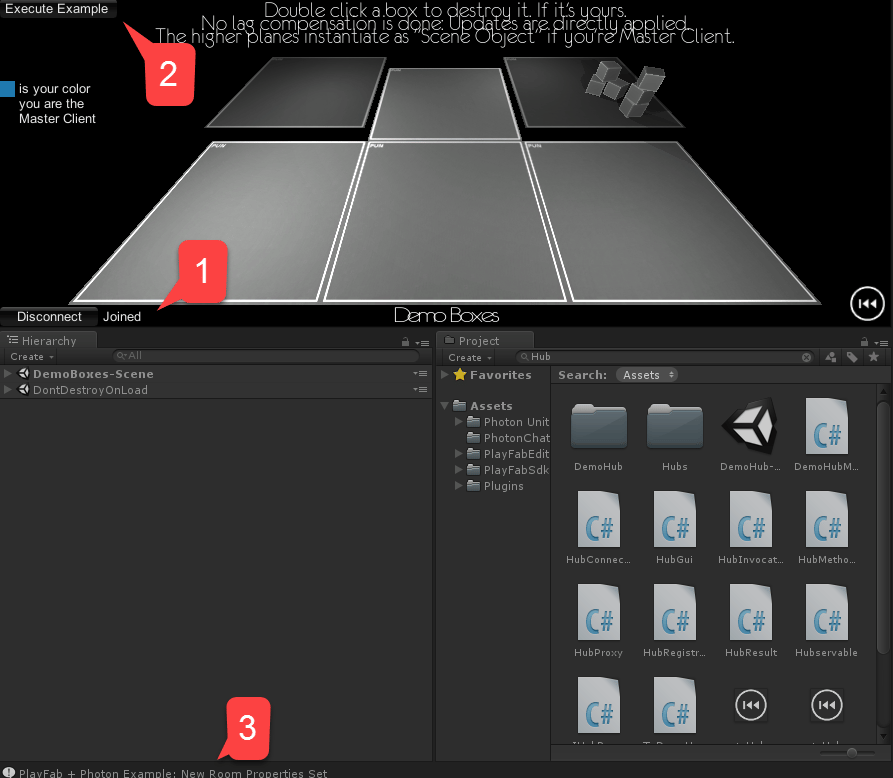
 * Una vez cargada la escena, espere a que el par se conecte a la sala recién creada **(1)**.
* A continuación, seleccione **Execute Example** en la esquina superior izquierda **(2)**.
* Observe la salida de la consola **(3)**.
* Asegúrese de que no se haya producido ningún error.
* Una vez cargada la escena, espere a que el par se conecte a la sala recién creada **(1)**.
* A continuación, seleccione **Execute Example** en la esquina superior izquierda **(2)**.
* Observe la salida de la consola **(3)**.
* Asegúrese de que no se haya producido ningún error.
 No olvide detener la reproducción en Unity. Esto se hace para asegurarnos de que también recibimos los eventos **RoomLeft** y **RoomClosed**.
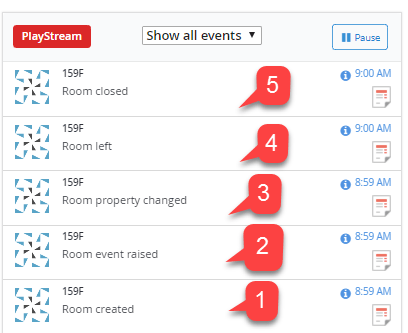
Vaya a la página de Game Manager del título y observe el panel de **PlayStream**. Debería poder ver los eventos generados como resultado de nuestro código de CloudScript que controla los eventos de Photon.
1. Inicialmente, nuestra instancia de Photon no tenía ninguna sala abierta. Cuando iniciamos el ejemplo, Photon creó la sala para la Boxes Demo.
2. El primer jugador en unirse es el jugador que solicitó la sala. Por lo tanto, no se registró ningún evento **RoomJoined**. A continuación, ejecutamos nuestro código de ejemplo:
* Primero, generamos un **evento de sala** personalizado.
* Después, establecimos una **propiedad de sala** personalizada.
* Luego detuvimos el modo de reproducción de Unity. Esto hizo que nuestro cliente abandonara la sala.
3. Como nuestro cliente desconectado era el último, no quedan más clientes y Photon cierra la sala.
Todos los eventos deberían quedar registrados en el flujo de eventos de PlayStream, como se muestra en la siguiente imagen.
No olvide detener la reproducción en Unity. Esto se hace para asegurarnos de que también recibimos los eventos **RoomLeft** y **RoomClosed**.
Vaya a la página de Game Manager del título y observe el panel de **PlayStream**. Debería poder ver los eventos generados como resultado de nuestro código de CloudScript que controla los eventos de Photon.
1. Inicialmente, nuestra instancia de Photon no tenía ninguna sala abierta. Cuando iniciamos el ejemplo, Photon creó la sala para la Boxes Demo.
2. El primer jugador en unirse es el jugador que solicitó la sala. Por lo tanto, no se registró ningún evento **RoomJoined**. A continuación, ejecutamos nuestro código de ejemplo:
* Primero, generamos un **evento de sala** personalizado.
* Después, establecimos una **propiedad de sala** personalizada.
* Luego detuvimos el modo de reproducción de Unity. Esto hizo que nuestro cliente abandonara la sala.
3. Como nuestro cliente desconectado era el último, no quedan más clientes y Photon cierra la sala.
Todos los eventos deberían quedar registrados en el flujo de eventos de PlayStream, como se muestra en la siguiente imagen.
 En este punto, ha integrado por completo la compatibilidad con eventos de Photon en su título de PlayFab.
## Related topics
- [Inicio rápido de Linux](/es/services/playfab/sdks/c/quickstart-linux.md)
- [Inicio rápido de iOS](/es/services/playfab/sdks/c/quickstart-ios.md)
- [Inicio rápido de Win32](/es/services/playfab/sdks/c/quickstart-win32.md)
- [Inicio rápido de Android](/es/services/playfab/sdks/c/quickstart-android.md)
- [Inicio rápido de Matchmaking](/es/services/playfab/multiplayer/matchmaking/quickstart.md)
En este punto, ha integrado por completo la compatibilidad con eventos de Photon en su título de PlayFab.
## Related topics
- [Inicio rápido de Linux](/es/services/playfab/sdks/c/quickstart-linux.md)
- [Inicio rápido de iOS](/es/services/playfab/sdks/c/quickstart-ios.md)
- [Inicio rápido de Win32](/es/services/playfab/sdks/c/quickstart-win32.md)
- [Inicio rápido de Android](/es/services/playfab/sdks/c/quickstart-android.md)
- [Inicio rápido de Matchmaking](/es/services/playfab/multiplayer/matchmaking/quickstart.md)