> ## Documentation Index
> Fetch the complete documentation index at: https://devdocs.xbox.com/llms.txt
> Use this file to discover all available pages before exploring further.
# Configuración de la autenticación de PlayFab con Google y HTML5
> Tutorial paso a paso para agregar el inicio de sesión de Google a un título de PlayFab mediante HTML5 y JavaScript, que abarca la configuración de la API de Google y la autenticación de jugadores con OAuth.
Este tutorial le guía a través del proceso de autenticación de PlayFab con Google y HTML5/JavaScript.
## Requisitos
Necesitará:
* Una [cuenta de Google](https://google.com/) para realizar pruebas.
* Un título de `[PlayFab](https://developer.playfab.com/)` registrado.
* Familiaridad con [Conceptos básicos de inicio de sesión y procedimientos recomendados](/services/playfab/identity/player-identity/login/login-basics-best-practices).
* Como mínimo, un servidor con un nombre de dominio válido que actúe como archivo HTML estático. Consulte el tutorial [Ejecución de un servidor HTTP para pruebas](/services/playfab/identity/player-identity/platform-specific-authentication/running-an-http-server-for-testing) para obtener información sobre cómo configurar uno.
## Servidor y dominio
Para seguir esta guía se necesita un servidor con un dominio válido. Si aún no tiene un dominio registrado y un servidor web remoto, siga nuestro tutorial [Ejecución de un servidor HTTP para pruebas](/services/playfab/identity/player-identity/platform-specific-authentication/running-an-http-server-for-testing) para obtener información sobre cómo configurar uno para ejecutar un servidor web local con un nombre de dominio válido.
A lo largo de esta guía, supondremos que su dominio es `[http://playfab.example](http://playfab.example)`.
## Registro de un proyecto de la API de Google
Comience por ir a la [consola de la API de Google](https://console.developers.google.com/):
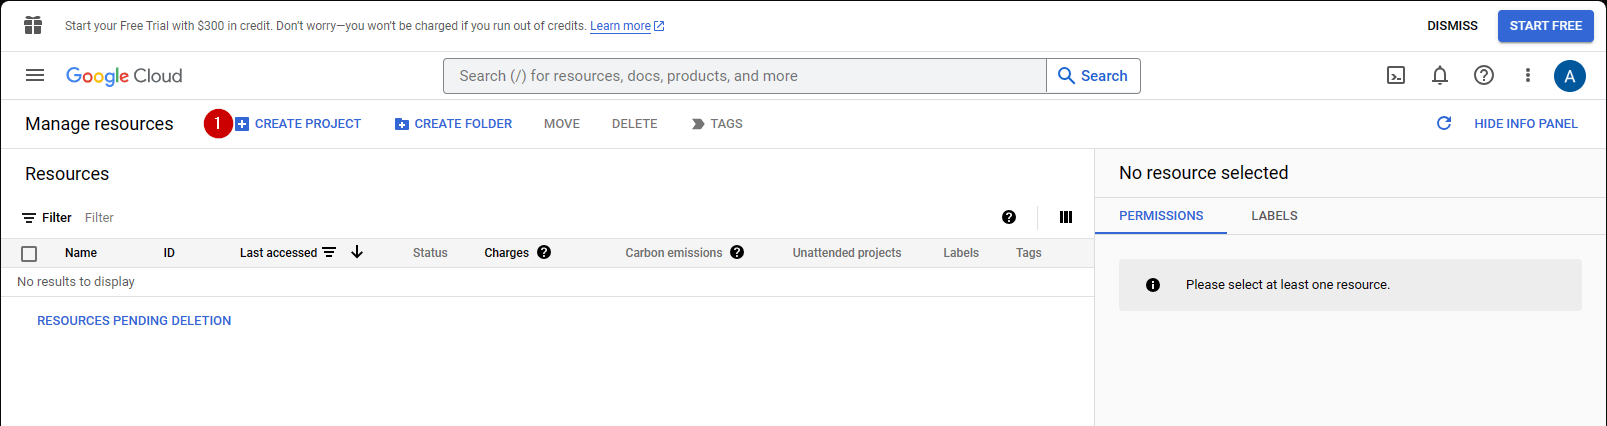
1. Vaya a **CREATE PROJECT** y selecciónelo.
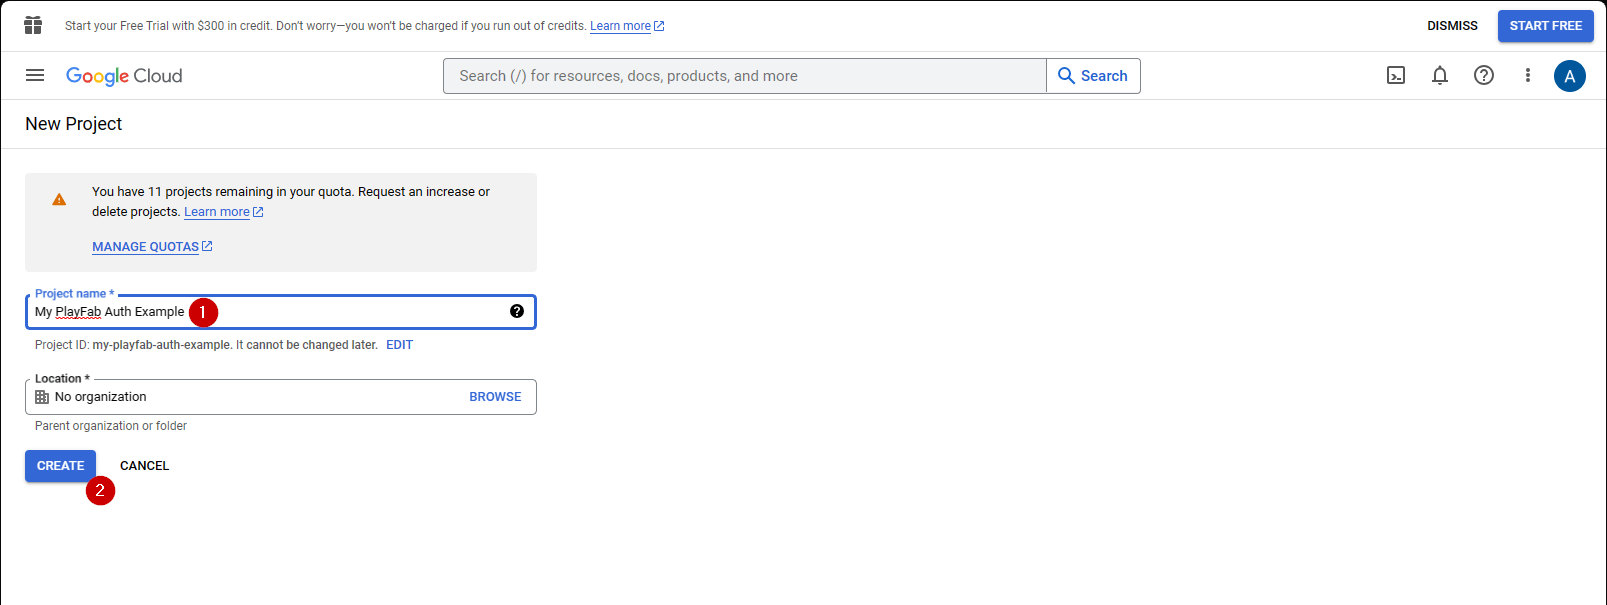
1. Rellene el campo situado bajo **Project Name**.
2. Seleccione el botón **Create**.
Es normal que el **Administrador de API** tarde entre 10 y 20 segundos en generar el proyecto.
Una vez creado el proyecto:
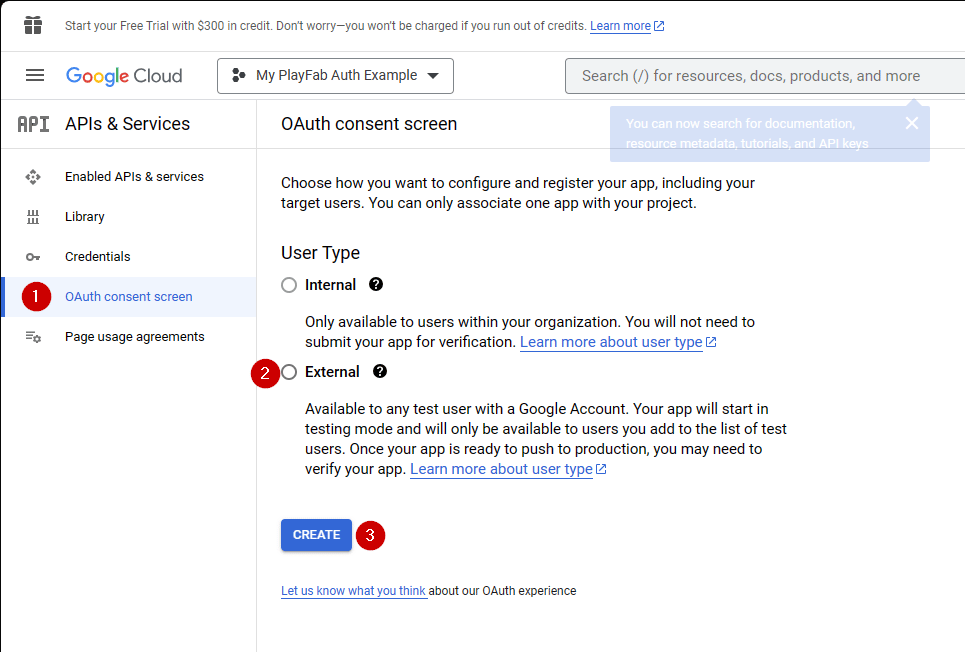
1. Vaya a la **pantalla de consentimiento de OAuth**.
2. Seleccione **External** en User Type.
3. A continuación, seleccione **Create**.
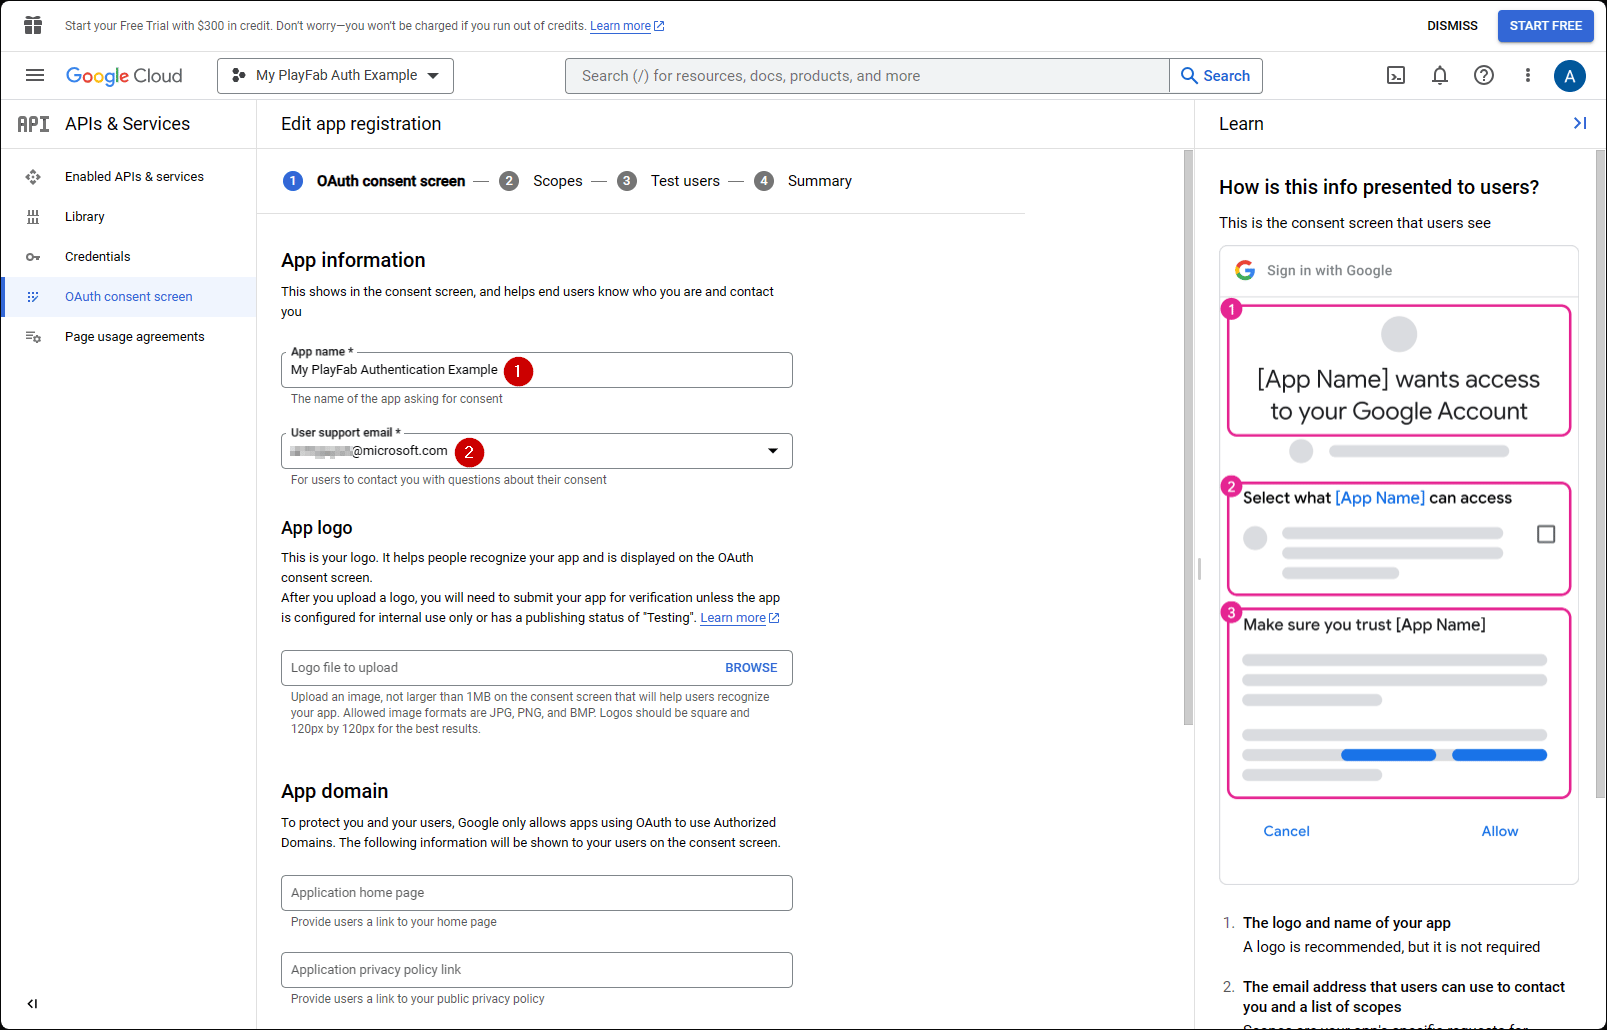
1. Rellene un nombre de aplicación.
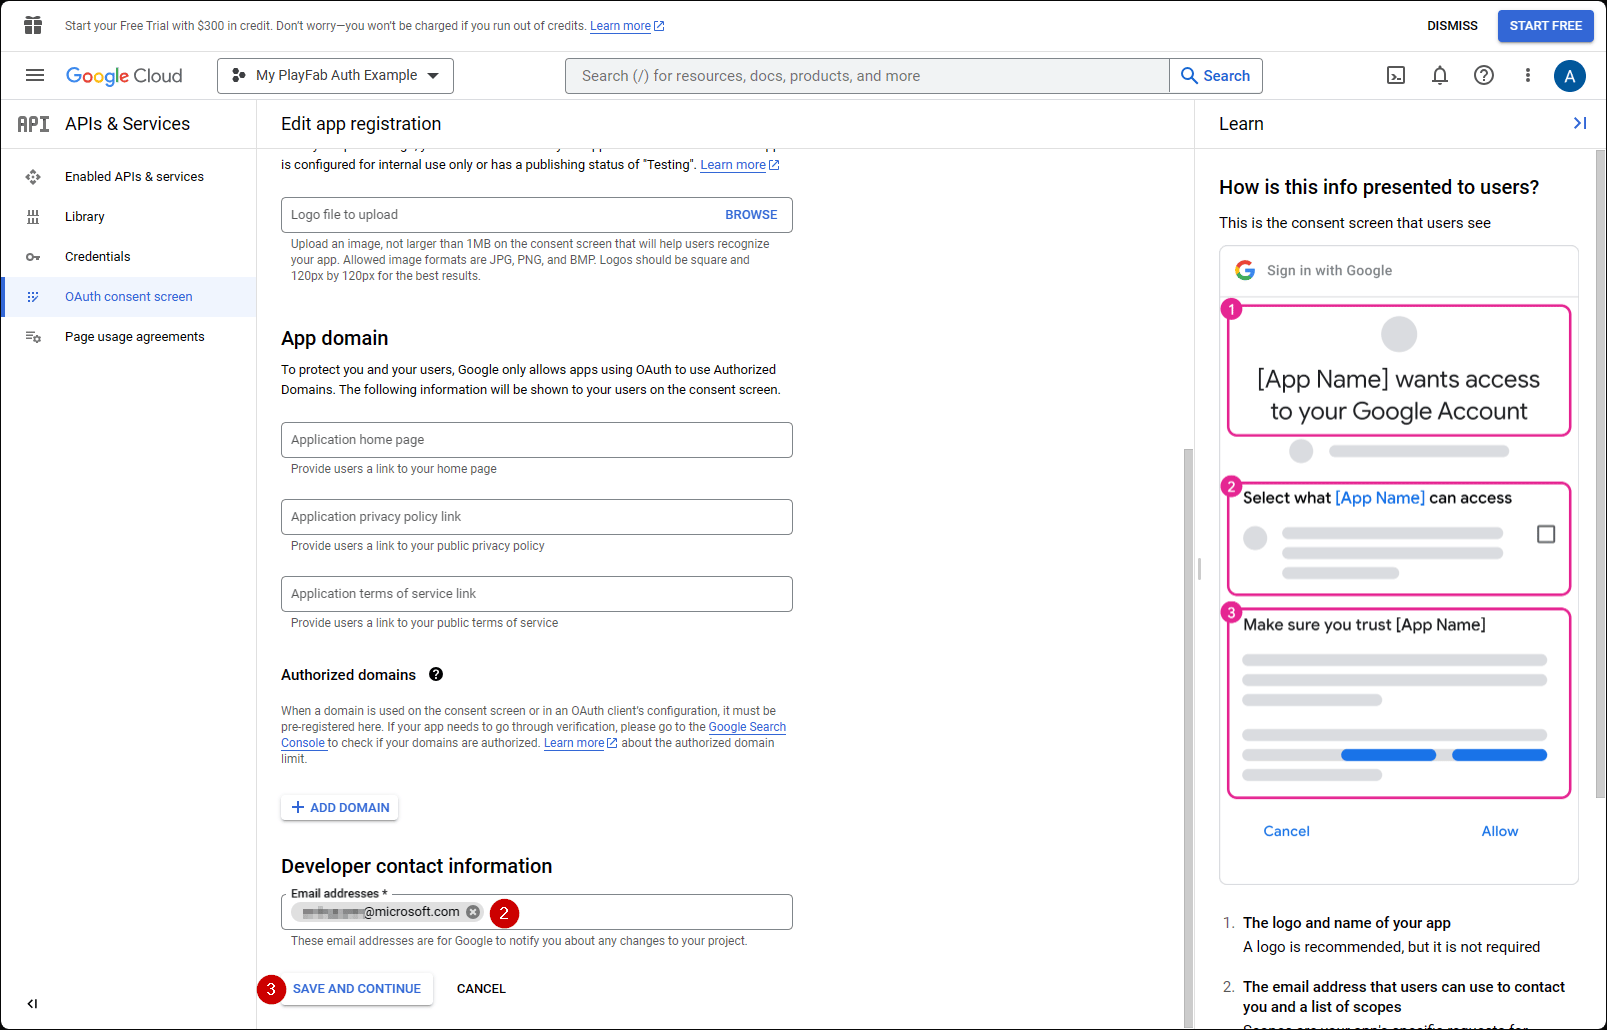
2. Asegúrese de que hay correos electrónicos en **user support email** y **Developer Contact Email**.
3. A continuación, seleccione **SAVE AND CONTINUE**.
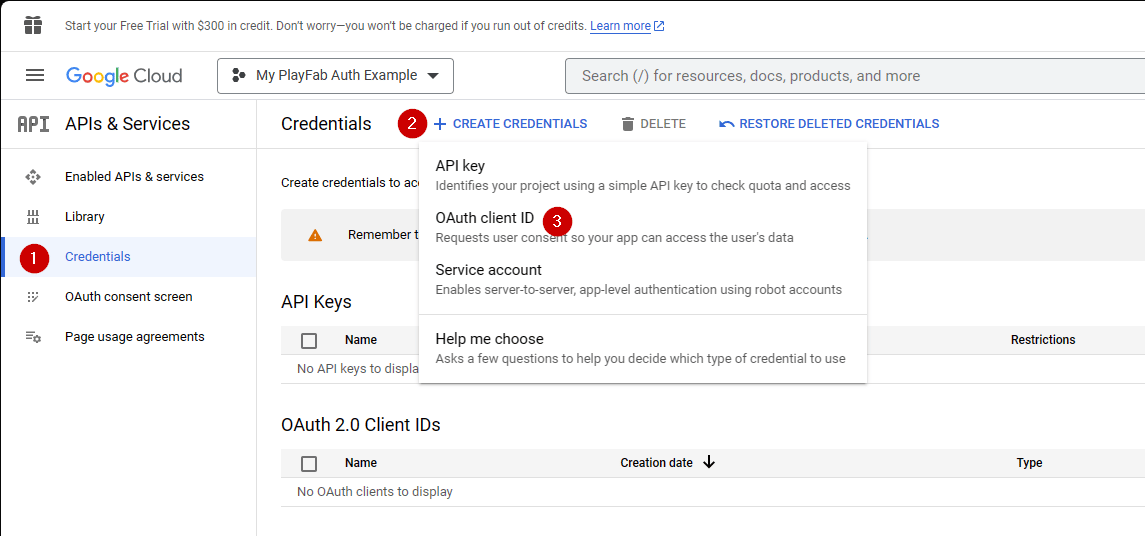
1. A continuación, vaya a **Credentials**.
2. Seleccione **Create credentials**.
3. Después, seleccione **OAuth client ID**.
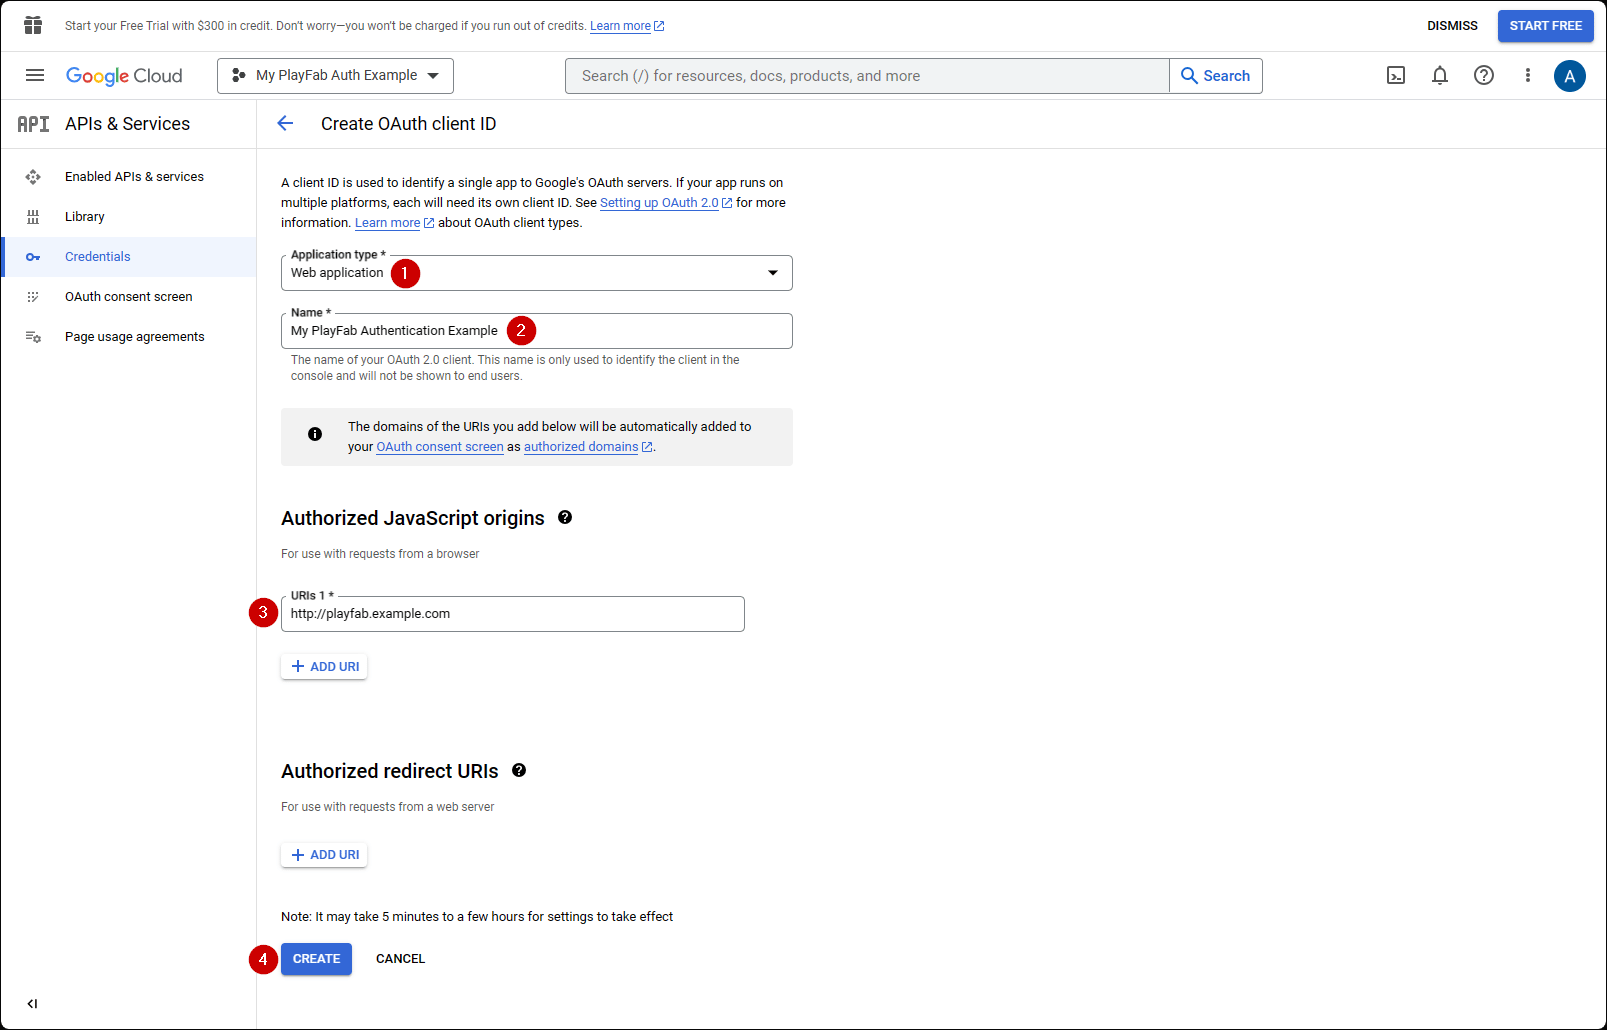
1. Seleccione **Web Application** como **Application type**.
2. Asigne un **nombre** a la aplicación.
3. Agregue su dominio a **Authorized JavaScript origins**, `[PlayFab](http://playfab.example.com)` en nuestro caso.
4. Por último, seleccione el botón **Create** para confirmar los cambios.
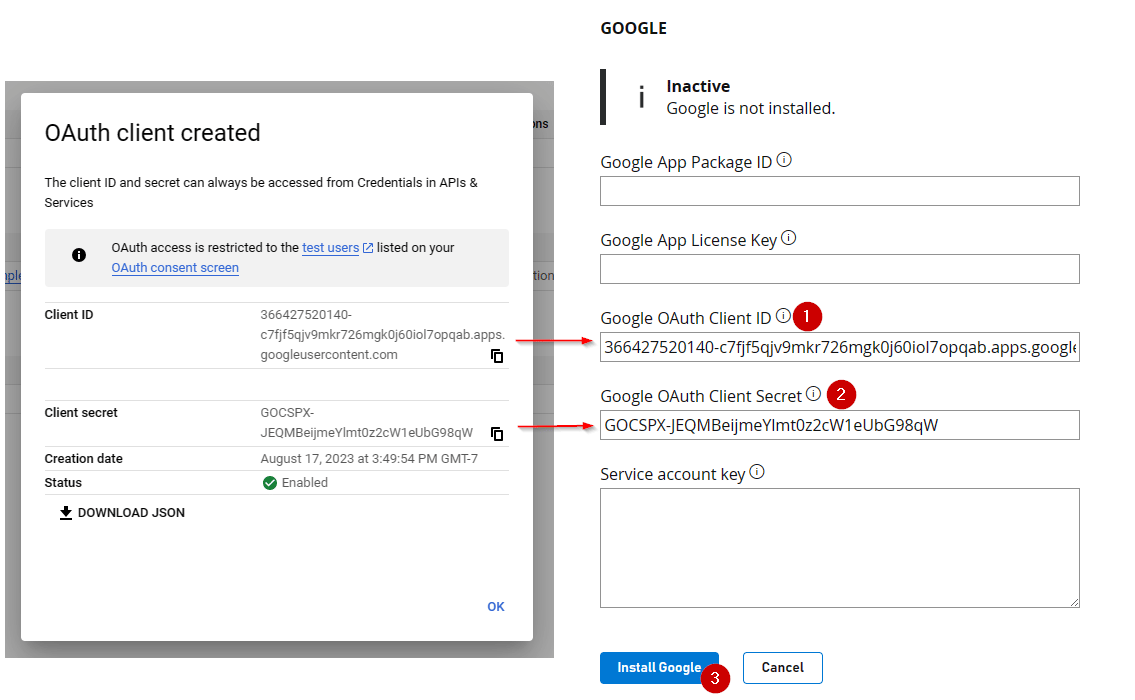
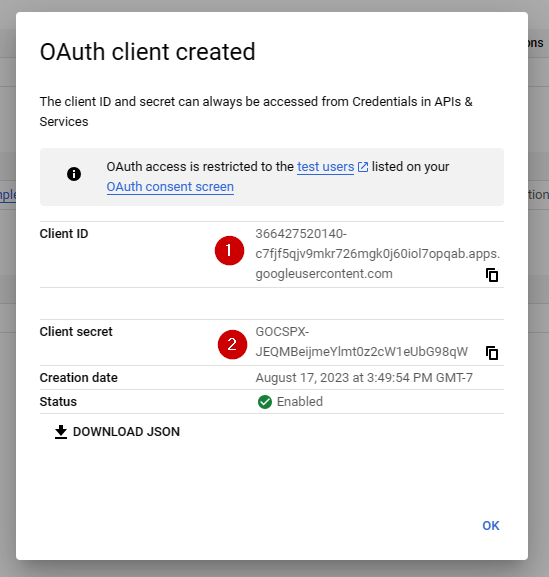
En la pantalla **OAuth client** que se muestra a continuación, el Administrador de API de Google revela dos datos importantes:
1. El **identificador de cliente**.
2. El **secreto de cliente**.
Asegúrese de copiar y guardar estos valores en un lugar seguro de fácil acceso, ya que se usarán en el proceso de autorización que se muestra más adelante en este tutorial.
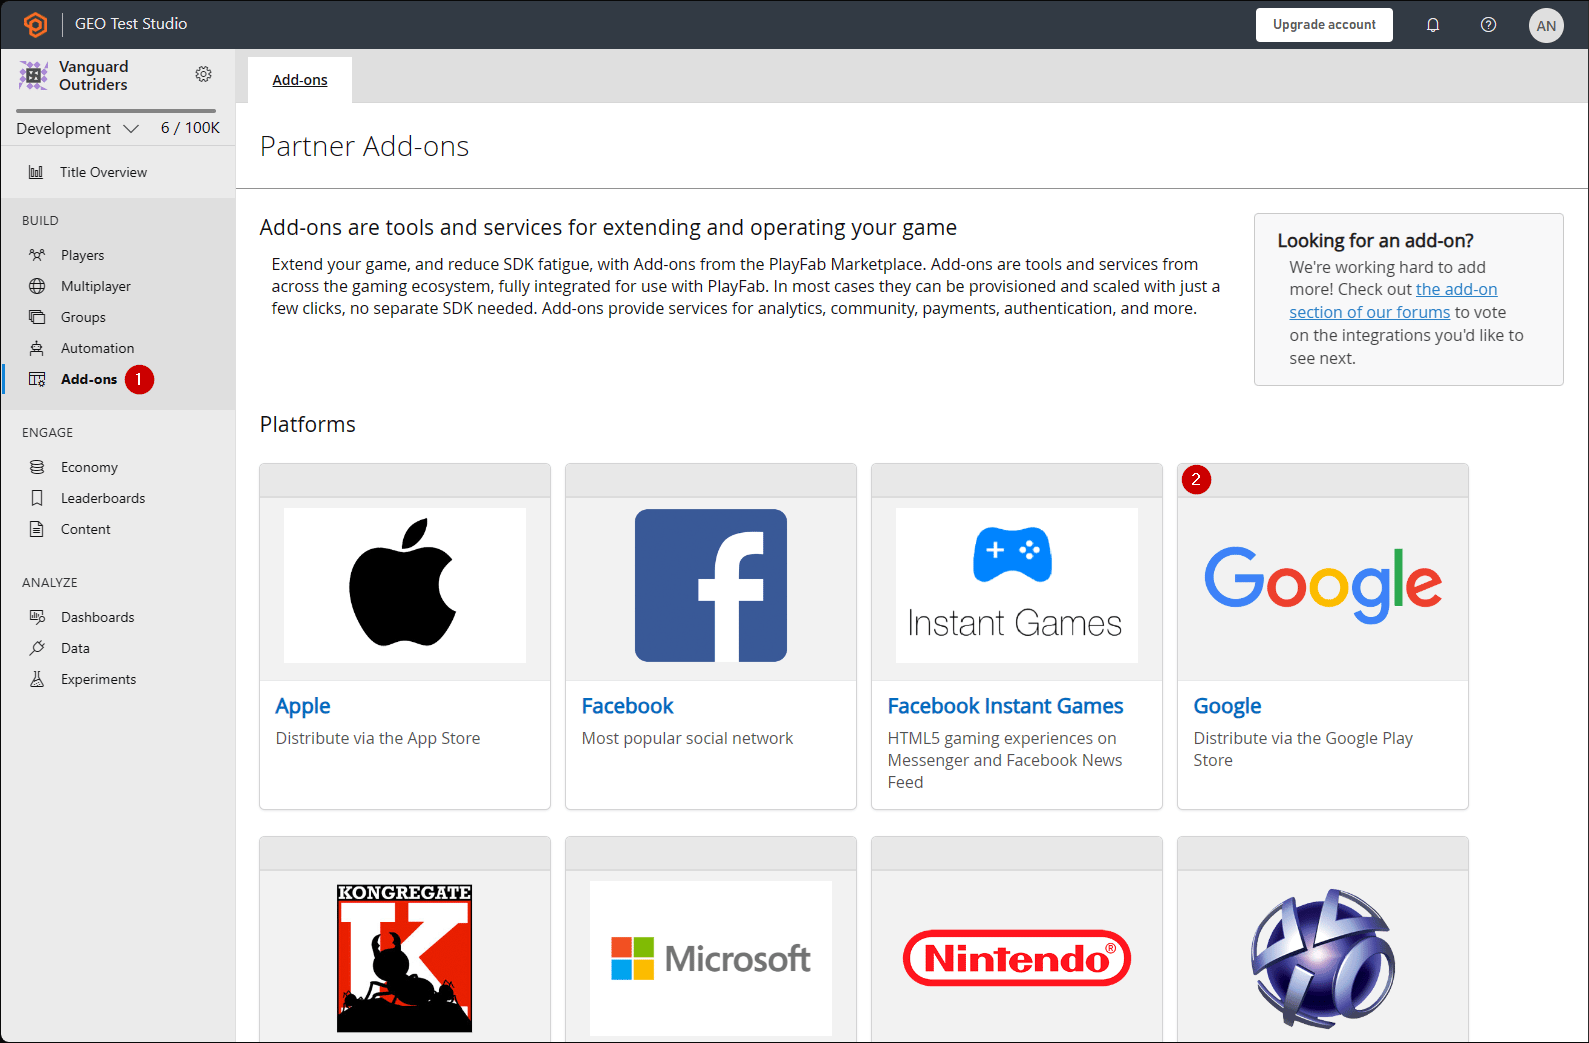
Vaya a la página de **Game Manager** de PlayFab de su título.
1. Vaya a **Add-ons** en el menú.
2. Busque y abra el icono o vínculo del **complemento de Google**.
1. Rellene el **identificador de cliente**.
2. Rellene el **secreto de cliente**.
3. A continuación, seleccione el botón **Install Google**.
Desde julio de 2017, el **Administrador de API de Google** tiene la mala costumbre de *no* enlazar correctamente el dominio de origen de **Allowed JS**. Si recibe el error siguiente: **"idpiframe\_initialization\_failed", details: "Not a valid origin for the client: somedomain.com..."**, elimine las credenciales y vuelva a crearlas. *No es necesario eliminar todo el proyecto, solo las credenciales.*
## Pruebas con un token de acceso
En este ejemplo, mostramos cómo probar la API LoginWithGoogleAccount mediante el enfoque clásico de token de acceso. Use el código HTML que se proporciona a continuación para sus pruebas.
Asegúrese\* de reemplazar `YOUR_CLIENT_ID` y `YOUR_PLAYFAB_TITLE` por sus propios valores.
El parámetro **AccessToken** falta en el objeto **LoginWithGoogleAccountRequest** de los archivos de tipos de TypeScript. Si usa TypeScript con el SDK de Node, puede crear un tipo personalizado `interface LoginRequest extends PlayFabClientModels.LoginWithGoogleAccountRequest { AccessToken: string; }` y convertir el tipo al usar la API `PlayFabClient.LoginWithGoogleAccount( { AccessToken: accessToken, CreateAccount: true, } as LoginRequest, onPlayFabResponse);`
```html theme={null}
Google Access Token Auth Example
```
**Pruebas con la biblioteca (en desuso) de Google Sign-in Platform**
El ejemplo siguiente usa la biblioteca de plataforma de Google Sign-In. **Según el [sitio de documentación pública de Google Identity](https://developers.google.com/identity/gsi/web/guides/migration), la biblioteca de plataforma de JavaScript de Google Sign-In para web quedará en desuso el 31 de marzo de 2023**. Este ejemplo no funcionará para los clientes de Google recién creados de aquí en adelante; consulte el ejemplo de código anterior, que usa la biblioteca más reciente de Google Identity Services.
```html theme={null}
Google Access Token Auth Example
```
Recuerde abrir esta página con su servidor web y asegúrese de acceder a ella mediante la URL que especificó al configurar el proyecto de Google (`http://playfab.example` en nuestro caso).
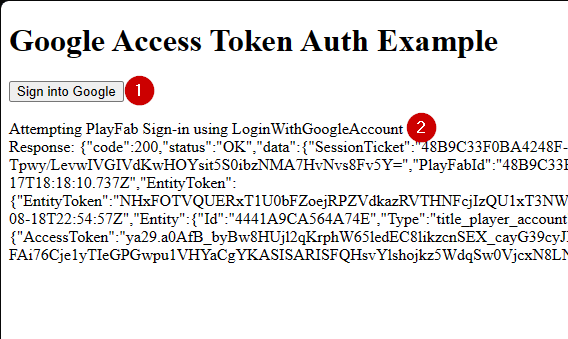
1. Cuando se abra la página, seleccione **G Signed In** y siga el flujo general de autenticación de Google.
2. Cuando esto termine, el script intentará autenticarse en PlayFab y mostrará el resultado.
Si *ya tiene* una sesión de autenticación de Google en ejecución, no tendrá que seleccionar **G Signed In**. Todo sucederá automáticamente.
## Related topics
- [Autenticación específica de la plataforma](/es/services/playfab/identity/player-identity/platform-specific-authentication/index.md)
- [Configuración de la autenticación de PlayFab con Kongregate y HTML5](/es/services/playfab/identity/player-identity/platform-specific-authentication/kongregate-html5.md)
- [Configuración de la autenticación de PlayFab con Twitch y HTML5](/es/services/playfab/identity/player-identity/platform-specific-authentication/twitch-html5.md)
- [Configuración de la autenticación de PlayFab mediante Facebook y HTML5](/es/services/playfab/identity/player-identity/platform-specific-authentication/facebook-html5.md)
- [Configuración del inicio de sesión con Battle.net para PlayFab](/es/services/playfab/identity/player-identity/platform-specific-authentication/battlenet-login.md)
 1. Rellene el campo situado bajo **Project Name**.
2. Seleccione el botón **Create**.
1. Rellene el campo situado bajo **Project Name**.
2. Seleccione el botón **Create**.
 1. Rellene un nombre de aplicación.
2. Asegúrese de que hay correos electrónicos en **user support email** y **Developer Contact Email**.
3. A continuación, seleccione **SAVE AND CONTINUE**.
1. Rellene un nombre de aplicación.
2. Asegúrese de que hay correos electrónicos en **user support email** y **Developer Contact Email**.
3. A continuación, seleccione **SAVE AND CONTINUE**.
 1. A continuación, vaya a **Credentials**.
2. Seleccione **Create credentials**.
3. Después, seleccione **OAuth client ID**.
1. A continuación, vaya a **Credentials**.
2. Seleccione **Create credentials**.
3. Después, seleccione **OAuth client ID**.
 1. Seleccione **Web Application** como **Application type**.
2. Asigne un **nombre** a la aplicación.
3. Agregue su dominio a **Authorized JavaScript origins**, `[PlayFab](http://playfab.example.com)` en nuestro caso.
4. Por último, seleccione el botón **Create** para confirmar los cambios.
1. Seleccione **Web Application** como **Application type**.
2. Asigne un **nombre** a la aplicación.
3. Agregue su dominio a **Authorized JavaScript origins**, `[PlayFab](http://playfab.example.com)` en nuestro caso.
4. Por último, seleccione el botón **Create** para confirmar los cambios.
 En la pantalla **OAuth client** que se muestra a continuación, el Administrador de API de Google revela dos datos importantes:
1. El **identificador de cliente**.
2. El **secreto de cliente**.
En la pantalla **OAuth client** que se muestra a continuación, el Administrador de API de Google revela dos datos importantes:
1. El **identificador de cliente**.
2. El **secreto de cliente**.
 Vaya a la página de **Game Manager** de PlayFab de su título.
1. Vaya a **Add-ons** en el menú.
2. Busque y abra el icono o vínculo del **complemento de Google**.
Vaya a la página de **Game Manager** de PlayFab de su título.
1. Vaya a **Add-ons** en el menú.
2. Busque y abra el icono o vínculo del **complemento de Google**.
 1. Rellene el **identificador de cliente**.
2. Rellene el **secreto de cliente**.
3. A continuación, seleccione el botón **Install Google**.
1. Rellene el **identificador de cliente**.
2. Rellene el **secreto de cliente**.
3. A continuación, seleccione el botón **Install Google**.