> ## Documentation Index
> Fetch the complete documentation index at: https://devdocs.xbox.com/llms.txt
> Use this file to discover all available pages before exploring further.

# Configuración de la autenticación de PlayFab mediante Facebook y HTML5

> Tutorial paso a paso para agregar el inicio de sesión de Facebook a un título de PlayFab con HTML5 y JavaScript, incluido el registro de la aplicación de Facebook y la autenticación de jugadores.

Este tutorial está diseñado para guiarle a través de la autenticación de PlayFab mediante Facebook y HTML5/JavaScript.

## Requisitos

* Una [cuenta de Facebook](https://www.facebook.com/) para realizar pruebas.
* Un título registrado en [PlayFab](https://developer.playfab.com/).
* Estar familiarizado con los [conceptos básicos y las prácticas recomendadas de inicio de sesión](/services/playfab/identity/player-identity/login/login-basics-best-practices).
* Un servidor mínimo, con un nombre de dominio válido, para servir un archivo HTML estático.

<Note>
  Si no está seguro de si cumple los requisitos adecuados para esta actividad, consulte el tutorial [Ejecución de un servidor HTTP para pruebas](/services/playfab/identity/player-identity/platform-specific-authentication/running-an-http-server-for-testing).
</Note>

## Servidor y dominio

Como parte de los requisitos para configurar la autenticación de PlayFab, debe disponer de un servidor con un dominio válido para poder seguir el tutorial. Si aún no tiene un dominio registrado y un servidor web remoto, siga nuestro tutorial [Ejecución de un servidor HTTP para pruebas](/services/playfab/identity/player-identity/platform-specific-authentication/running-an-http-server-for-testing) para ejecutar un servidor web local con un nombre de dominio válido.

A lo largo de esta guía, supondremos que su dominio es `['http://playfab.example'](http://playfab.example)`.

## Registro de una aplicación de Facebook

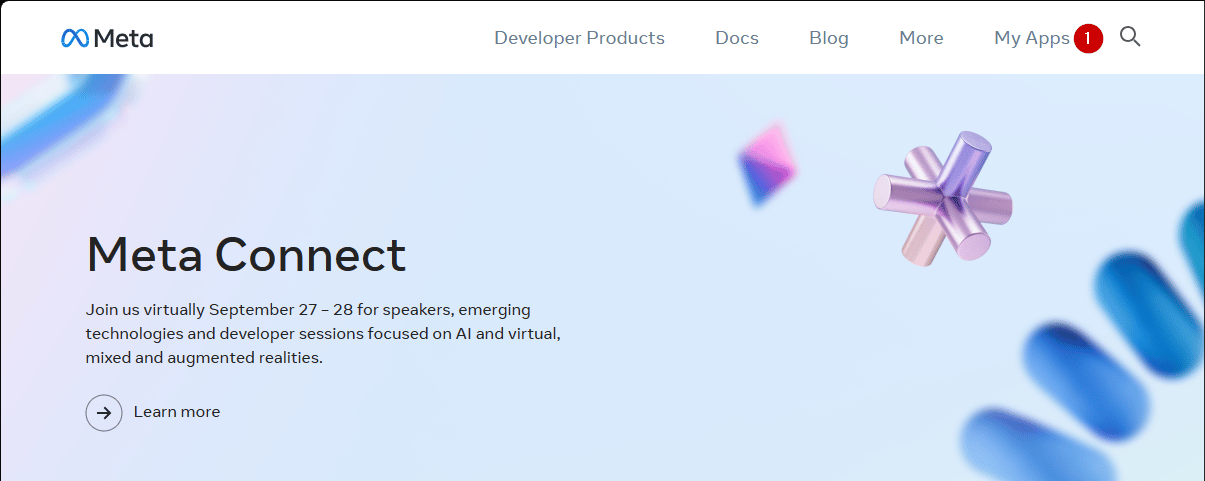
Empiece por ir al [portal para desarrolladores de Facebook](https://developers.facebook.com/).

1. Seleccione el botón **My Apps**.

<img src="https://mintcdn.com/microsoft-4404708b/mLCHf0iQv3VidfBe/images/playfab/identity/player-identity/platform-specific-authentication/tutorials/facebook-html5/my-apps.png?fit=max&auto=format&n=mLCHf0iQv3VidfBe&q=85&s=c533fd072cd7b47233fd2c7eb8c431a6" alt="Agregar una nueva aplicación en Facebook" width="1205" height="481" data-path="images/playfab/identity/player-identity/platform-specific-authentication/tutorials/facebook-html5/my-apps.png" />

1. Seleccione **Create App** para crear una aplicación nueva.
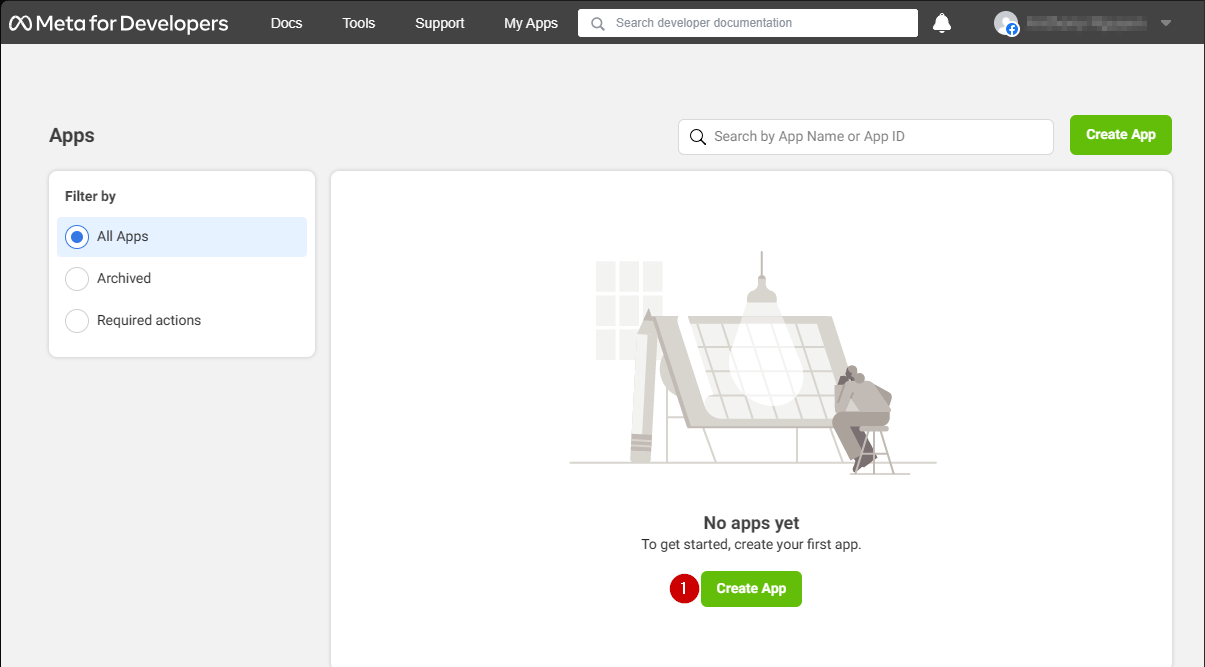
<img src="https://mintcdn.com/microsoft-4404708b/mLCHf0iQv3VidfBe/images/playfab/identity/player-identity/platform-specific-authentication/tutorials/facebook-html5/facebook-add-a-new-app.png?fit=max&auto=format&n=mLCHf0iQv3VidfBe&q=85&s=ab8793987c97a532fa9e970436afe2a3" alt="Crear una nueva aplicación en Facebook" width="1205" height="667" data-path="images/playfab/identity/player-identity/platform-specific-authentication/tutorials/facebook-html5/facebook-add-a-new-app.png" />

Se abre una nueva ventana emergente de **aplicación**.

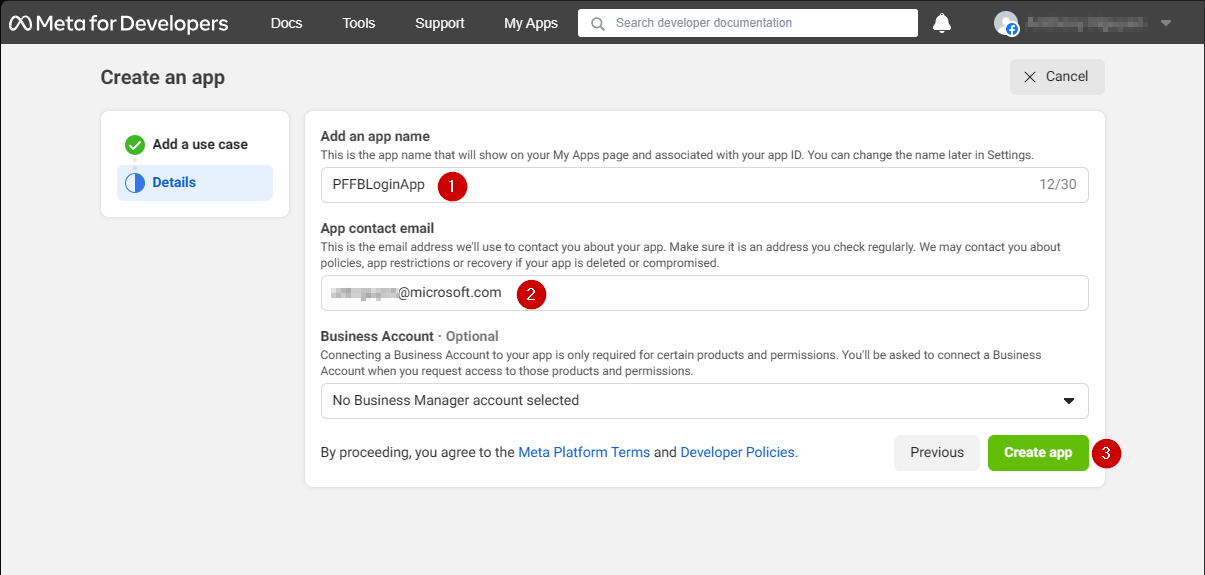
1. Escriba un nombre para su **aplicación** en el campo situado bajo **Add an app name**.
2. Escriba una dirección de correo electrónico de contacto en el campo situado bajo **App contact email**.
3. Seleccione el botón **Create app** para guardar.
<Note>
  Asegúrese de crear su propio nombre de aplicación y correo electrónico únicos, como se muestra en el ejemplo siguiente.
</Note>

<img src="https://mintcdn.com/microsoft-4404708b/mLCHf0iQv3VidfBe/images/playfab/identity/player-identity/platform-specific-authentication/tutorials/facebook-html5/facebook-new-app-id.png?fit=max&auto=format&n=mLCHf0iQv3VidfBe&q=85&s=43a15fe0906efcfb030b98c375ef610f" alt="Nuevo App ID de Facebook" width="1205" height="575" data-path="images/playfab/identity/player-identity/platform-specific-authentication/tutorials/facebook-html5/facebook-new-app-id.png" />

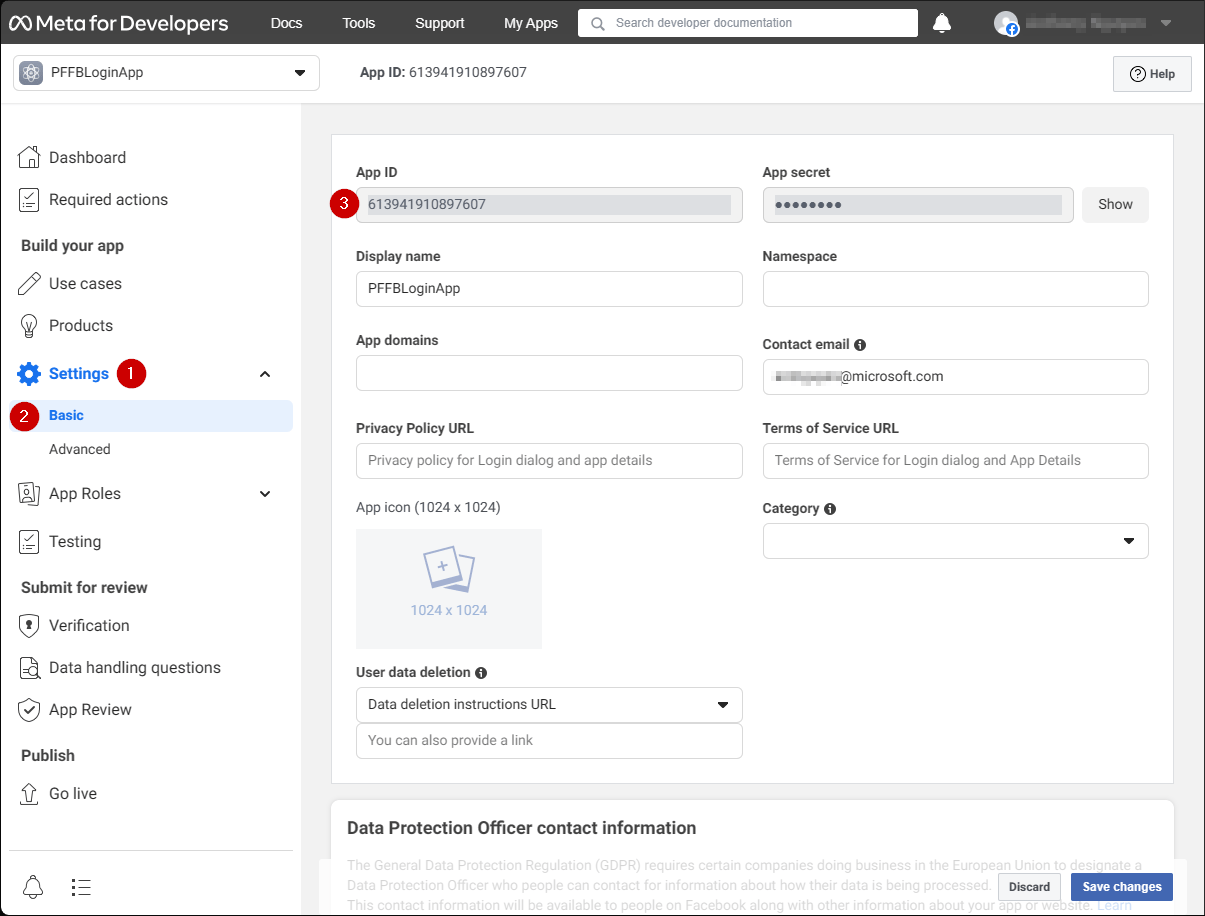
1. Vaya a la pestaña **Settings**.
2. Seleccione la subpestaña **Basic**.
3. Localice su **App ID**.
<Note>
  Copie su **App ID** en un lugar seguro; lo usaremos más adelante para configurar el **SDK de Facebook**.
</Note>

<img src="https://mintcdn.com/microsoft-4404708b/mLCHf0iQv3VidfBe/images/playfab/identity/player-identity/platform-specific-authentication/tutorials/facebook-html5/facebook-save-app-id.png?fit=max&auto=format&n=mLCHf0iQv3VidfBe&q=85&s=724d5c403c24e3077b1fe09f59791f46" alt="Guardar el App ID de Facebook" width="1205" height="916" data-path="images/playfab/identity/player-identity/platform-specific-authentication/tutorials/facebook-html5/facebook-save-app-id.png" />

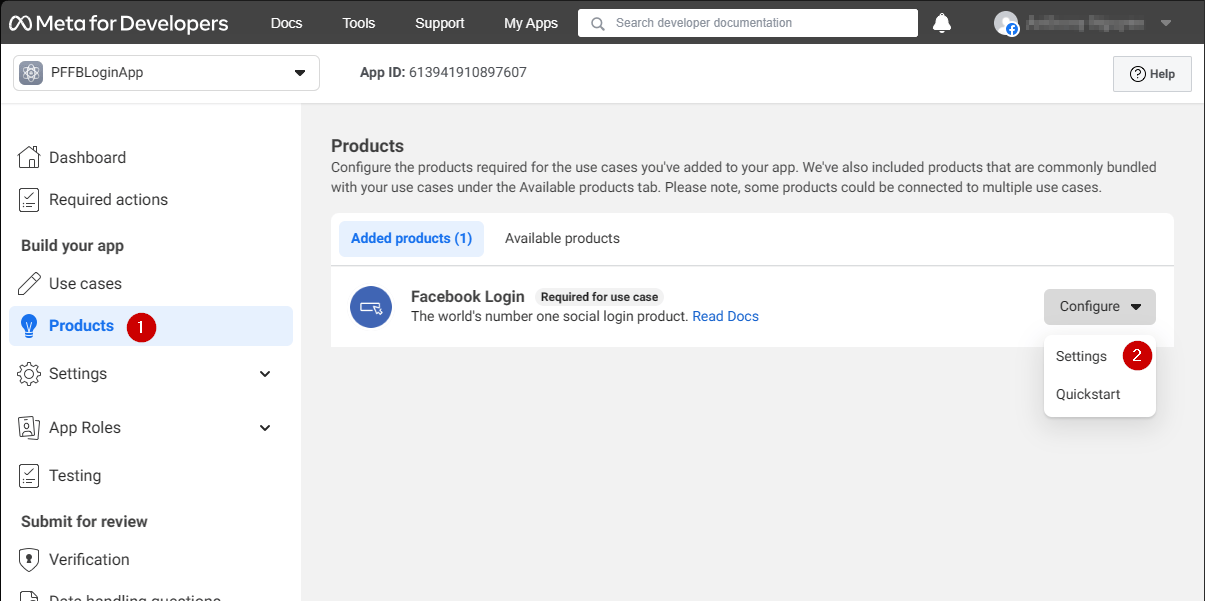
1. Vaya al menú de la izquierda de la pantalla y seleccione el elemento **Products**.
2. Localice **Configure** en el área **Facebook Login** y seleccione **Settings** en el menú desplegable.
<img src="https://mintcdn.com/microsoft-4404708b/mLCHf0iQv3VidfBe/images/playfab/identity/player-identity/platform-specific-authentication/tutorials/facebook-html5/login-get-started.png?fit=max&auto=format&n=mLCHf0iQv3VidfBe&q=85&s=bd346c82af2a1914bd8dfca79653f5c6" alt="Introducción al inicio de sesión de Facebook" width="1205" height="601" data-path="images/playfab/identity/player-identity/platform-specific-authentication/tutorials/facebook-html5/login-get-started.png" />

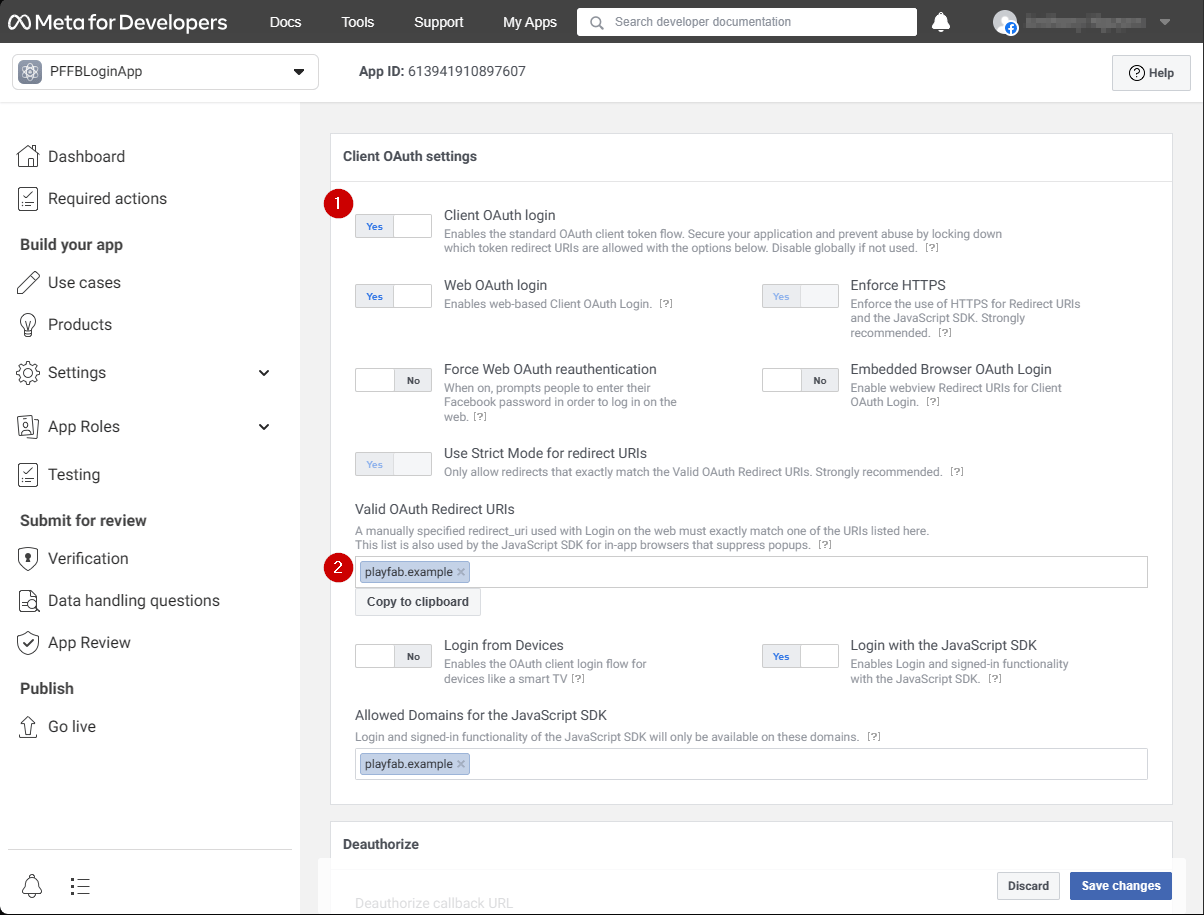
La página debería abrirse y mostrar el ejemplo siguiente.

1. Compruebe que tanto **Client OAuth** como **Web OAuth** están activados (marcados como **Yes**).
2. Establezca **Valid OAuth redirect URIs** en el **URI** de su propia página de autenticación.
<Note>
  En su caso, será `playfab.example`.
</Note>

<img src="https://mintcdn.com/microsoft-4404708b/mLCHf0iQv3VidfBe/images/playfab/identity/player-identity/platform-specific-authentication/tutorials/facebook-html5/login-product-settings.png?fit=max&auto=format&n=mLCHf0iQv3VidfBe&q=85&s=493c1ca8600489493ca47ced5c579204" alt="Configuración del producto de inicio de sesión de Facebook" width="1204" height="915" data-path="images/playfab/identity/player-identity/platform-specific-authentication/tutorials/facebook-html5/login-product-settings.png" />

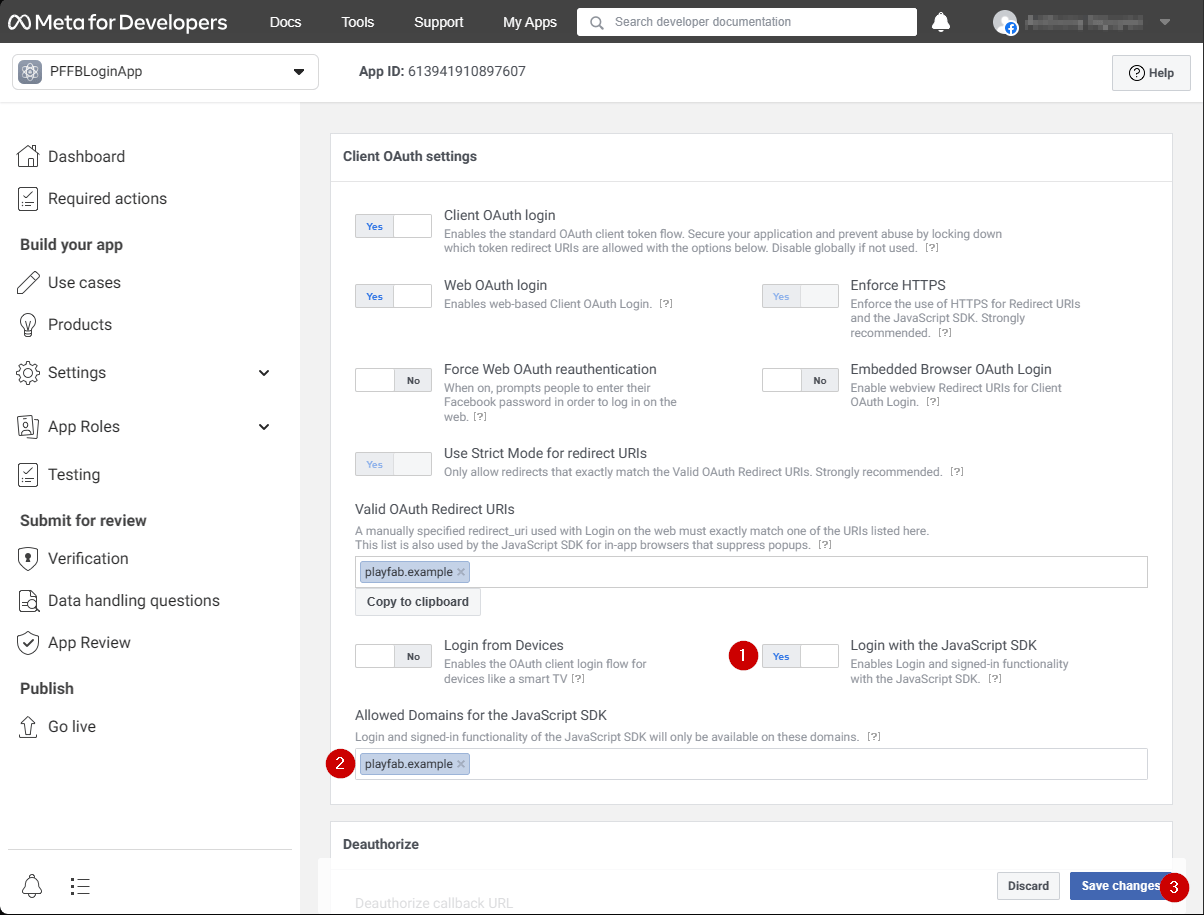
En la pantalla **Client OAuth Settings**:

1. Compruebe que **Login with the JavaScript SDK** está activado (marcado como **Yes**)
2. Establezca **Valid OAuth redirect URIs** en el **URI** de su propia página de autenticación.
<Note>
  En su caso, será `playfab.example`.
</Note>

3. Seleccione **Save Changes** para confirmar.

<img src="https://mintcdn.com/microsoft-4404708b/mLCHf0iQv3VidfBe/images/playfab/identity/player-identity/platform-specific-authentication/tutorials/facebook-html5/set-oauth-redirect.png?fit=max&auto=format&n=mLCHf0iQv3VidfBe&q=85&s=1d900349086b3efc854d19e7e394bbfa" alt="Establecer el URI de redirección de OAuth en Facebook" width="1204" height="915" data-path="images/playfab/identity/player-identity/platform-specific-authentication/tutorials/facebook-html5/set-oauth-redirect.png" />

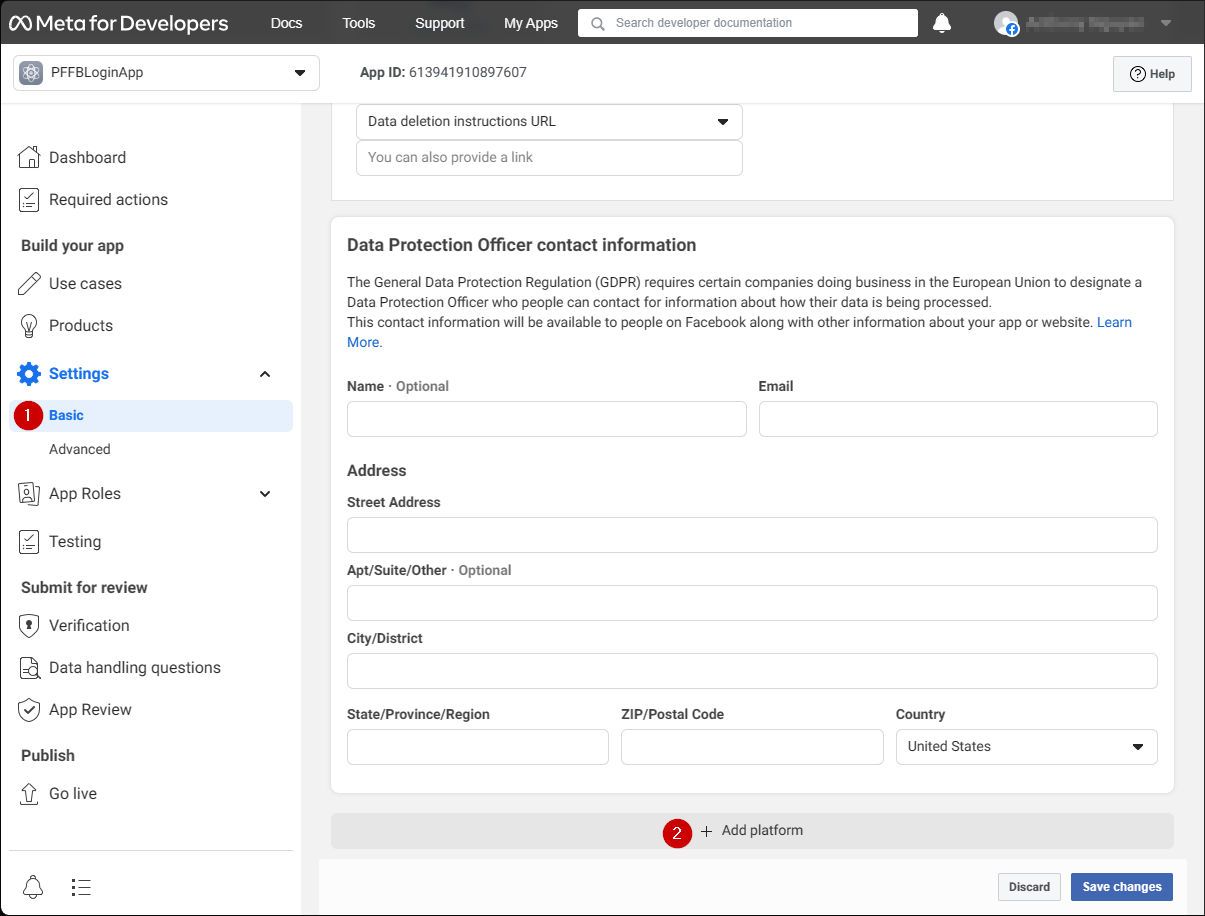
En la página **Application Manager**:

* Abra **Settings/Basic (1)** en el menú.
* Seleccione el botón **Add Platform (2)**.
<img src="https://mintcdn.com/microsoft-4404708b/mLCHf0iQv3VidfBe/images/playfab/identity/player-identity/platform-specific-authentication/tutorials/facebook-html5/add-platform.png?fit=max&auto=format&n=mLCHf0iQv3VidfBe&q=85&s=d715322d7bdb36fdb0cca082e6394fd7" alt="Agregar plataforma en Application Manager de Facebook" width="1205" height="916" data-path="images/playfab/identity/player-identity/platform-specific-authentication/tutorials/facebook-html5/add-platform.png" />

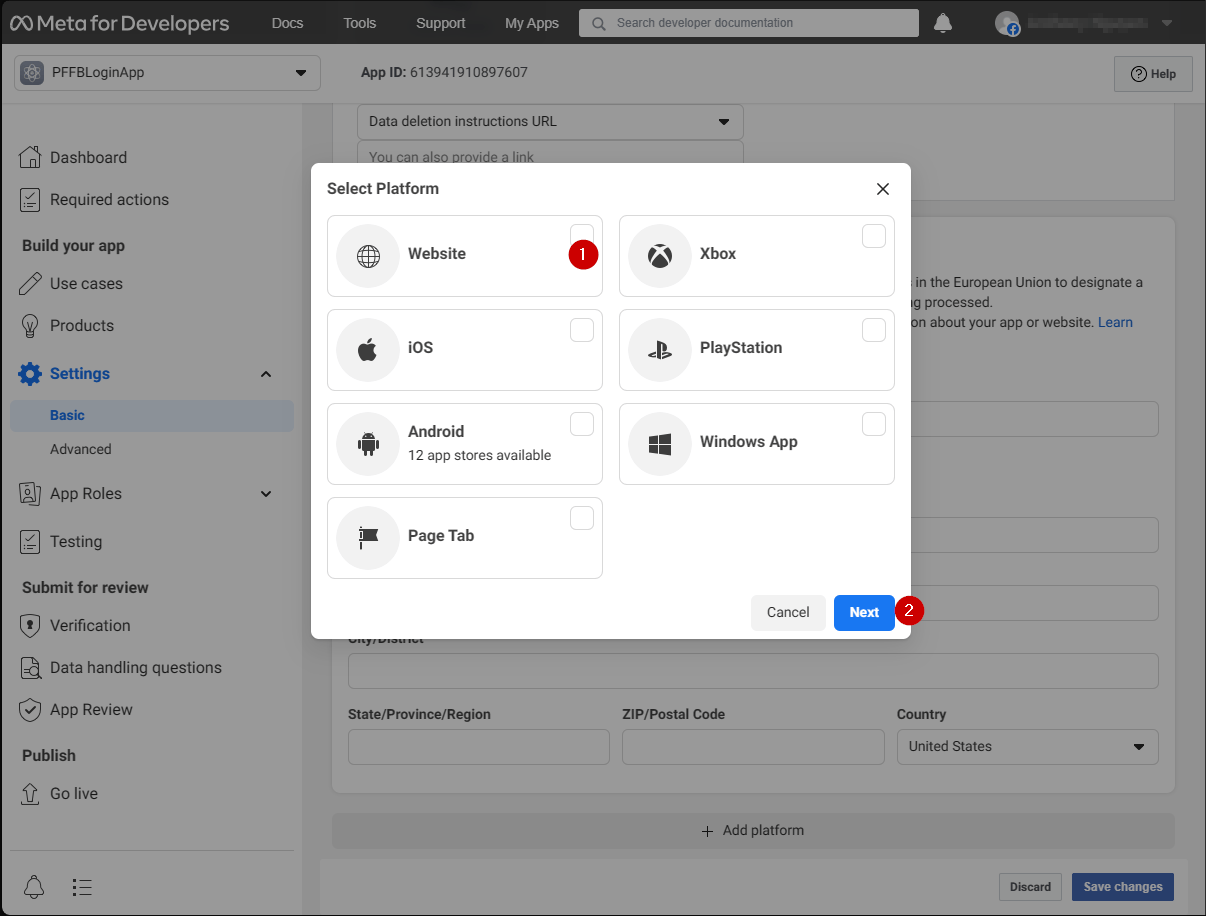
Aparece una ventana emergente en la pantalla:

1. Seleccione el **icono de Website**.
2. Después, seleccione **Next**.
<img src="https://mintcdn.com/microsoft-4404708b/mLCHf0iQv3VidfBe/images/playfab/identity/player-identity/platform-specific-authentication/tutorials/facebook-html5/website-options.png?fit=max&auto=format&n=mLCHf0iQv3VidfBe&q=85&s=96645e531316bffa3730f606c1b799ce" alt="Opciones de la plataforma Website en Facebook" width="1206" height="916" data-path="images/playfab/identity/player-identity/platform-specific-authentication/tutorials/facebook-html5/website-options.png" />

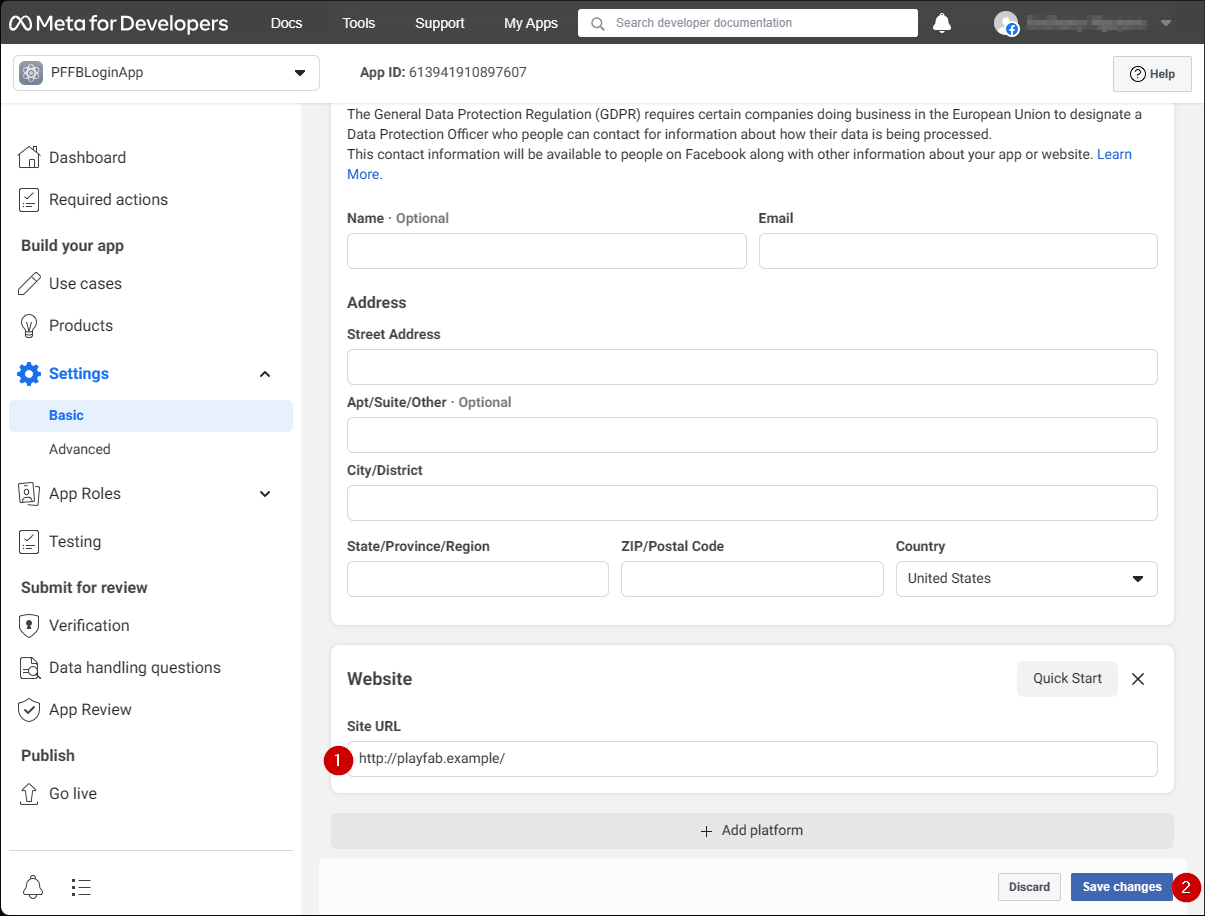
Ahora debería aparecer el panel de configuración de **Website**.

1. En el campo **Site URL**, escriba la **URL** de su página de autenticación (en su caso, `playfab.example`).
2. Seleccione **Save changes** para confirmar.
<img src="https://mintcdn.com/microsoft-4404708b/mLCHf0iQv3VidfBe/images/playfab/identity/player-identity/platform-specific-authentication/tutorials/facebook-html5/website-configuration.png?fit=max&auto=format&n=mLCHf0iQv3VidfBe&q=85&s=ef19a6ad2bf003e8e58802abeea329c5" alt="Panel de configuración de sitio web de Facebook" width="1205" height="916" data-path="images/playfab/identity/player-identity/platform-specific-authentication/tutorials/facebook-html5/website-configuration.png" />

## Pruebas

Use el siguiente archivo HTML para probar la autenticación de PlayFab mediante Facebook.

<Note>
  Asegúrese de sustituir **YOUR-APPLICATION-ID** y **YOUR-PLAYFAB-TITLE** por los suyos propios.
</Note>

```html theme={null}
<!DOCTYPE html>
<html>
<head>
   <script>
        // This function will be called when Facebook SDK is loaded
        window.fbAsyncInit = function() {

            // Make sure to use your own App ID for the configuration
            FB.init({
                appId      : 'YOUR-APPLICATION-ID',
                xfbml      : true,
                version    : 'v2.9'
            });

            // Record PageView event for analytics
            FB.AppEvents.logPageView();
        };

        // Facebook SDK loader. Creates a script entry to load the SDK
        (function(d, s, id){
            var js, fjs = d.getElementsByTagName(s)[0];
            if (d.getElementById(id)) {return;}
            js = d.createElement(s); js.id = id;
            js.src = "//connect.facebook.net/en_US/sdk.js";
            fjs.parentNode.insertBefore(js, fjs);
        }(document, 'script', 'facebook-jssdk'));
    </script>
    <script src="https://download.playfab.com/PlayFabClientApi.js"></script>
</head>
<body>
    <p>Facebook Auth Example</p>
    <button onclick="loginWithFacebook()">Log In with Facebook</button>
    <script>
        // This method is invoked when you press the button
        function loginWithFacebook() {
            logLine("Logging in via Facebook...");

            // Standard practice: make call to FB.login.
            // This will show Facebook popup window. To prevent browsers from locking it,
            // always make sure to call it from Button click event
            FB.login(function(response){
                if(!response.authResponse){
                    logLine("Problem authenticating via Facebook!");
                } else {
                    loginWithPlayfab(response.authResponse.accessToken);
                }
            });
        }

        function loginWithPlayfab(accessToken){

            logLine("Logging in via PlayFab...");

            // When given accessToken, make call to LoginWithFacebook API Call
            // Make sure to use your own PlayFab Title ID
            PlayFabClientSDK.LoginWithFacebook({
                AccessToken: accessToken,
                TitleId: "YOUR-PLAYFAB-TITLE",
                CreateAccount: true
            }, onPlayFabResponse);
        }

        // Handles response from playfab.
        function onPlayFabResponse(response, error) {
            if (response)
                logLine("Response: " + JSON.stringify(response));
            if (error)
                logLine("Error: " + JSON.stringify(error));
        }

        function logLine(message) {
            var textnode = document.createTextNode(message);
            document.body.appendChild(textnode);
            var br = document.createElement("br");
            document.body.appendChild(br);
        }
    </script>
</body>
</html>
```

Solicite el archivo anterior a su servidor usando el dominio que configuró durante la configuración de la **aplicación de Facebook** (`playfab.example` en nuestro caso).

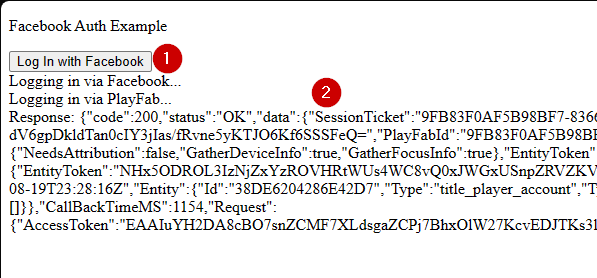
1. Cuando se abra la página **Facebook Auth Example**, seleccione el botón **Log In with Facebook**.
2. Siga las instrucciones de Facebook que aparezcan en la ventana emergente.

Observe la salida.
<img src="https://mintcdn.com/microsoft-4404708b/mLCHf0iQv3VidfBe/images/playfab/identity/player-identity/platform-specific-authentication/tutorials/facebook-html5/facebook-auth-example.png?fit=max&auto=format&n=mLCHf0iQv3VidfBe&q=85&s=e6f77a4ce2fae3bfd5dfcc97acd2e88b" alt="Ejemplo de autenticación de Facebook" width="597" height="278" data-path="images/playfab/identity/player-identity/platform-specific-authentication/tutorials/facebook-html5/facebook-auth-example.png" />

Obtendrá un vale de sesión de PlayFab. En este punto, habrá configurado correctamente la autenticación de PlayFab y Facebook mediante HTML5 y JavaScript.


## Related topics

- [Configuración de la autenticación de PlayFab con Google y HTML5](/es/services/playfab/identity/player-identity/platform-specific-authentication/google-html5.md)
- [Configuración de la autenticación de PlayFab con Twitch y HTML5](/es/services/playfab/identity/player-identity/platform-specific-authentication/twitch-html5.md)
- [Configuración de la autenticación de PlayFab con Kongregate y HTML5](/es/services/playfab/identity/player-identity/platform-specific-authentication/kongregate-html5.md)
- [Autenticación de inicio de sesión anónimo de servidor](/es/services/playfab/identity/player-identity/platform-specific-authentication/anonymous-login.md)
- [Configuración del inicio de sesión con Battle.net para PlayFab](/es/services/playfab/identity/player-identity/platform-specific-authentication/battlenet-login.md)
