> ## Documentation Index
> Fetch the complete documentation index at: https://devdocs.xbox.com/llms.txt
> Use this file to discover all available pages before exploring further.
# Game Saves walkthroughs and samples
> Step-by-step XBOX Game Saves walkthroughs for Partner Center setup, safe-write patterns, offline handling, testing sync scenarios, and title migration.
This article provides step-by-step instructions for common development and migration scenarios when using Game Saves. It covers essential setup in Microsoft Partner Center, best practices for writing data safely, platform-specific save management, and recommended testing procedures.
## Partner Center configurations
### Enabling XBOX services and Game Saves for your title
To use the Game Saves APIs, complete the following steps in Partner Center.
* Enable XBOX services.
1. Sign in to [Partner Center](https://partner.microsoft.com/dashboard/home).
2. Go to your title, then enable XBOX services in the settings. For more information about this step, see [Setting up an app or game at Partner Center, for Managed Partners](/services/xbox-services/fundamentals/portal-config/live-setup-partner-center-partners#2-contact-your-microsoft-representative-to-enable-your-app-or-game).
* Get your service configuration identifier (SCID). All read and write operations must be associated with a SCID. The SCID is also used for Game Saves initialization.
* In Partner Center, find the SCID under the **XBOX services** > **XBOX settings** tab for your title. You can also find your Microsoft account (MSA) App ID (MSAAppID) on this page.
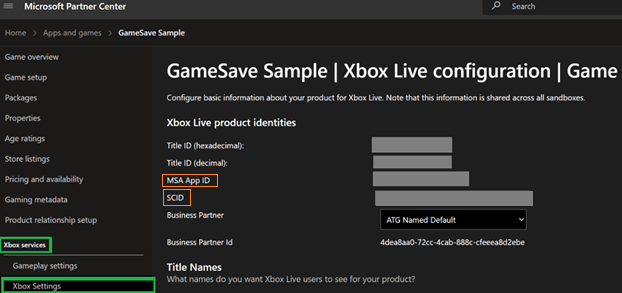 After you get your SCID and MSAAppID, add this App ID to the title's config (.mgc) file.
For more information about game config files, see [Creating the Microsoft Game Config .mgc](/build/core-features/common/game-config/MicrosoftGameConfig-Overview).
## Development scenarios
### Where do I integrate Game Saves in my code?
Game Saves logic depends on user sign-in. Add the Game Saves code next to the user sign-in flow.
### How do I ensure that my game saves data doesn't become corrupted?
To save data safely and avoid corruption, follow these steps. This guidance applies to all save operations.
1. Write to a temporary file.
* Serialize your save data into a new file (for example, `save.tmp`) rather than overwriting the live save. This step protects the existing save in case your process is interrupted mid-write.
2. Close the write handle after the write is fully committed to disk.
3. Replace the old save file atomically with the new temporary file by using the Win32 [ReplaceFile](https://learn.microsoft.com/windows/win32/api/winbase/nf-winbase-replacefilea).
### How do I support offline devices?
You're responsible for determining how the title behaves if there's connection loss both before and after initializing Game Saves.
For more information about offline behavior, see [Understanding the Game Saves sync flow](/build/core-features/common/game-save/game-saves-syncing#connection-check).
### What user interactions do I need to be aware of?
The OS shows system prompts when an action requires user input. For information about these prompts, see [Game Saves dialogs](/build/core-features/common/game-save/game-saves-dialogues).
### Is there a way to save locally and to the device only?
If you pass a `null` user handle to the Game Save initialization process, the system creates a machine-only provider. Data is stored locally and persists on the device, with a maximum limit of 256 MB. The data doesn't sync to the cloud.
For more information about Game Saves storage, see [Game Saves storage systems](/build/core-features/common/game-save/game-saves-storage-systems).
### Managing game saves through the device
#### Accessing local game saves on PC by using File Explorer
If your title runs on PC, you have direct access to the files. Depending on the Game Saves API implementation, you can access your local game saves at the following locations.
| Game Saves API | File path |
| :------------- | :---------------------------------------------------------------------------- |
| XGameSaveFiles | `%AppData%\Local\Packages\\SystemAppData\xgs\_\` |
| XGameSave | `%AppData%\Local\Packages\\SystemAppData\wgs\_\` |
When you manipulate data on PC, sync logic still applies. For example, modifying data when the title doesn't have a lock causes conflicts.
#### Accessing local game saves on console
Manage the console save data via the XBOX UI. Access it by using the following steps.
1. Select the **Home** button on the XBOX controller.
2. Select **My games & apps** > **See all**.
3. Hover over your game, and then select the **View** button.
4. Select **Saved data**.
After you get your SCID and MSAAppID, add this App ID to the title's config (.mgc) file.
For more information about game config files, see [Creating the Microsoft Game Config .mgc](/build/core-features/common/game-config/MicrosoftGameConfig-Overview).
## Development scenarios
### Where do I integrate Game Saves in my code?
Game Saves logic depends on user sign-in. Add the Game Saves code next to the user sign-in flow.
### How do I ensure that my game saves data doesn't become corrupted?
To save data safely and avoid corruption, follow these steps. This guidance applies to all save operations.
1. Write to a temporary file.
* Serialize your save data into a new file (for example, `save.tmp`) rather than overwriting the live save. This step protects the existing save in case your process is interrupted mid-write.
2. Close the write handle after the write is fully committed to disk.
3. Replace the old save file atomically with the new temporary file by using the Win32 [ReplaceFile](https://learn.microsoft.com/windows/win32/api/winbase/nf-winbase-replacefilea).
### How do I support offline devices?
You're responsible for determining how the title behaves if there's connection loss both before and after initializing Game Saves.
For more information about offline behavior, see [Understanding the Game Saves sync flow](/build/core-features/common/game-save/game-saves-syncing#connection-check).
### What user interactions do I need to be aware of?
The OS shows system prompts when an action requires user input. For information about these prompts, see [Game Saves dialogs](/build/core-features/common/game-save/game-saves-dialogues).
### Is there a way to save locally and to the device only?
If you pass a `null` user handle to the Game Save initialization process, the system creates a machine-only provider. Data is stored locally and persists on the device, with a maximum limit of 256 MB. The data doesn't sync to the cloud.
For more information about Game Saves storage, see [Game Saves storage systems](/build/core-features/common/game-save/game-saves-storage-systems).
### Managing game saves through the device
#### Accessing local game saves on PC by using File Explorer
If your title runs on PC, you have direct access to the files. Depending on the Game Saves API implementation, you can access your local game saves at the following locations.
| Game Saves API | File path |
| :------------- | :---------------------------------------------------------------------------- |
| XGameSaveFiles | `%AppData%\Local\Packages\\SystemAppData\xgs\_\` |
| XGameSave | `%AppData%\Local\Packages\\SystemAppData\wgs\_\` |
When you manipulate data on PC, sync logic still applies. For example, modifying data when the title doesn't have a lock causes conflicts.
#### Accessing local game saves on console
Manage the console save data via the XBOX UI. Access it by using the following steps.
1. Select the **Home** button on the XBOX controller.
2. Select **My games & apps** > **See all**.
3. Hover over your game, and then select the **View** button.
4. Select **Saved data**.
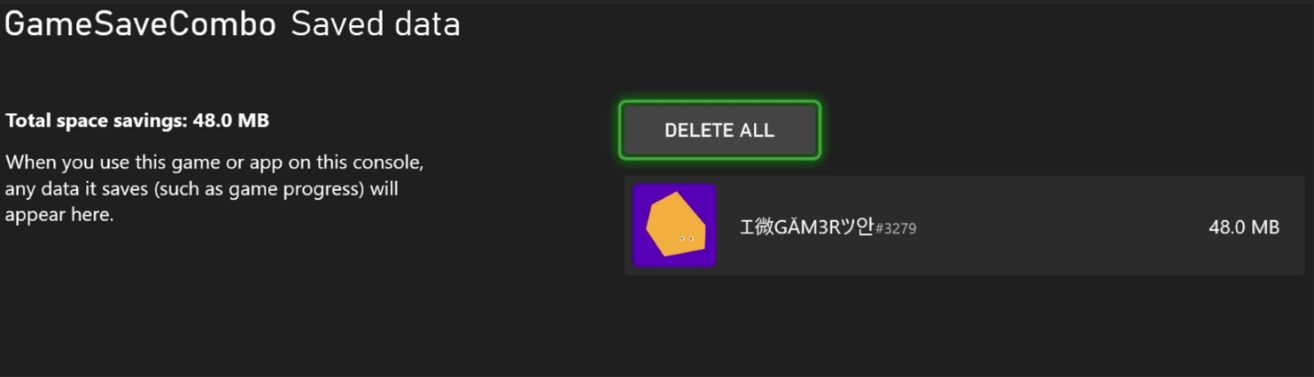 Consider the following when you manipulate data directly on console.
* Deleting data on the console by using the system UI doesn't remove the copy stored in the cloud. When you launch the title again, it syncs the data from the cloud.
* Machine-provider data appears as a user with no name. This data stays on the device, doesn't sync to the cloud, and is bound to the device.
For more information about the machine provider, see [Game Saves storage systems](/build/core-features/common/game-save/game-saves-storage-systems#game-saves-storage-systems).
For more detailed control of game saves, use [Game Saves tools](/build/core-features/common/game-save/game-saves-tools#manipulating-game-saves).
## Testing scenarios
When you create test cases, separate data validation from the game‑save logic.
### Test if game saves sync correctly to and from the cloud
Use the following steps to test for correct syncing. The test flows verify the behavior.
`XGameSaveFiles`:
1. Confirm that the SCID is correct.
2. Confirm that you're using the correct user handle.
3. Confirm that the title calls `XGameSaveFilesGetFolderWithUIAsync` during the current game session. If the title resumes from a suspend state, call the function.
1. Use Fiddler to confirm the lock was acquired.
2. Save this path and use it later to confirm that the data is uploading.
4. Write some data to the file path provided by `XGameSaveFilesGetFolderWithUIAsync`.
5. Terminate or suspend the title.
6. Wait 10–30 seconds for the OS to automatically upload the data to the cloud and release the lock.
1. Confirm that the data was uploaded and the lock was released by using Fiddler.
7. Manually delete the data in the folder provided by `XGameSaveFilesGetFolderWithUIAsync`.
1. On console, access this data through player settings.
8. Launch the title again, and then attempt to sign the user in.
9. A sync dialog appears, showing an active download sync from the cloud.
To help test successful syncing, see the following resources:
* [Game Saves tools to inspect traffic and manipulate saves](/build/core-features/common/game-save/game-saves-tools)
* [Understanding the Game Saves sync flow](/build/core-features/common/game-save/game-saves-syncing)
### Test if game saves roam correctly
For a test plan to confirm if data roams, see [XR-052-06 Test Plan](https://learn.microsoft.com/build/store/policies/XR/XR052#052-06-cloud-storage-roaming).
## Migration scenarios
### Sharing game saves across titles
To transfer or access data from one title to another, complete two steps.
1. Modify the access policies of the title you want to access in Partner Center.
2. Initialize the Game Saves providers for both titles in source code.
#### Modify access policies
A title controls which titles have access to its game saves data by configuring access policies.
1. Go to [Partner Center](https://partner.microsoft.com/dashboard).
2. Select **Apps and games** > **\** > **Gameplay settings**.
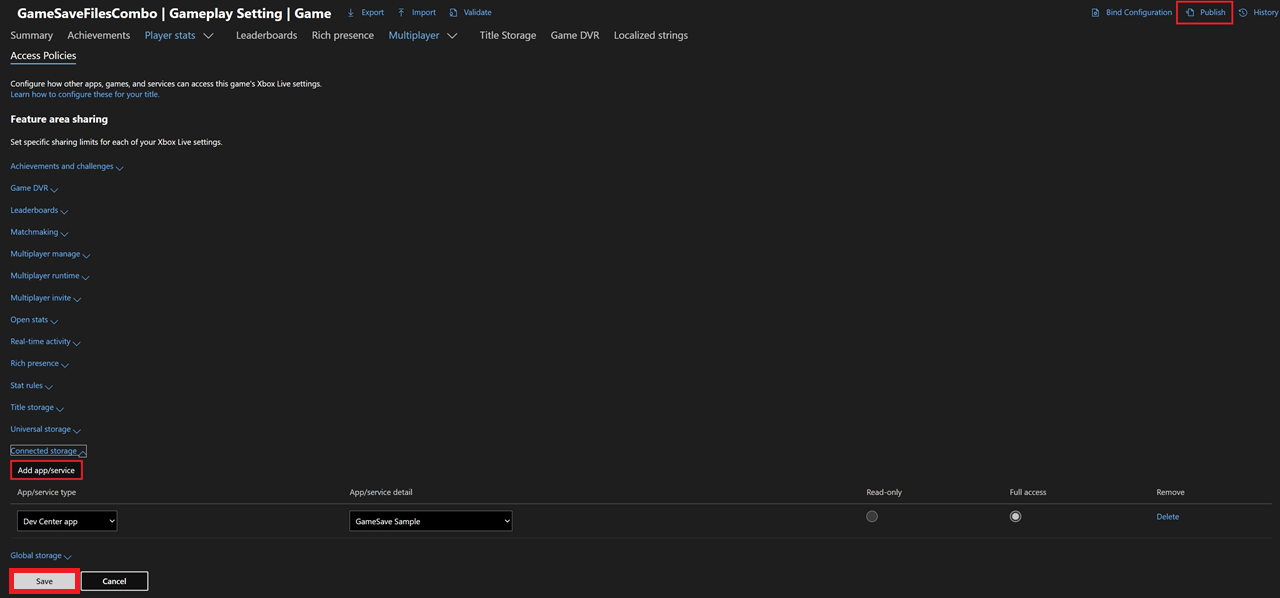
3. In **Gameplay Settings**, select **Access Policies**, and then expand **Connected Storage**.
4. Select **Add app/service**, and then add the titles that you want to provide access to.
5. When you finish adding the titles, select **Save**, and then select **Publish**. The changes take effect within an hour.
The following screenshot shows an example of making the GameSaveFilesCombo title fully accessible to the GameSaveSample title.
Consider the following when you manipulate data directly on console.
* Deleting data on the console by using the system UI doesn't remove the copy stored in the cloud. When you launch the title again, it syncs the data from the cloud.
* Machine-provider data appears as a user with no name. This data stays on the device, doesn't sync to the cloud, and is bound to the device.
For more information about the machine provider, see [Game Saves storage systems](/build/core-features/common/game-save/game-saves-storage-systems#game-saves-storage-systems).
For more detailed control of game saves, use [Game Saves tools](/build/core-features/common/game-save/game-saves-tools#manipulating-game-saves).
## Testing scenarios
When you create test cases, separate data validation from the game‑save logic.
### Test if game saves sync correctly to and from the cloud
Use the following steps to test for correct syncing. The test flows verify the behavior.
`XGameSaveFiles`:
1. Confirm that the SCID is correct.
2. Confirm that you're using the correct user handle.
3. Confirm that the title calls `XGameSaveFilesGetFolderWithUIAsync` during the current game session. If the title resumes from a suspend state, call the function.
1. Use Fiddler to confirm the lock was acquired.
2. Save this path and use it later to confirm that the data is uploading.
4. Write some data to the file path provided by `XGameSaveFilesGetFolderWithUIAsync`.
5. Terminate or suspend the title.
6. Wait 10–30 seconds for the OS to automatically upload the data to the cloud and release the lock.
1. Confirm that the data was uploaded and the lock was released by using Fiddler.
7. Manually delete the data in the folder provided by `XGameSaveFilesGetFolderWithUIAsync`.
1. On console, access this data through player settings.
8. Launch the title again, and then attempt to sign the user in.
9. A sync dialog appears, showing an active download sync from the cloud.
To help test successful syncing, see the following resources:
* [Game Saves tools to inspect traffic and manipulate saves](/build/core-features/common/game-save/game-saves-tools)
* [Understanding the Game Saves sync flow](/build/core-features/common/game-save/game-saves-syncing)
### Test if game saves roam correctly
For a test plan to confirm if data roams, see [XR-052-06 Test Plan](https://learn.microsoft.com/build/store/policies/XR/XR052#052-06-cloud-storage-roaming).
## Migration scenarios
### Sharing game saves across titles
To transfer or access data from one title to another, complete two steps.
1. Modify the access policies of the title you want to access in Partner Center.
2. Initialize the Game Saves providers for both titles in source code.
#### Modify access policies
A title controls which titles have access to its game saves data by configuring access policies.
1. Go to [Partner Center](https://partner.microsoft.com/dashboard).
2. Select **Apps and games** > **\** > **Gameplay settings**.
3. In **Gameplay Settings**, select **Access Policies**, and then expand **Connected Storage**.
4. Select **Add app/service**, and then add the titles that you want to provide access to.
5. When you finish adding the titles, select **Save**, and then select **Publish**. The changes take effect within an hour.
The following screenshot shows an example of making the GameSaveFilesCombo title fully accessible to the GameSaveSample title.
 #### Initialize Game Save providers
Now that you have permission to access the first title, you can read the `XGameSave` data from the other title.
* If you're using `XGameSave`, call `XGameSaveInitializeProvider` or `XGameSaveInitializeProviderAsync` for each title.
* If you're using `XGameSaveFiles`, the providers are implicitly initialized. Call `XGameSaveFilesGetFolderWithUiAsync` for each title.
### Interop between XGameSave and XGameSaveFiles
A title might need to use `XGameSave` together with `XGameSaveFiles`. The typical reasons might be as follows:
* The publisher has an existing title on console that's already using `XGameSave`.
* The publisher doesn't want to update that existing title to use `XGameSaveFiles`.
* The publisher thinks that adding `XGameSaveFiles` to a PC title is easier than using `XGameSave`, but still wants to support cross-saves between PC, console, and XBOX game streaming.
Moving between `XGameSave` and `XGameSaveFiles` is fairly straightforward. When the title calls [XGameSaveFilesGetFolderWithUiAsync](/reference/system/xgamesavefiles/functions/xgamesavefilesgetfolderwithuiasync), it maps containers and blobs to directories and files by using the following rules:
* Any forward slash (/) in the container name creates the directory structure in which the file resides.
* The following characters are invalid for `XGameSaveFiles`. If the system encounters these characters, it maps them to an underscore (\_):
* Characters from \0 through \001f, inclusive.
* The following characters aren't valid for `XGameSaveFiles`. If the system encounters these characters, it maps them to a period (.):
* Quotation marks (")
* Less than sign (\<)
* Greater than sign (>)
* Pipe (|)
* Asterisk (\*)
* Question mark (?)
* Backslash (\\)
* A slash (/) in the blob name maps to a period (.) in the file name.
* Files are limited to 16 MB. `XGameSave` supports a maximum upload size of 16 MB.
When the title moves from `XGameSaveFiles` back to `XGameSave`, it restores the original container and blob names if the file names remain unchanged or aren't moved.
### Porting previous titles to PC Game Saves with no-code cloud saves
Some titles that you port to PC Game Pass might require a no-code cloud save solution. This requirement can occur in the following scenarios:
* The title runs as an x86 application. It uses the Microsoft Game Development Kit (GDK) only in its packaged form.
* The title is created without custom code, using tools such as Blueprint in Unreal Engine or Bolt in Unity.
Titles that use no-code cloud saves read and write to their designated save directory through standard Win32 file I/O APIs. The system automatically syncs the data. You don't need to write special code to handle the synchronization and upload. Synchronization occurs before the title launches.
No-code cloud saves are uploaded when the title is no longer running on PC. Upload occurs when one of the following conditions is met:
* The title is terminated.
* The tracked user signs out.
* The PC power state changes.
* 30 minutes have passed since the title last wrote to the designated save area.
The no-code cloud save solution is built on top of `XGameSaveFiles` and shares all its limitations with respect to file sizes and per-user storage limits. Files are limited to 64 MB (or 16 MB if there's a need to have interoperation between `XGameSave` or Connected Storage). By default, the per-user storage is limited to 256 MB. Titles that need larger per-user storage limits can work with their Developer Partner Manager (DPM) to request an exception.
There are specific naming conventions and character limits for directories and file names. For more information, see [XGameSaveFiles path logic](/build/core-features/common/game-save/xgamesavefiles#xgamesavefiles-path-logic).
No-code cloud saves are supported only on PC. The title requires the [Simplified User Model](/build/core-features/common/user/users-opting-into-simplified-model). It ensures that a user is signed in before the title launches. If a user can't be signed in to the title, it doesn't launch. If the user is signed out during game play, it gets terminated.
No-code cloud saves require the title to be launched as a packaged build by using `wdapp install`. Launching the `.exe` directly doesn't activate cloud save redirection.
When a packaged build runs, saves written through `NoCodePCRoot` are redirected into `XGameSaveFiles`-managed storage. A later direct `.exe` launch reads the physical `NoCodePCRoot` folder instead, which might be empty, making saves appear missing. To avoid this issue, always test no-code cloud saves with packaged builds by using `wdapp install`.
### Enabling no-code cloud saves
To enable no-code cloud saves, complete the following steps:
1. Modify your `MicrosoftGame.config` file.
2. Enable the simplified user model.
3. Specify the root folder for save files.
4. Provide the title's corresponding SCID.
The following code example shows this process.
```xml theme={null}
test\path
DF9D8061-4790-4B84-86B4-CD060B00B4DD
256
false
```
The root folder that you specify for `NoCodePCRoot` must be relative to one of a small collection of options.
| RelativeTo | Folder location on PC |
| ----------------- | ----------------------------------------------- |
| `AppData` | Maps to the environment variable %APPDATA% |
| `Public` | Maps to the environment variable %PUBLIC% |
| `LocalAppData` | Maps to the environment variable %LOCALAPPDATA% |
| `LocalAppDataLow` | Maps to %USERPROFILE%\AppData\LocalLow |
| `ProgramData` | Maps to the environment variable %PROGRAMDATA% |
| `SavedGames` | Maps to %USERPROFILE%\Saved Games |
| `UserProfile` | Maps to the environment variable %USERPROFILE% |
Use `SavedGames` as the `RelativeTo` value. The Saved Games folder (`%USERPROFILE%\Saved Games`) corresponds to the Windows known folder ID `FOLDERID_SavedGames`. OneDrive doesn't sync this folder by default.
Avoid using other locations such as `AppData` (`%APPDATA%`). OneDrive can sync these locations and might cause conflicts with cloud save synchronization.
For more information about `FOLDERID_SavedGames`, see [SHGetKnownFolderPath](https://learn.microsoft.com/windows/win32/api/shlobj_core/nf-shlobj_core-shgetknownfolderpath).
*You can't place files directly in the root directory*. Nest them within at least one subfolder from the root folder. For example, using a file name directly, like `savegame1.sav`, isn't valid because savegame1.sav is ignored. `` is intended to define a directory path, not a specific file.
## Code samples
* [GameSaveCombo](https://learn.microsoft.com/samples/microsoft/xbox-gdk-samples/gamesavecombo/)
* [GameSaveFilesCombo](https://learn.microsoft.com/samples/microsoft/xbox-gdk-samples/gamesavefilescombo/)
## Reference API documentation
* [XGameSaveFiles (API contents)](/reference/system/xgamesavefiles/xgamesavefiles_members)
* Functions
* [XGameSaveFilesGetFolderWithUiAsync](/reference/system/xgamesavefiles/functions/xgamesavefilesgetfolderwithuiasync)
## See also
[Game Saves TOC](/build/core-features/common/game-save/game-saves-toc)
## Related topics
- [Game Saves overview](/build/core-features/common/game-save/game-saves-overview.md)
- [XGameSaveFilesGetFolderWithUiAsync](/reference/system/xgamesavefiles/functions/xgamesavefilesgetfolderwithuiasync.md)
- [Game save](/build/core-features/common/game-save/index.md)
- [Game Saves (contents)](/build/core-features/common/game-save/game-saves-toc.md)
- [Wrapper sample](/services/playfab/multiplayer/servers/wrapper-sample.md)
#### Initialize Game Save providers
Now that you have permission to access the first title, you can read the `XGameSave` data from the other title.
* If you're using `XGameSave`, call `XGameSaveInitializeProvider` or `XGameSaveInitializeProviderAsync` for each title.
* If you're using `XGameSaveFiles`, the providers are implicitly initialized. Call `XGameSaveFilesGetFolderWithUiAsync` for each title.
### Interop between XGameSave and XGameSaveFiles
A title might need to use `XGameSave` together with `XGameSaveFiles`. The typical reasons might be as follows:
* The publisher has an existing title on console that's already using `XGameSave`.
* The publisher doesn't want to update that existing title to use `XGameSaveFiles`.
* The publisher thinks that adding `XGameSaveFiles` to a PC title is easier than using `XGameSave`, but still wants to support cross-saves between PC, console, and XBOX game streaming.
Moving between `XGameSave` and `XGameSaveFiles` is fairly straightforward. When the title calls [XGameSaveFilesGetFolderWithUiAsync](/reference/system/xgamesavefiles/functions/xgamesavefilesgetfolderwithuiasync), it maps containers and blobs to directories and files by using the following rules:
* Any forward slash (/) in the container name creates the directory structure in which the file resides.
* The following characters are invalid for `XGameSaveFiles`. If the system encounters these characters, it maps them to an underscore (\_):
* Characters from \0 through \001f, inclusive.
* The following characters aren't valid for `XGameSaveFiles`. If the system encounters these characters, it maps them to a period (.):
* Quotation marks (")
* Less than sign (\<)
* Greater than sign (>)
* Pipe (|)
* Asterisk (\*)
* Question mark (?)
* Backslash (\\)
* A slash (/) in the blob name maps to a period (.) in the file name.
* Files are limited to 16 MB. `XGameSave` supports a maximum upload size of 16 MB.
When the title moves from `XGameSaveFiles` back to `XGameSave`, it restores the original container and blob names if the file names remain unchanged or aren't moved.
### Porting previous titles to PC Game Saves with no-code cloud saves
Some titles that you port to PC Game Pass might require a no-code cloud save solution. This requirement can occur in the following scenarios:
* The title runs as an x86 application. It uses the Microsoft Game Development Kit (GDK) only in its packaged form.
* The title is created without custom code, using tools such as Blueprint in Unreal Engine or Bolt in Unity.
Titles that use no-code cloud saves read and write to their designated save directory through standard Win32 file I/O APIs. The system automatically syncs the data. You don't need to write special code to handle the synchronization and upload. Synchronization occurs before the title launches.
No-code cloud saves are uploaded when the title is no longer running on PC. Upload occurs when one of the following conditions is met:
* The title is terminated.
* The tracked user signs out.
* The PC power state changes.
* 30 minutes have passed since the title last wrote to the designated save area.
The no-code cloud save solution is built on top of `XGameSaveFiles` and shares all its limitations with respect to file sizes and per-user storage limits. Files are limited to 64 MB (or 16 MB if there's a need to have interoperation between `XGameSave` or Connected Storage). By default, the per-user storage is limited to 256 MB. Titles that need larger per-user storage limits can work with their Developer Partner Manager (DPM) to request an exception.
There are specific naming conventions and character limits for directories and file names. For more information, see [XGameSaveFiles path logic](/build/core-features/common/game-save/xgamesavefiles#xgamesavefiles-path-logic).
No-code cloud saves are supported only on PC. The title requires the [Simplified User Model](/build/core-features/common/user/users-opting-into-simplified-model). It ensures that a user is signed in before the title launches. If a user can't be signed in to the title, it doesn't launch. If the user is signed out during game play, it gets terminated.
No-code cloud saves require the title to be launched as a packaged build by using `wdapp install`. Launching the `.exe` directly doesn't activate cloud save redirection.
When a packaged build runs, saves written through `NoCodePCRoot` are redirected into `XGameSaveFiles`-managed storage. A later direct `.exe` launch reads the physical `NoCodePCRoot` folder instead, which might be empty, making saves appear missing. To avoid this issue, always test no-code cloud saves with packaged builds by using `wdapp install`.
### Enabling no-code cloud saves
To enable no-code cloud saves, complete the following steps:
1. Modify your `MicrosoftGame.config` file.
2. Enable the simplified user model.
3. Specify the root folder for save files.
4. Provide the title's corresponding SCID.
The following code example shows this process.
```xml theme={null}
test\path
DF9D8061-4790-4B84-86B4-CD060B00B4DD
256
false
```
The root folder that you specify for `NoCodePCRoot` must be relative to one of a small collection of options.
| RelativeTo | Folder location on PC |
| ----------------- | ----------------------------------------------- |
| `AppData` | Maps to the environment variable %APPDATA% |
| `Public` | Maps to the environment variable %PUBLIC% |
| `LocalAppData` | Maps to the environment variable %LOCALAPPDATA% |
| `LocalAppDataLow` | Maps to %USERPROFILE%\AppData\LocalLow |
| `ProgramData` | Maps to the environment variable %PROGRAMDATA% |
| `SavedGames` | Maps to %USERPROFILE%\Saved Games |
| `UserProfile` | Maps to the environment variable %USERPROFILE% |
Use `SavedGames` as the `RelativeTo` value. The Saved Games folder (`%USERPROFILE%\Saved Games`) corresponds to the Windows known folder ID `FOLDERID_SavedGames`. OneDrive doesn't sync this folder by default.
Avoid using other locations such as `AppData` (`%APPDATA%`). OneDrive can sync these locations and might cause conflicts with cloud save synchronization.
For more information about `FOLDERID_SavedGames`, see [SHGetKnownFolderPath](https://learn.microsoft.com/windows/win32/api/shlobj_core/nf-shlobj_core-shgetknownfolderpath).
*You can't place files directly in the root directory*. Nest them within at least one subfolder from the root folder. For example, using a file name directly, like `savegame1.sav`, isn't valid because savegame1.sav is ignored. `` is intended to define a directory path, not a specific file.
## Code samples
* [GameSaveCombo](https://learn.microsoft.com/samples/microsoft/xbox-gdk-samples/gamesavecombo/)
* [GameSaveFilesCombo](https://learn.microsoft.com/samples/microsoft/xbox-gdk-samples/gamesavefilescombo/)
## Reference API documentation
* [XGameSaveFiles (API contents)](/reference/system/xgamesavefiles/xgamesavefiles_members)
* Functions
* [XGameSaveFilesGetFolderWithUiAsync](/reference/system/xgamesavefiles/functions/xgamesavefilesgetfolderwithuiasync)
## See also
[Game Saves TOC](/build/core-features/common/game-save/game-saves-toc)
## Related topics
- [Game Saves overview](/build/core-features/common/game-save/game-saves-overview.md)
- [XGameSaveFilesGetFolderWithUiAsync](/reference/system/xgamesavefiles/functions/xgamesavefilesgetfolderwithuiasync.md)
- [Game save](/build/core-features/common/game-save/index.md)
- [Game Saves (contents)](/build/core-features/common/game-save/game-saves-toc.md)
- [Wrapper sample](/services/playfab/multiplayer/servers/wrapper-sample.md)